When I was scrolling through the Douglas Retailer website for brands that offered deep skin options in Europe besides the mega parent brands and sub brands from L’Oréal and Estée Lauder, I came across this one and remembered even seeing a few of their items on the French Parfumdo website as well. My curiosity grew. I learned that Mesauda (or Mesauda Milano) is an Italian beauty brand founded in 2007 and mainly spearheaded by Victor Buaron, along with his two brothers who also work in the company. Although Mesauda doesn’t have the best gradient of a shade range, it’s certainly better than the other ten or so brands I hadn’t heard of on the Douglas website that didn’t make anything darker than for medium skin tones. And in some cases, the range from Mesauda is still better than the brands I did recognize. This effort to be inclusive is what got me to take the plunge and make a purchase.
The Ordering Process
Technically, I made multiple purchases via Douglas and the brand’s website directly. I was able to get free shipping via Douglas, but that came with zero packaging protection. There’s no bubble wrap, tissue paper, or padding of any kind. The box itself is sturdy, but the items inside are able to slide around and into each other. Thankfully, I haven’t received any broken items from Douglas.
From the brand’s website, shipping from Italy to Germany starts at a little over 8 euros, which isn’t too bad a price considering you get 20% off your first order if you subscribe to their emails. Unfortunately, shipping outside of the European Union is super expensive. In my first order, I had no issues other than paying via Paypal requiring me to submit the information twice in order for it to go through. I would log into my account, fill in everything, click submit payment (via paypal), get redirected to my paypal to accept everything, get redirected back to the Mesauda website checkout page with everything blank again, relog in, repeat all the same steps, and then it would let me check out! It wasn’t a time-out feature from lingering on the page too long either. This happened even when trying to check out one minute after logging in. This is tedious, but not that bad as long as the orders go through.
The problem arose when I was making a second order and my cart total qualified me for free shipping automatically if I was within Italy*. But because I was shipping to Germany, it kept giving me an error message about needing to select a different shipping option, even though there was no second option to select. So, I actually had to remove items from my cart for it to give me the paid shipping option. Not a great move from a business standpoint if the customer is forced to buy less products to make the purchase go through!
*According to the shipping page, free shipping within Italy starts at 30 Euros and free shipping to Germany is supposed to start at 60 Euros. My guess is either this information is outdated and Germans aren’t supposed to get free shipping at any minimum which led to the error, or it’s supposed to be free after 60 Euros but it switches automatically to Italy’s free standard shipping option instead of the free international one. And since they likely use different post services depending on the location, the lack of coding to switch to the courier they use for Germany (DPD) could cause the inability to check out.
Then, in that same second ordering attempt, I tried to use my reward points which gave 15 euros off my order via a one-time-use code. The problem was that because the Paypal option makes you have to check out twice, the order failing to process in round 1 made the website register as if that code had already been used. So, when I tried to check out the second time in round 2, it said the code had been used the maximum number of times! I essentially had to email customer service (they replied within 24 hours and thankfully in English) and they gave me a new code, so I checked out in round 1 without the new code, waited til it took me back to the cleared page to relog and resubmit everything and put the code in round 2 of checking out, and then it completed the order! So, in the future, if I want to make use of the reward program I will have to hope the paypal error continues so I know to only include the promo code after the first “complete order” entry fails. Otherwise, if it actually goes through, I will have checked out without my code being applied!
I let them know about all of this including screenshots and a screen recording, but it wasn’t addressed in the email response other than giving me that new one-time-use code and telling me to let them know if it worked, so I’m not sure if it was understood.
Another thing to note is that I do not getting shipping confirmation emails from them, even though it says that’s something that is supposed to happen. Instead, I get an email from the shipping carrier the day before the order is due to be delivered.
So, one one hand, Douglas is the less expensive way to go, but they don’t have all the newest products and one has to pray the parcel delivery person won’t toss the package around like they do in the US.

When I access Douglas via Google Chrome, there’s an option to translate some of the page from German to English, but it makes the page buggy and not load sometimes, which is another factor in the ordering process. Douglas also has a point system, but I don’t have enough to see what it does. I believe it accounts for essentially 10% off one’s order at different point intervals.
On the other hand, the official Mesauda website is much more English-friendly and has an option to select English at the bottom of the page that’s built into the site, but sometimes it doesn’t translate everything when loaded and it still shows Italian here and there. The official site also has the benefit of the reward program, but the downside is the potential issues checking out. As I’ve only contacted customer service with Mesauda, I don’t know how Douglas customer service compares. Also, I get the shipping confirmation via Douglas, but no additional emails letting me know when it’s about to be delivered.
Onto the reviews!
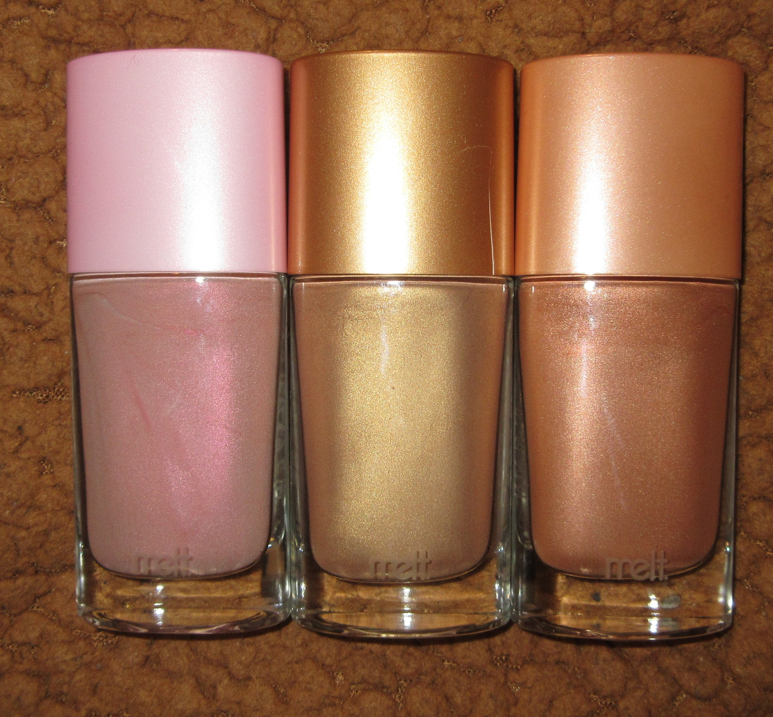
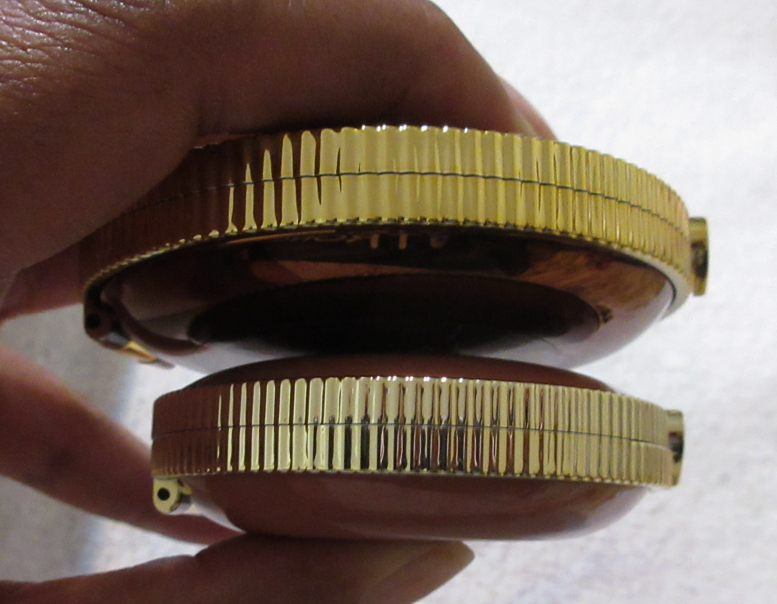
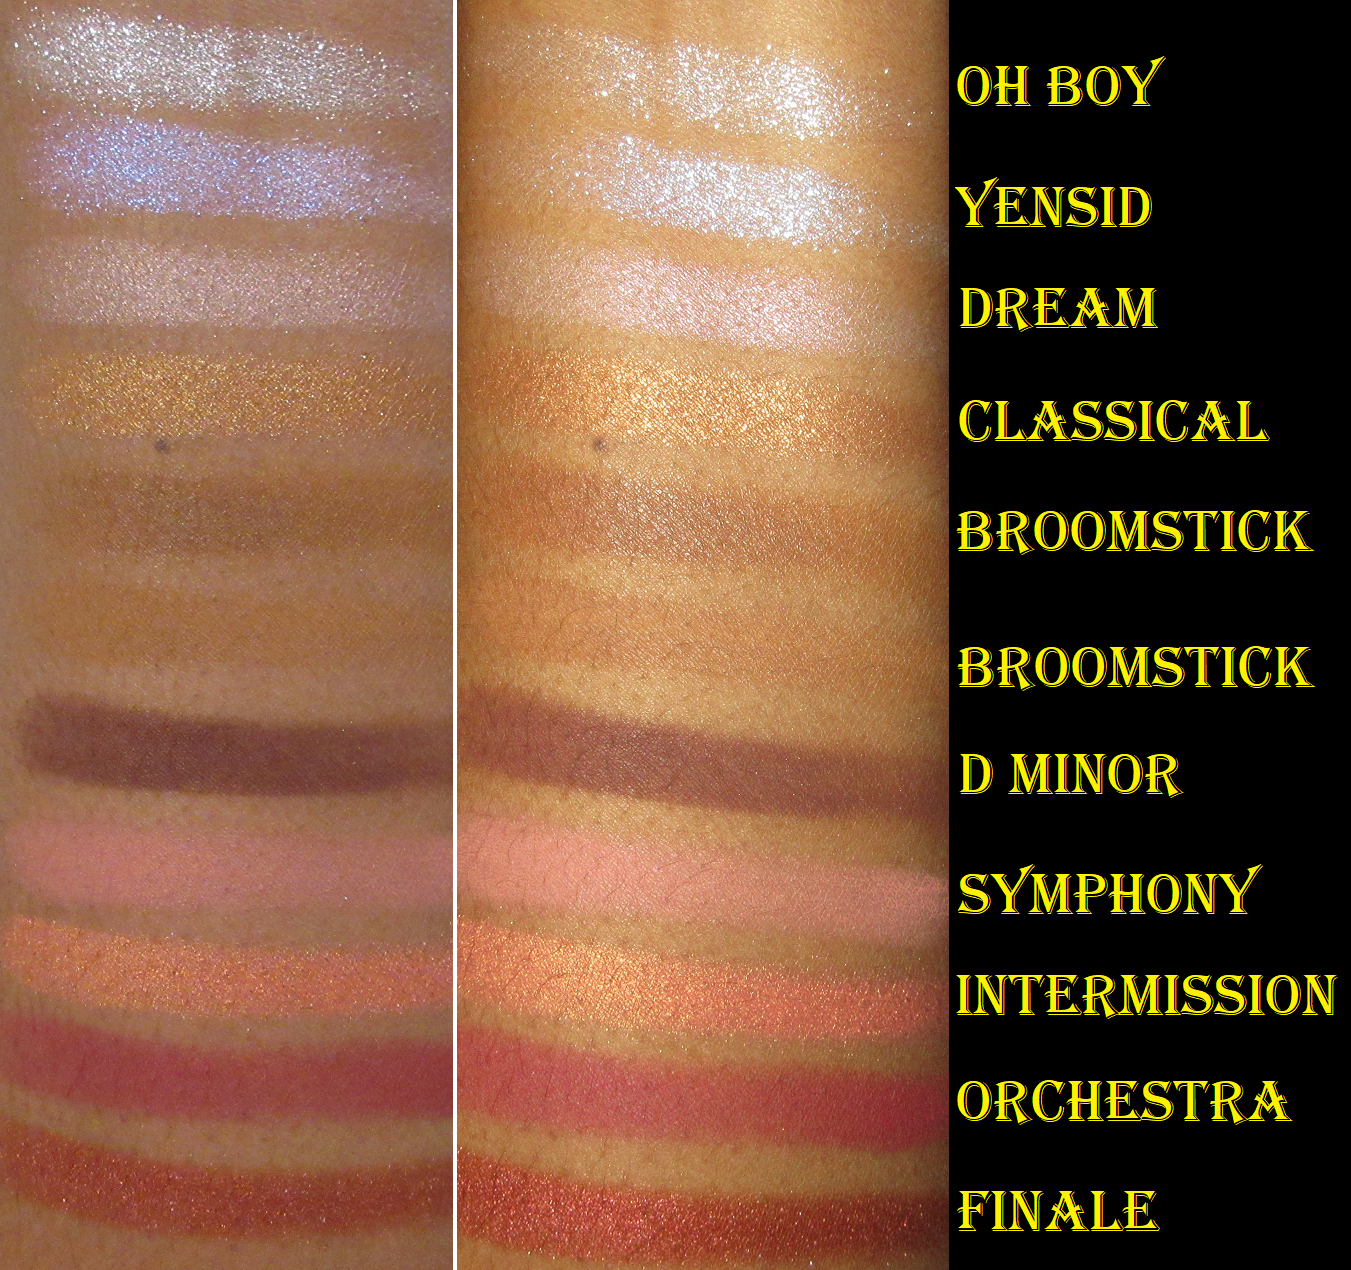
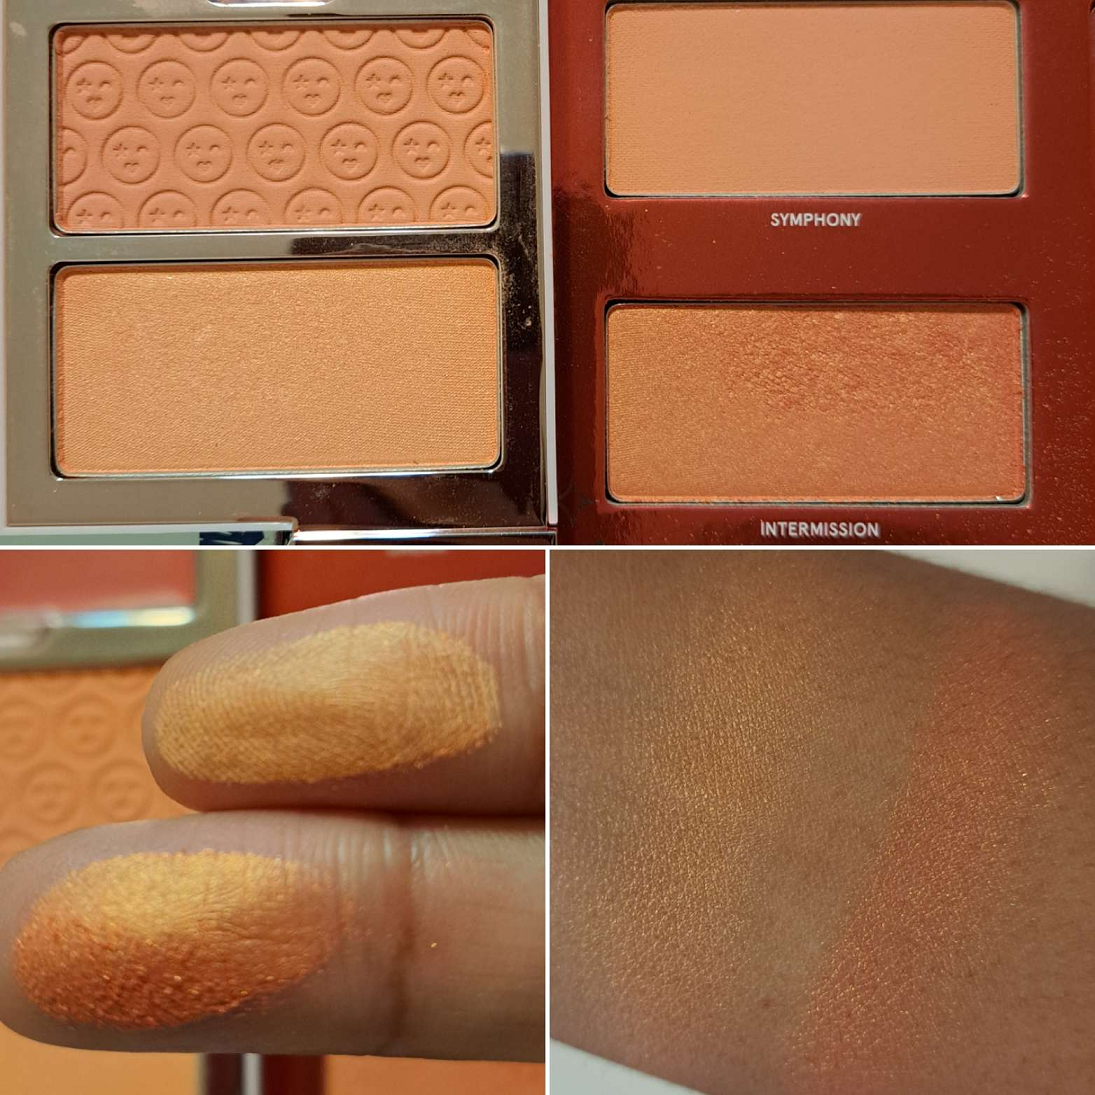
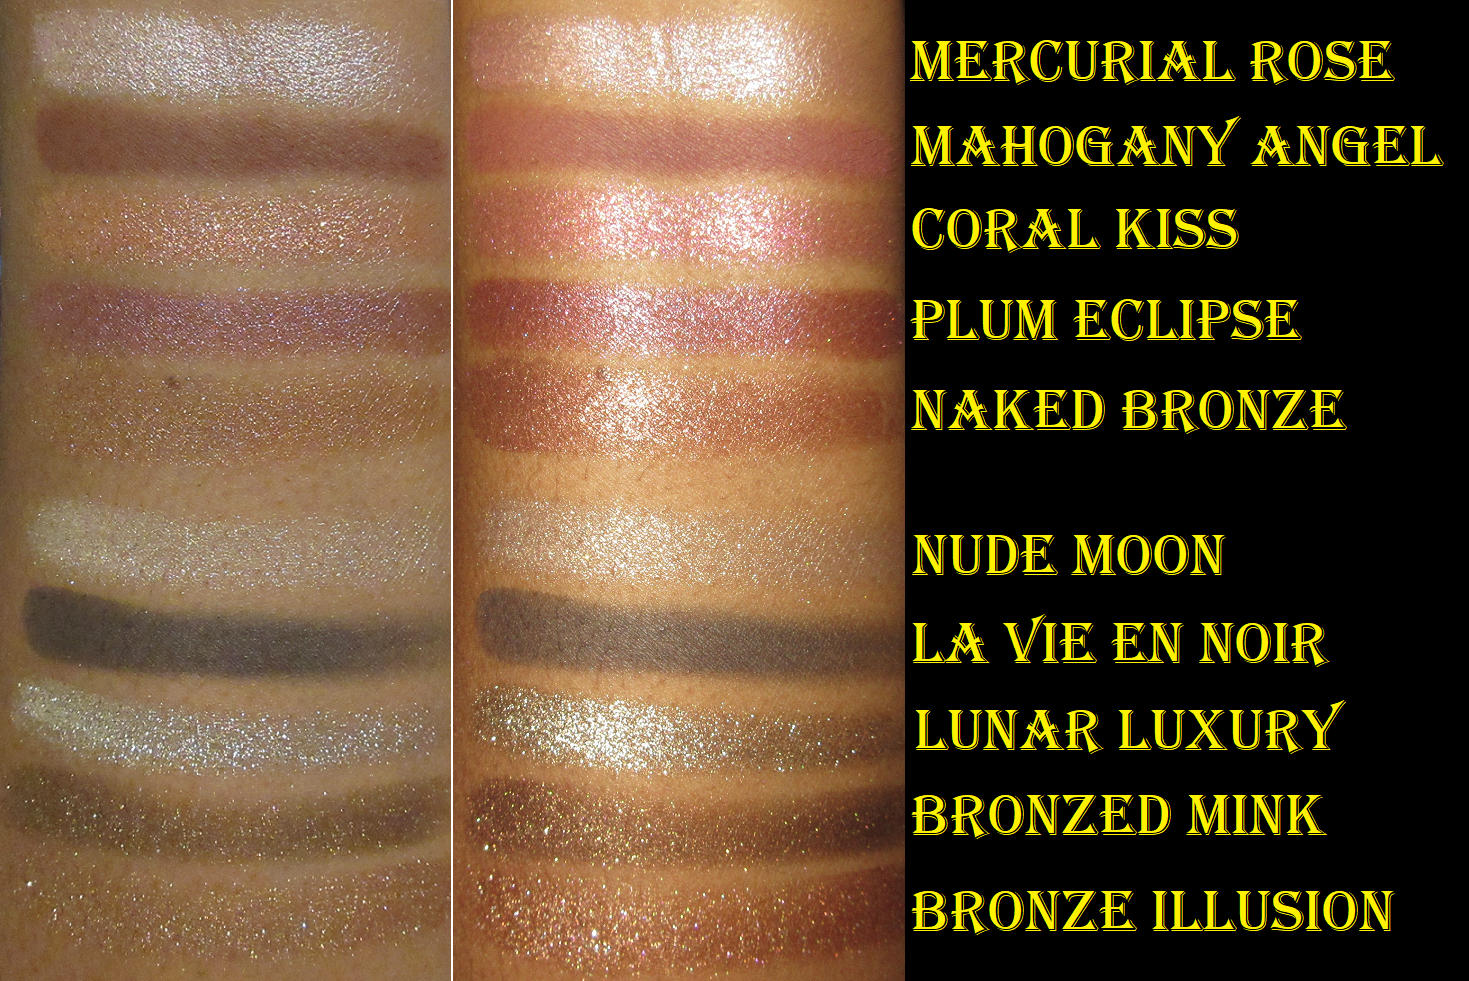
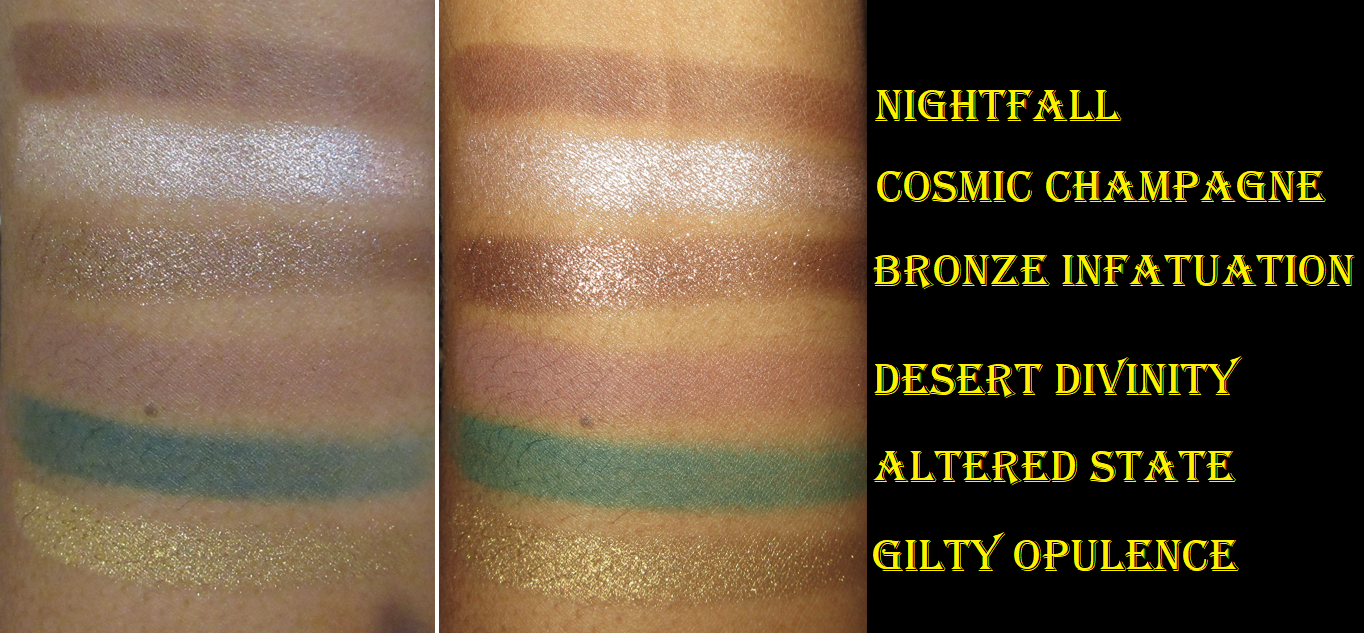
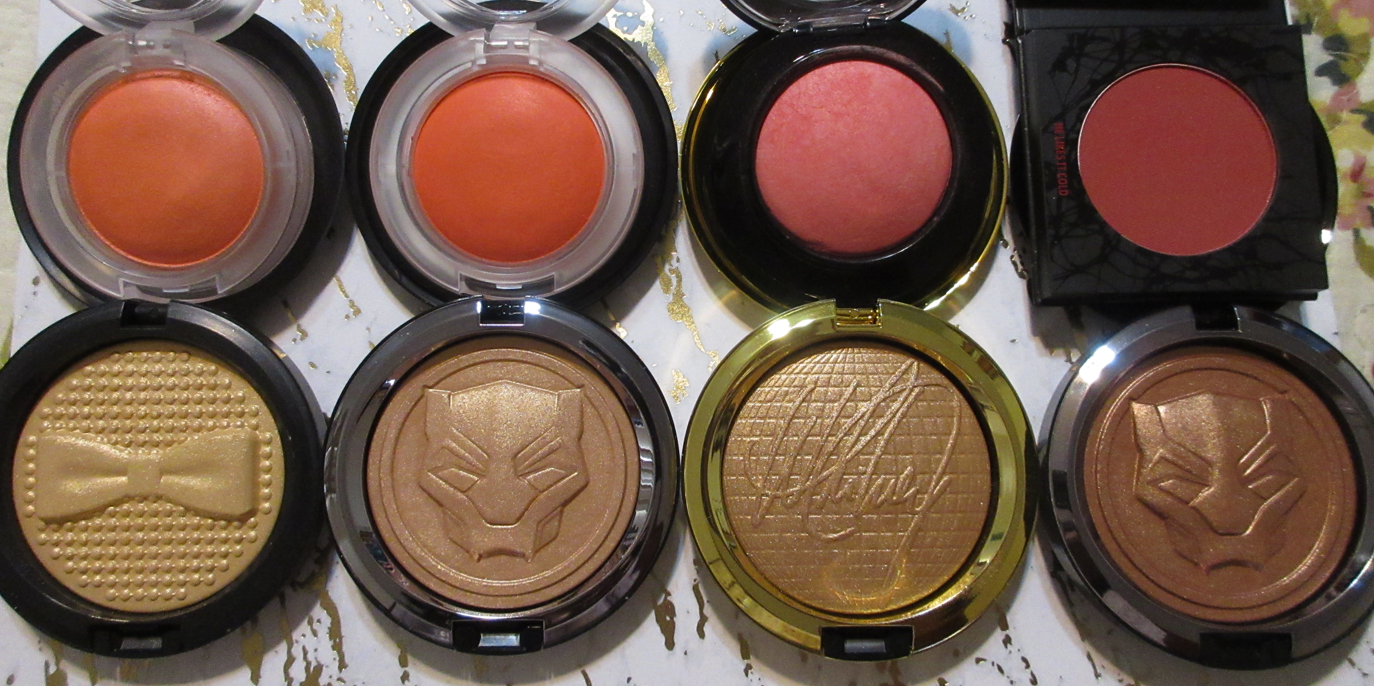
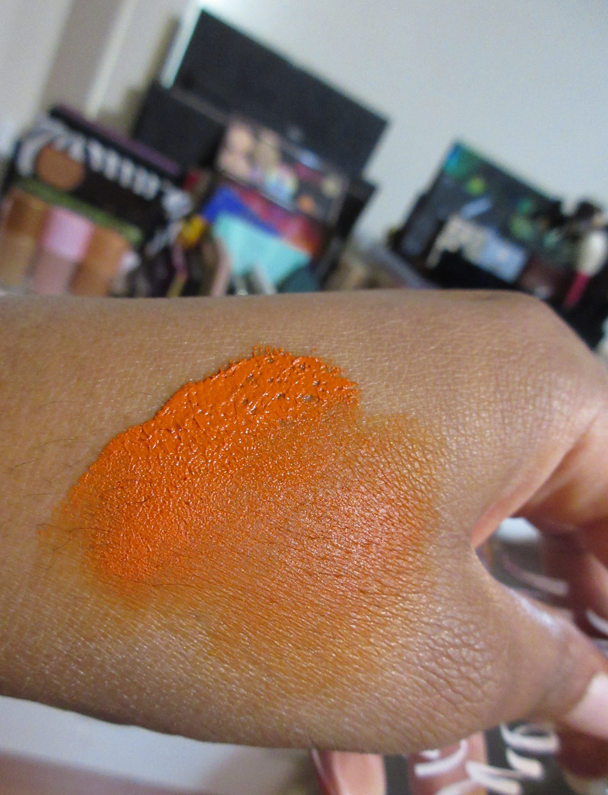
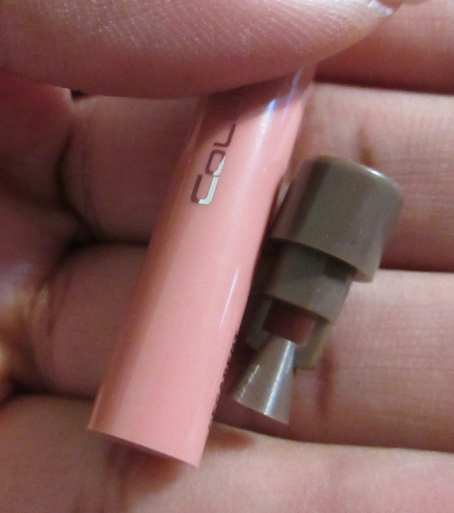
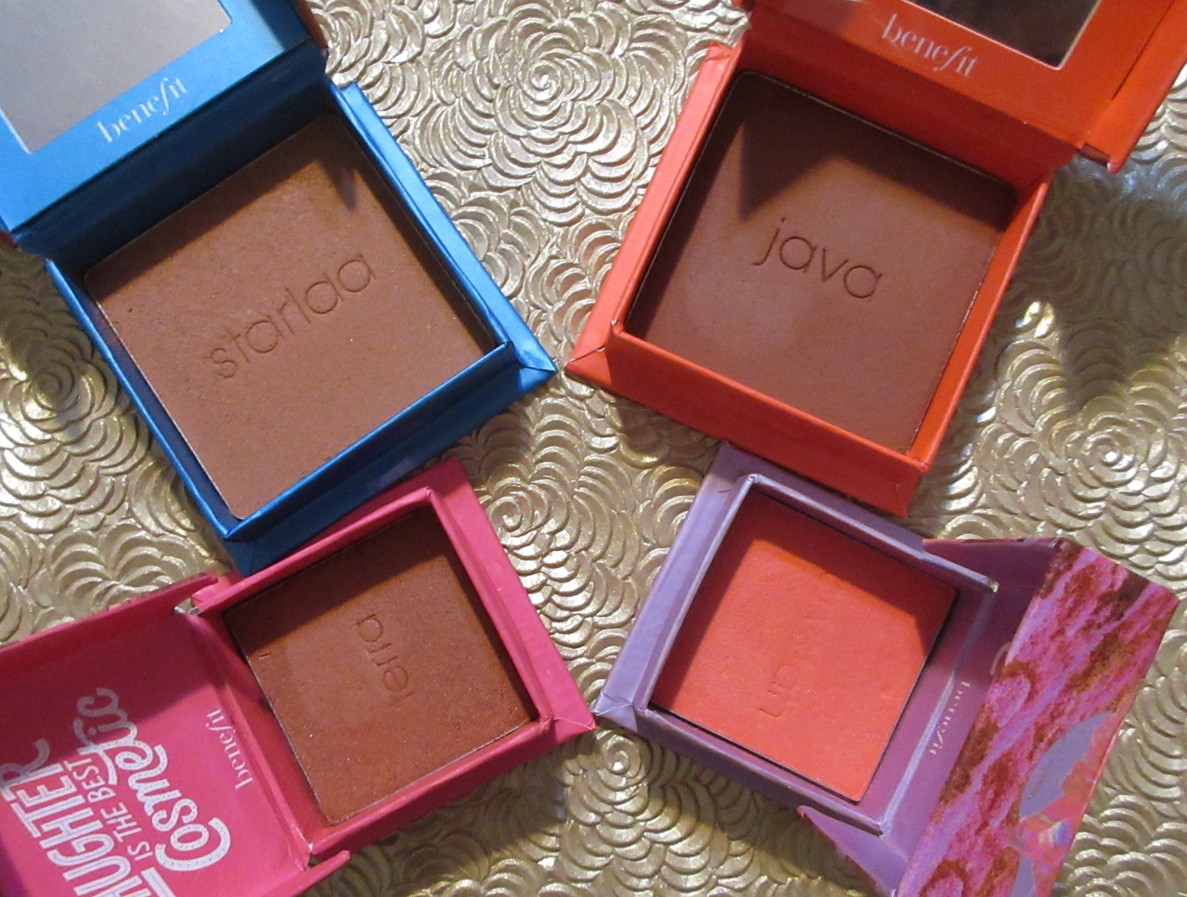
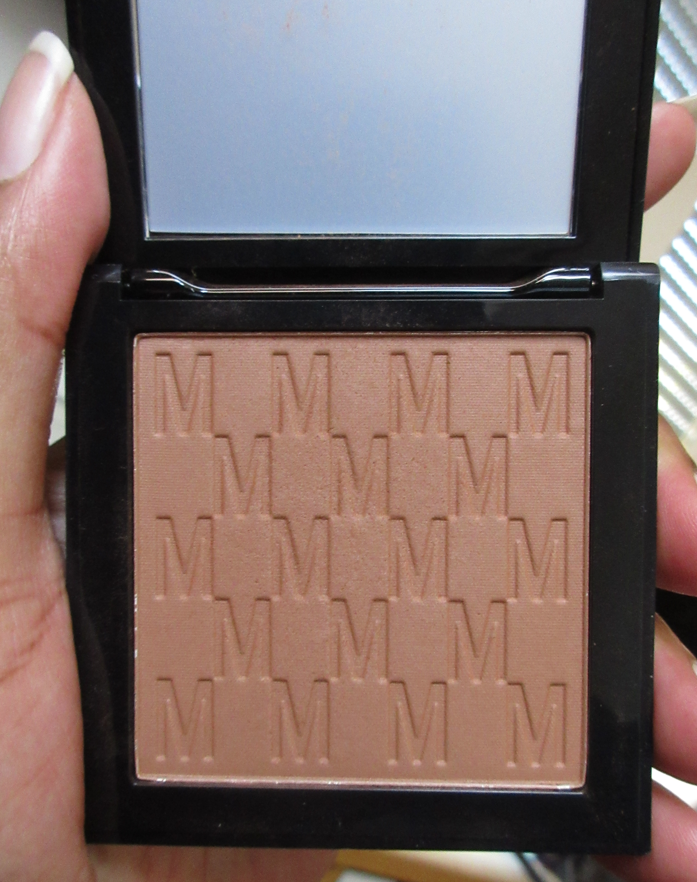
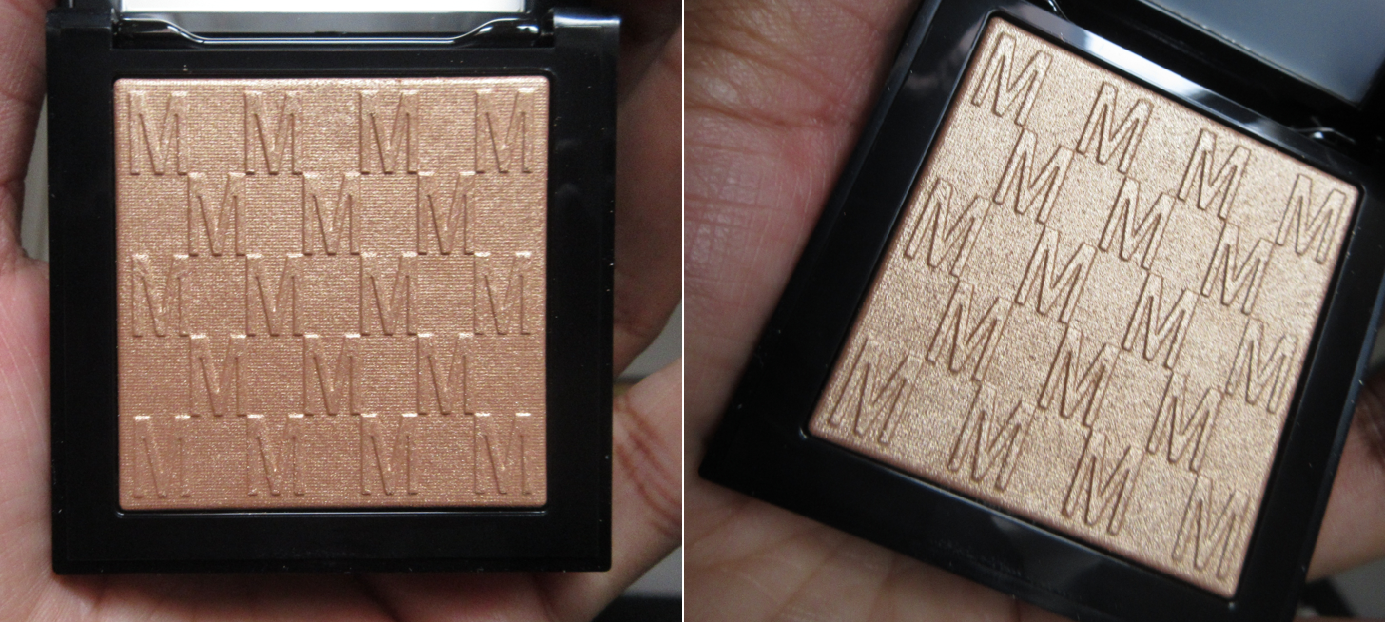
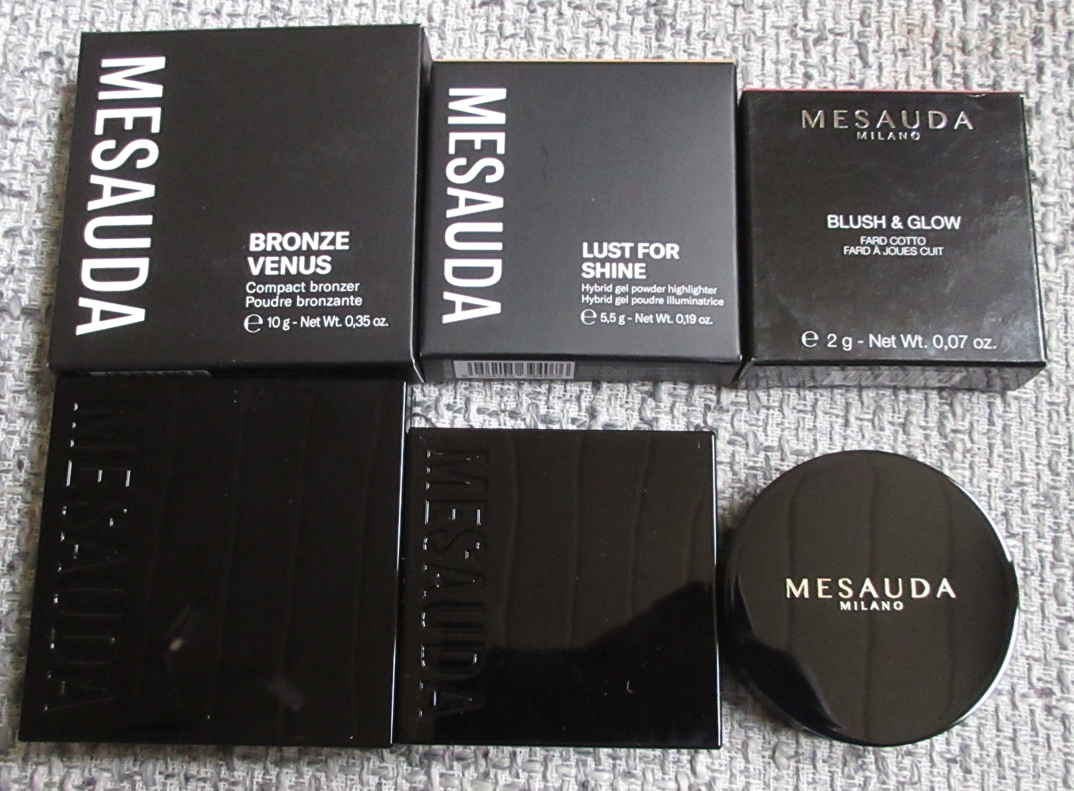
Bronze Venus Bronzer in Caramel Macchiato and Rich Mahogany
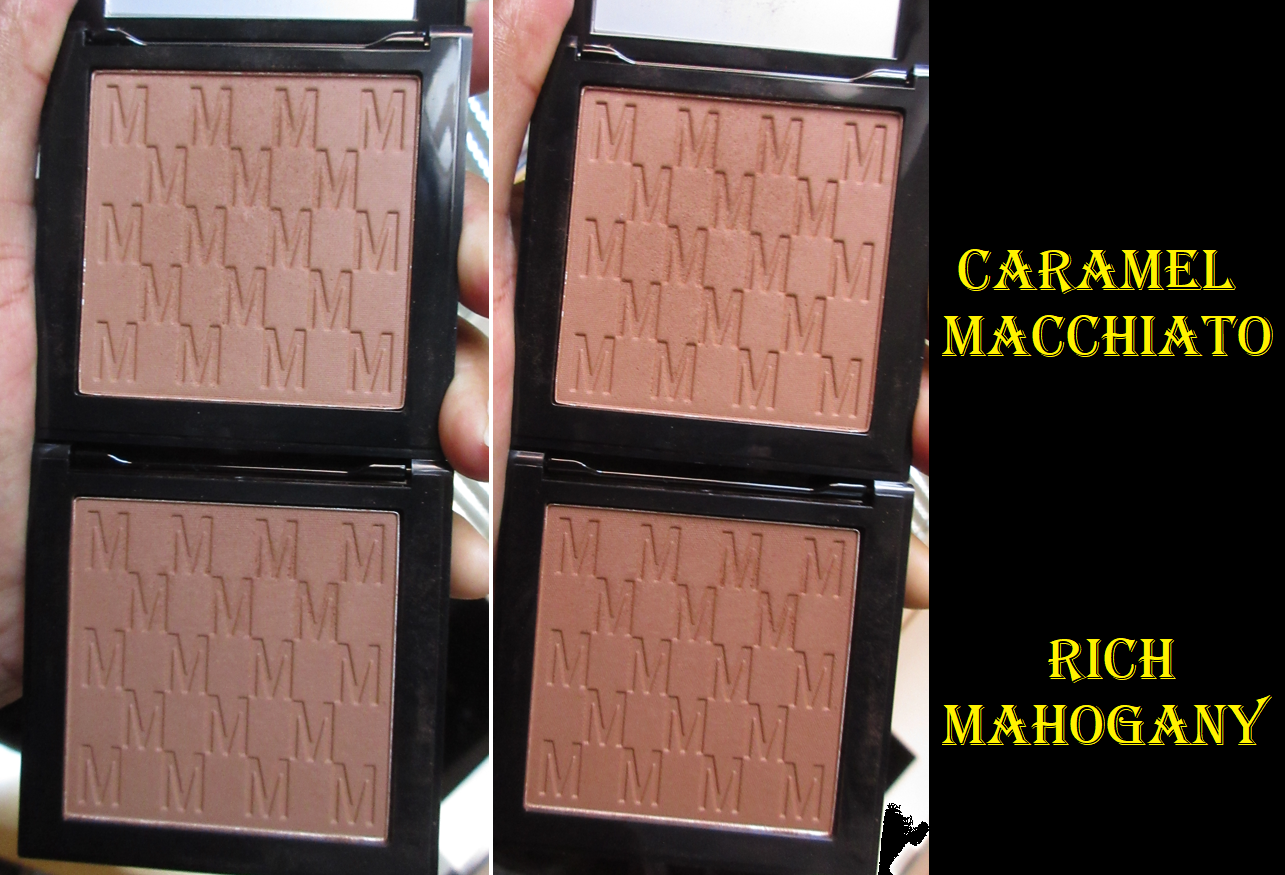
In the photo above, Caramel Macchiato is on the top left and right with Rich Mahogany on the bottom left and right. The left half of the picture shows how they look in the pan, while the right half shows a more accurate representation of how the colors will look on the skin. I took these photos in the same spot but slightly different angles and the amount of light I got from the window was able to show these drastic differences in the way they look. I believe I accurately captured all swatches though.

Caramel Macchiato
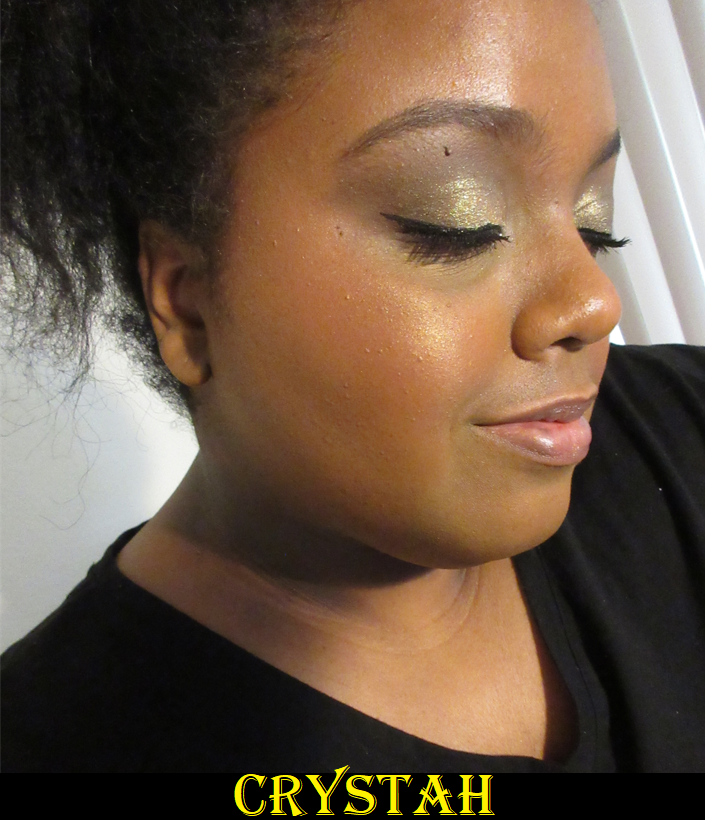
Caramel Macchiato is a warm golden-leaning bronzer shade. This is closer to my skin tone than most of the bronzers in my collection, but thanks to the buildable formula, I can make it very apparent if I want. Between the two deepest bronzer options, I think this one fits me better. However, the other shade shows up more on my skin because it’s less of a match with my undertone.

Rich Mahogany
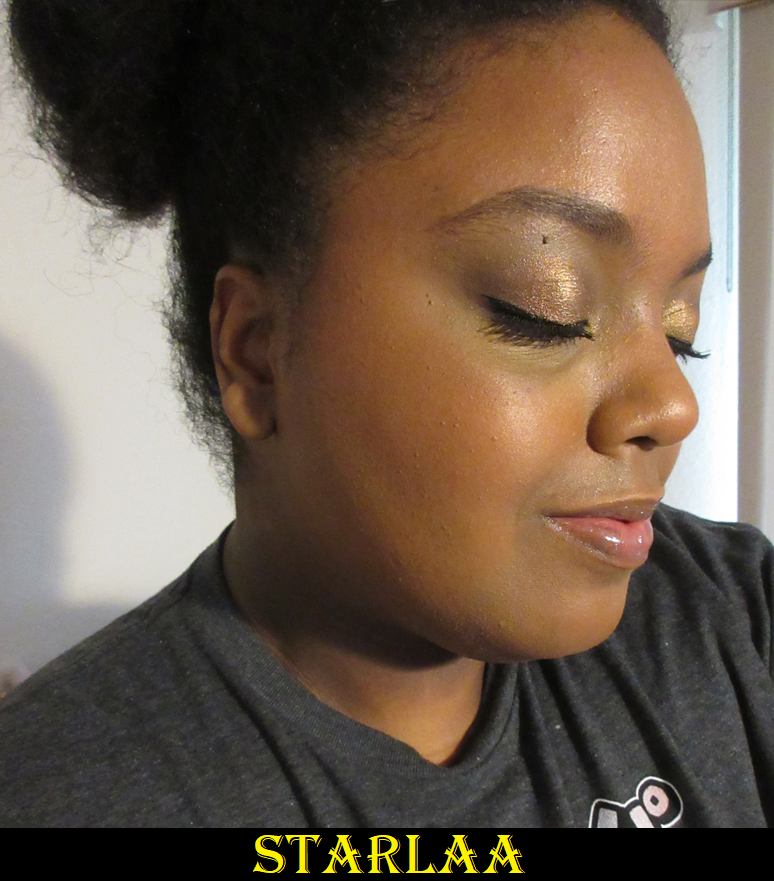
Rich Mahogany is a medium-dark neutral brown with just a touch of red. This was actually the first of the two shades I purchased, and even though I preferred the color of Caramel Macchiato in the product images, I really didn’t expect that one to work for me. I didn’t even know if Rich Mahogany was going to be deep enough based on how it looked on the arm swatch of the darker model because I’m used to brands manipulating photos when their range doesn’t go very deep. *cough* Hourglass *cough*
I’m happy to report that Rich Mahogany could work for someone a shade or two darker than me, though it will be on the subtler side. The greater difference between Caramel Macchiato and Rich Mahogany is the undertone more than depth.


Six shades of bronzer is a nice amount, although I’m not sure if they go light enough on the spectrum either. It appears that they have the medium-tan range adequately covered.

I very much like this formula of bronzer. Beyond being buildable, it has the benefit of the soft and buttery feeling texture that reminds me of the way the Huda Glowish Bronzer feels, but in a lighter consistency that’s more powdery in the way it gets picked up by a brush, while still applying to the skin in a beautiful natural sheen that mimics the look of a baked gelee formula. The brand cites coconut oil and Polynesian Tiare flowers as the sources of the “moisturizing boost with smoothing and antioxidant properties,” that is given to the skin. I believe that combination is how Monoi oil is produced, which I thought I would mention for those who like that oil in products, though Monoi isn’t specifically listed in the ingredients and it’s just coconut oil and the Tiara flowers separately. The emollient nature of this product is supposed to also aid in the adhesion to the skin, which I can attest to this bronzer lasting on me all day without fading. The downside is that I sometimes get the issue that in spots that have more moisture than others, I get a little bit of sticking of a patch that’s darker than the rest. I can mostly blend it out to look even with the rest of my bronzer, but sometimes it’s so stubborn in a sticking spot that I have to wipe it off or cover it back up with foundation, then apply powder, then redo the bronzer application in that spot. If I always powdered prior to bronzer, this might not be an issue. However, because I often skip powdering my whole face, I was able to notice this.
And although I prefer to build up quickly a subtler shade like Caramel Macchiato with a brush like the Sonia G Smooth Buffer, I had the sticking issue a little more often with that brush. When I use a brush that doesn’t load on as much product, like the Sonia G Jumbo Bronzer brush, I haven’t had that problem.
To those averse to fragrance, this does contain some. The brand calls it a “floral/fruity” scent, but I just smell slightly soapy flowers. It actually reminds me of the smell of Dior powders, but not as strong.


Please click the photos to enlarge them if needed, and use the arrows to go through the slide before clicking ‘x’ in the slide to return to the post. As I mentioned before, the depths are about the same and the tone is the main difference between the two shades. They’re also on the subtle side now and if I get darker this summer, they might not show up anymore.
This bronzer doesn’t have holy grail status, but I could see myself putting this among the top 20 on a ranking list. Despite having it for over a month, I still feel I need more time with it to see if my interest in using it continues to grow over time or if it’ll be overshadowed by the others I own. For anyone interested in bronzers I purchased prior to 2023 and where I’d rank those, I have a post on that topic here.
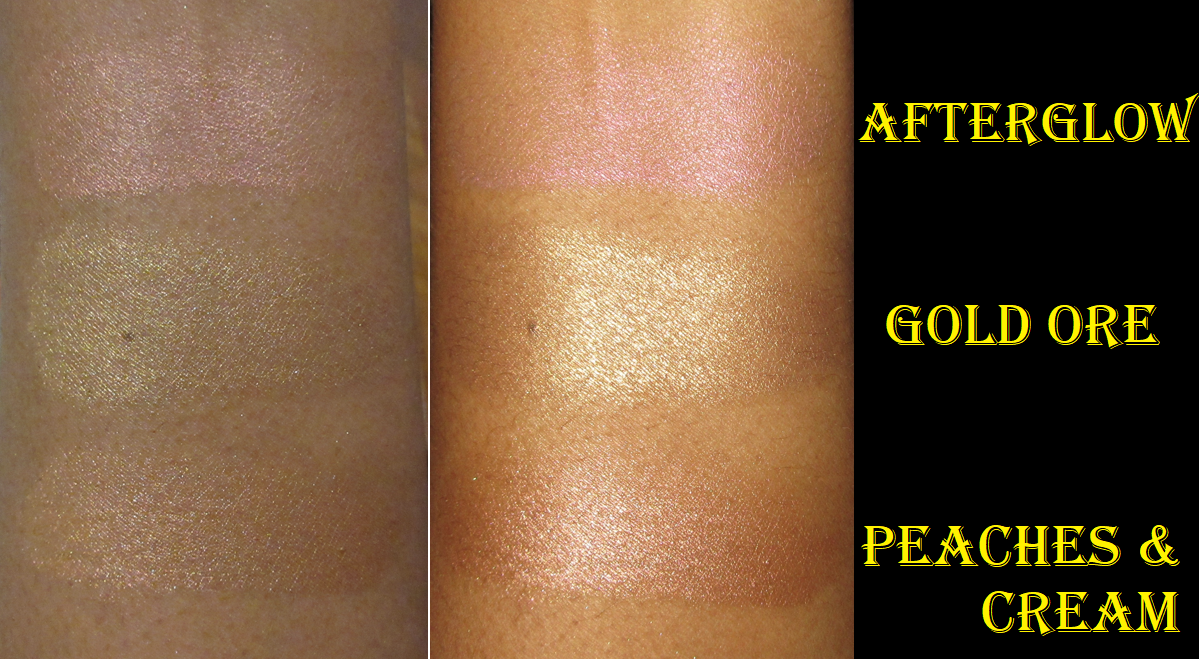
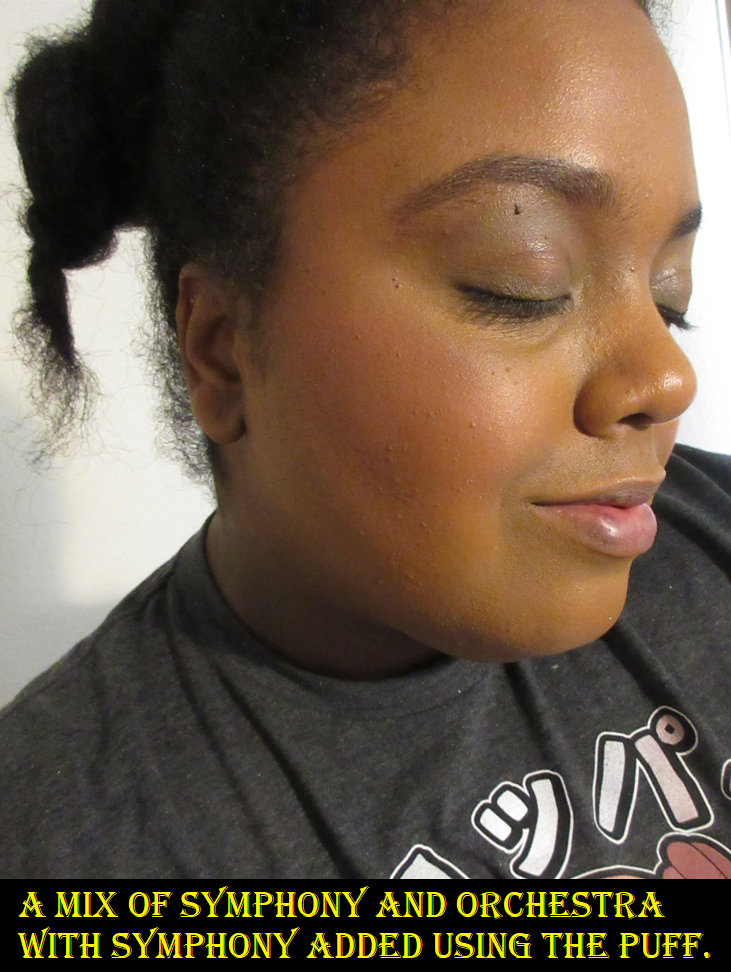
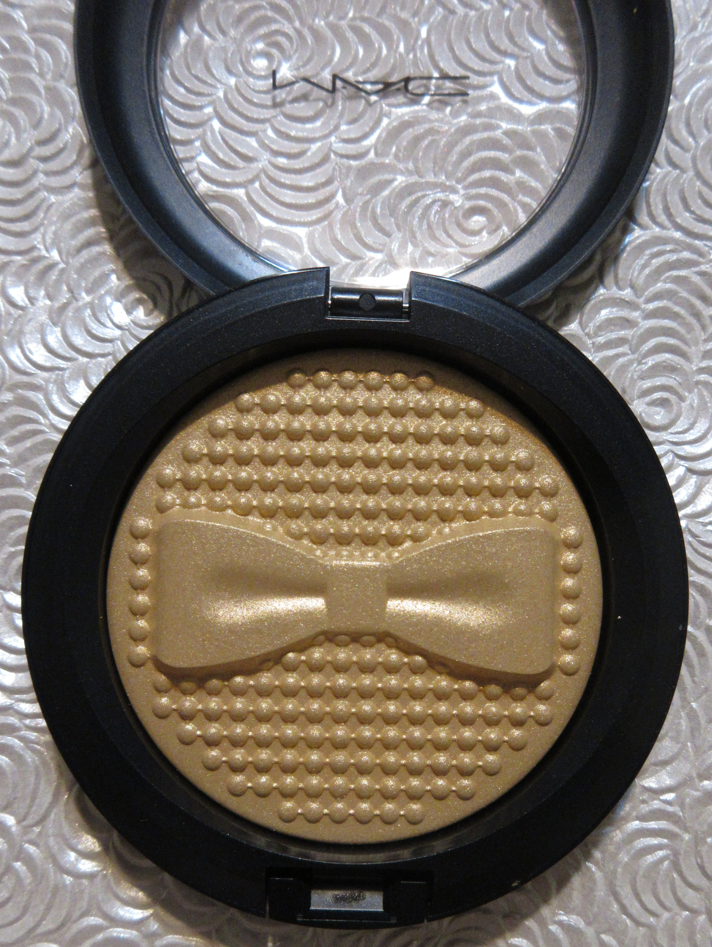
Lust For Shine Highlighter in Guilty Treasure

Mesauda has several different forms of highlighter: liquid, baked, gel-powder, and cream-powder. Since my favorites tend to be gel-powder, I naturally chose to order this Lust For Shine formula. The texture is thinner and drier than I expected. The shimmer looks fairly smooth on the skin with its small particle size, while still being reflective. I consider the highlight intensity level to be a buildable medium, though it stands out even more on my skin tone because Guilty Treasure is on the lighter side of workable for me. I only brought highlighters with the same depth as my skin tone on the trip because I thought I would only want my highlight to look subtle, but I ended up still missing having that extra “pop” in my makeup looks. So, I bought this lighter shade out of fear that Deep Attraction might be my skin tone or deeper, which would have defeated the purpose of trying to buy a shade that differed from what I had with me. What helps Guilty Treasure to work on my skin tone is how sheer the formula is in allowing my skin tone to show through, which minimizes the cast I could have gotten if it had a base color as light as the shimmer.
I apply my other highlighters first, and then add this one in strategic places for a spotlight effect. It can be blended out to a super natural shine for those who like the most subtle of highlighters, or layered up to the medium I mentioned, if one doesn’t blend it out too much. This highlighter doesn’t adhere to my skin as strongly. It will stay on most of the day, as long as I don’t touch my face more than a few times. There were some days during testing that it didn’t last more than a few hours and I realized I must have rubbed it off while sitting with my cheek rested on my hand or when I took a nap. A lot of highlighters don’t last through me napping, so that’s not too surprising. It’s just that this highlighter is easier to accidentally wipe away than others, and I have accidentally overblended it a few times already and needed to apply more. This can happen no matter which highlighter brush I use (goat, squirrel, synthetic-natural mix, fan brush, flat top, candle-shape, etc.). Also, if it’s one of my more natural days when I skip foundation, this highlighter definitely only sticks to my face for a short time.
To help it adhere more strongly, I’ve tried spraying my brush to slightly dampen it the way I do with a lot of my shimmery eyeshadows. This added moisture helps increase the shine level and better melt it into the skin, but the effects are only temporary. The best way to make this last longer is to have products underneath that remain at least a little wet or emollient like a dewy foundation or cream highlight.

This formula is fairly nice and it’s easier to pick up product with the Mesauda highlighter than the Nabla one, but I’d still recommend the Skin Glazing highlighters (and it’s one euro cheaper) because of the gorgeous glass skin effect it has on the skin. I love when highlighters have a somewhat wet look to them (which gel-highlighters tend to do), but I only get a slight wet effect using the Mesauda one if all other products with it are fully dry. I still like it more than most standard powder formula highlighters, but it doesn’t make the top of my favorites list. I’m still glad I tried it because the curiosity would have gnawed at me.
Also, unlike the bronzers, this is fragrance free.

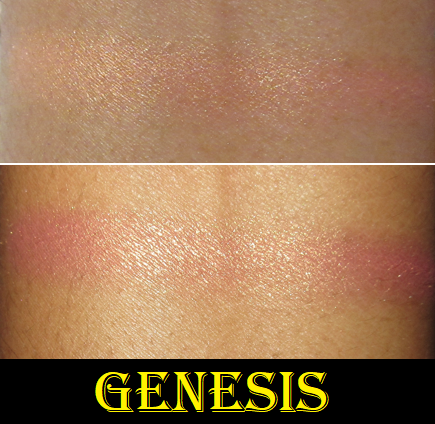
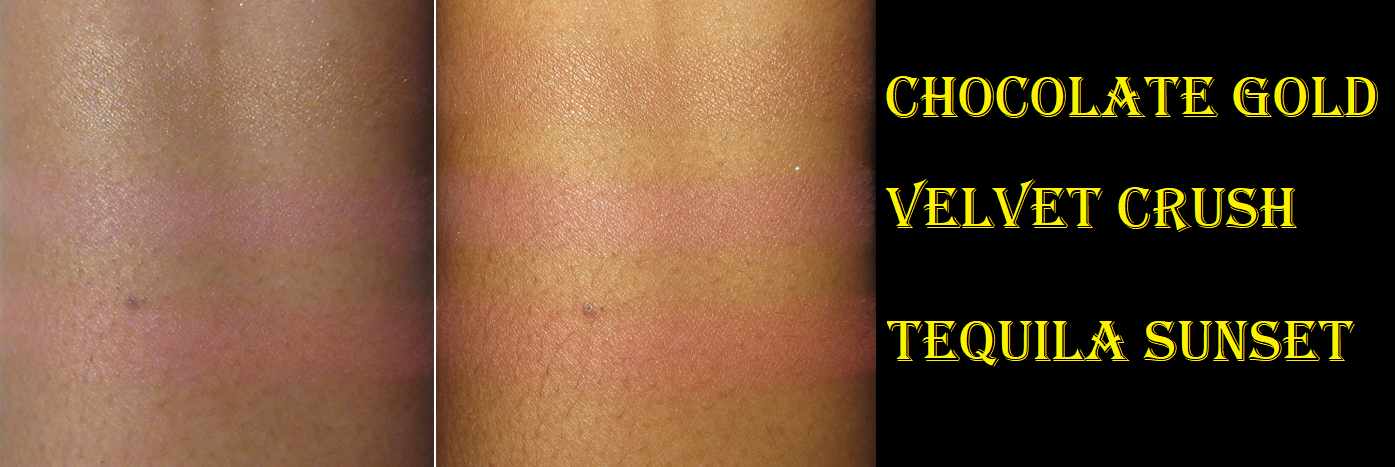
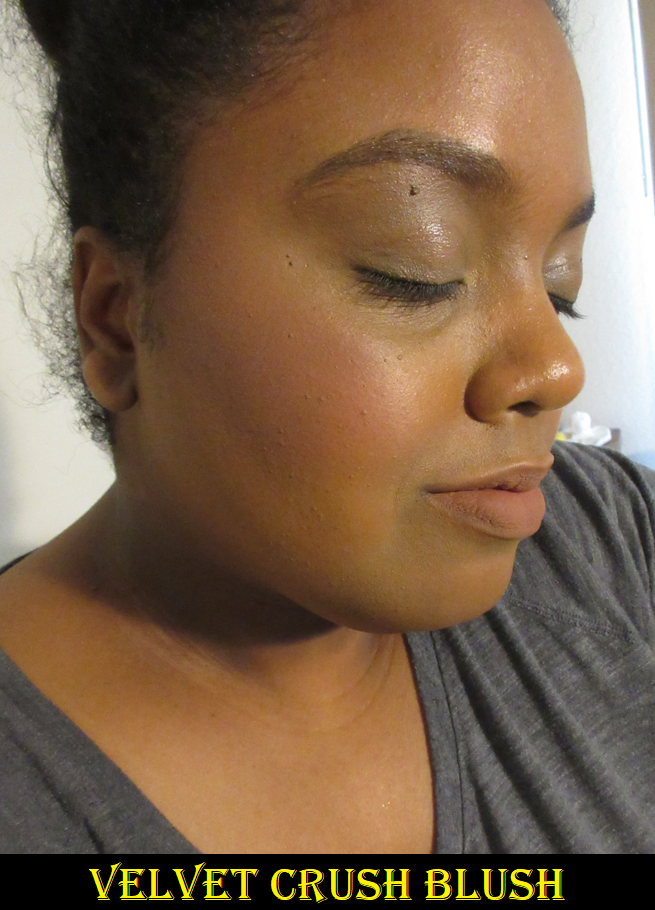
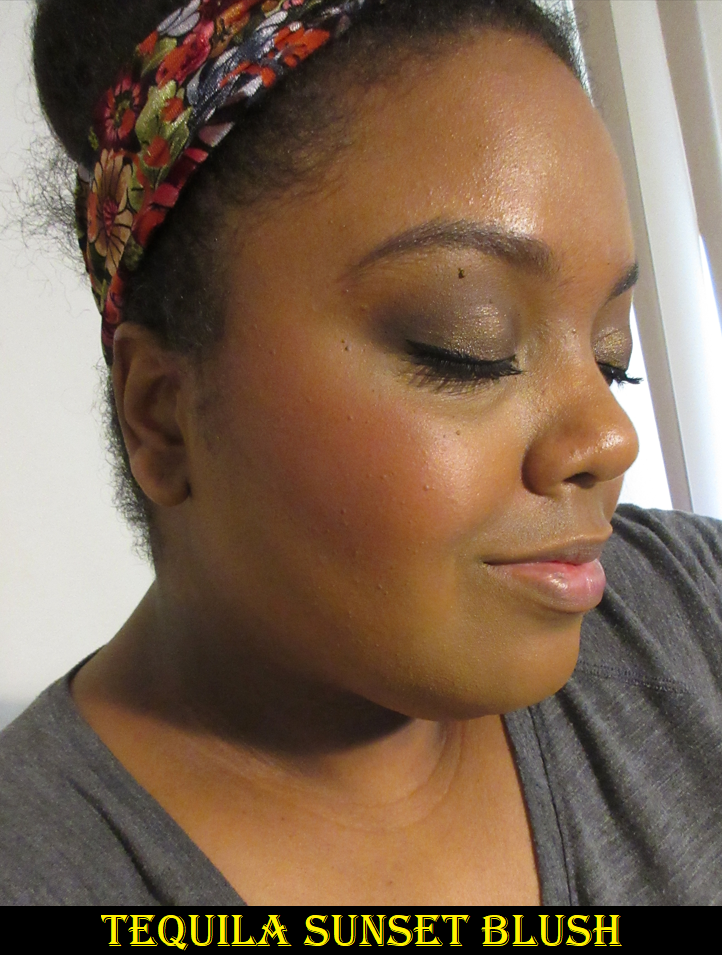
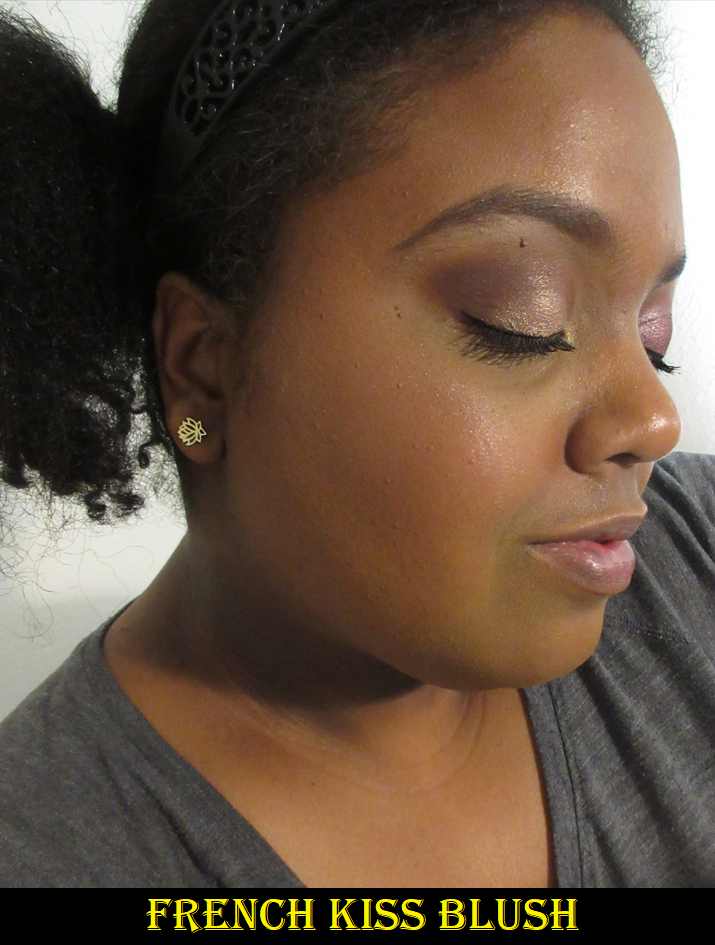
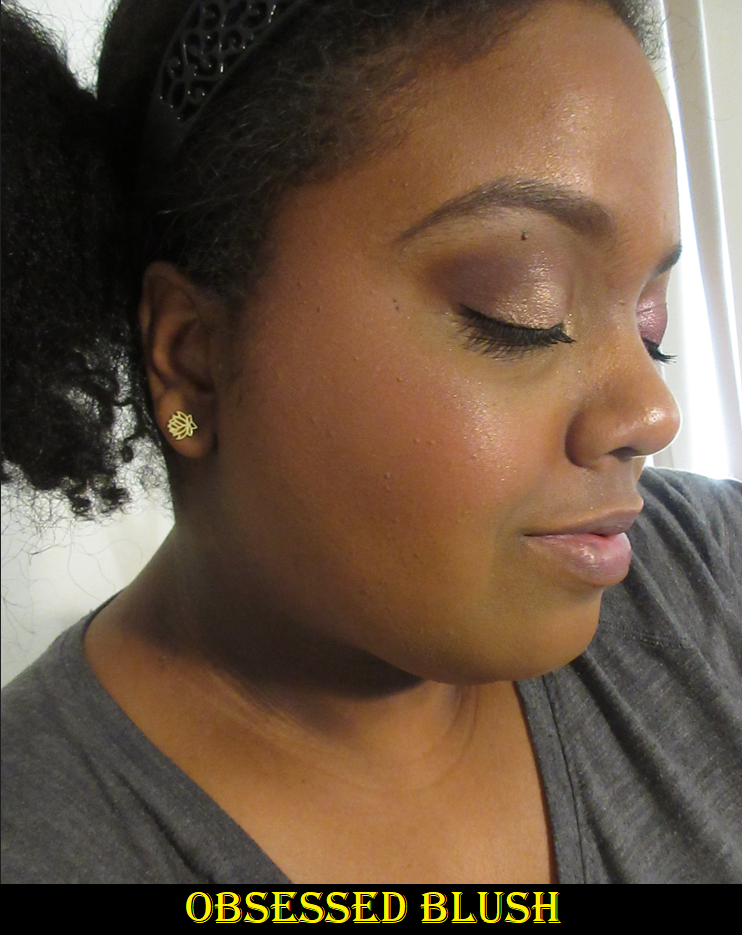
At First Blush in French Kiss, Obsessed, and Lovebite


I wanted Obsessed and French Kiss from the beginning, but I didn’t expect the blushes to actually look as vivid in person as they are depicted in the swatches, and especially for the lightest shades available. So, I bought Lovebite to be on the safe side and realized quickly that although the blushes do look lighter on the skin than in the pan, they are still quite pigmented despite their thin texture (which seems to be a theme with Mesauda powder products). Another consistent feature is the soft and silky feeling to the touch of them.
There is visible shimmer in the pan, but it’s very fine and just adds a satin soft sheen to the cheeks. The brand boasts ingredients like, “rose hip with its emollient and soothing action and Ginko biloba with its antioxidant properties,” but it appears corn oil is a more prominent feature based on the order of the ingredients on the list. The emollient factor was considered a good thing in the bronzers, though it had that sticking to wetness issue. With the blushes, I don’t have any issues like that. Granted, it does fade a little as the day goes on, but I still consider it a decently lasting blush formula.
Also, just like the highlighter, these are fragrance free.
French Kiss
I would describe this color as a peachy-pink-brown, and on the lighter side of medium in terms of depth. It definitely shows up on me (though it’s harder to see on camera), and does not look ashy, but if it was just a little bit darker it would be perfect for me. I wear it on its own, but it makes for a nice mixing shade if I want to tone down a brighter blush to turn it a little more neutral without making my cheeks darker.


Obsessed
This is a warm medium toned peachy-pink blush. I expected this to be my favorite of the three, but it flips back and forth between first and second place. I like that it shows up on me easier than French Kiss because it’s a little darker, but I think the brown in the other one compliments my skin tone slightly more. However, since it’s a warm leaning pink it’s still complimentary. I use it on its own, but I also like mixing it with French Kiss.
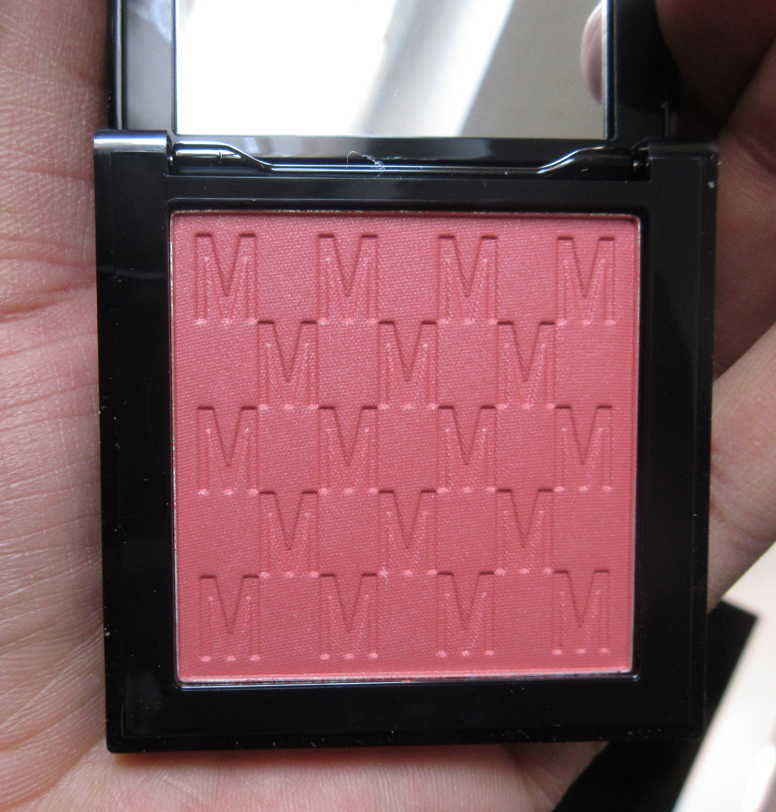

Lovebite
I have to be careful using this one because it’s such a vibrant reddish-pink shade, and pigmented to boot. I tap my brush once into the pan and work that amount of product from my brush onto one single cheek until it’s blended to be less intense. Then I repeat the process on the other cheek.

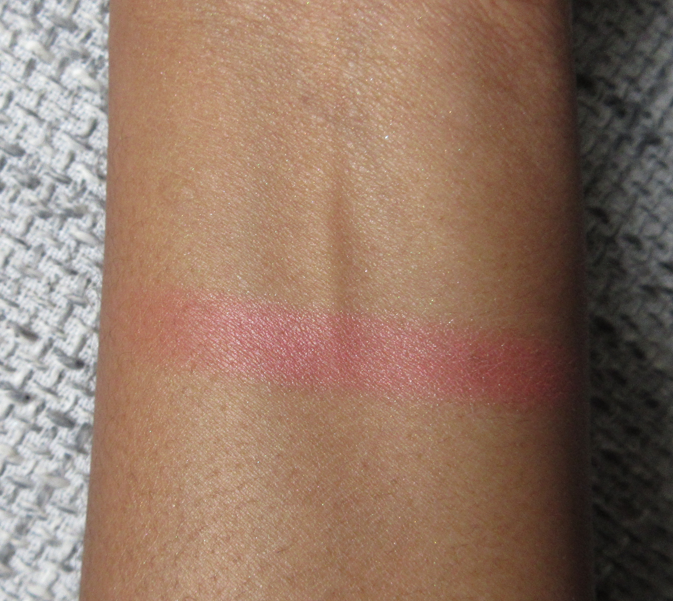
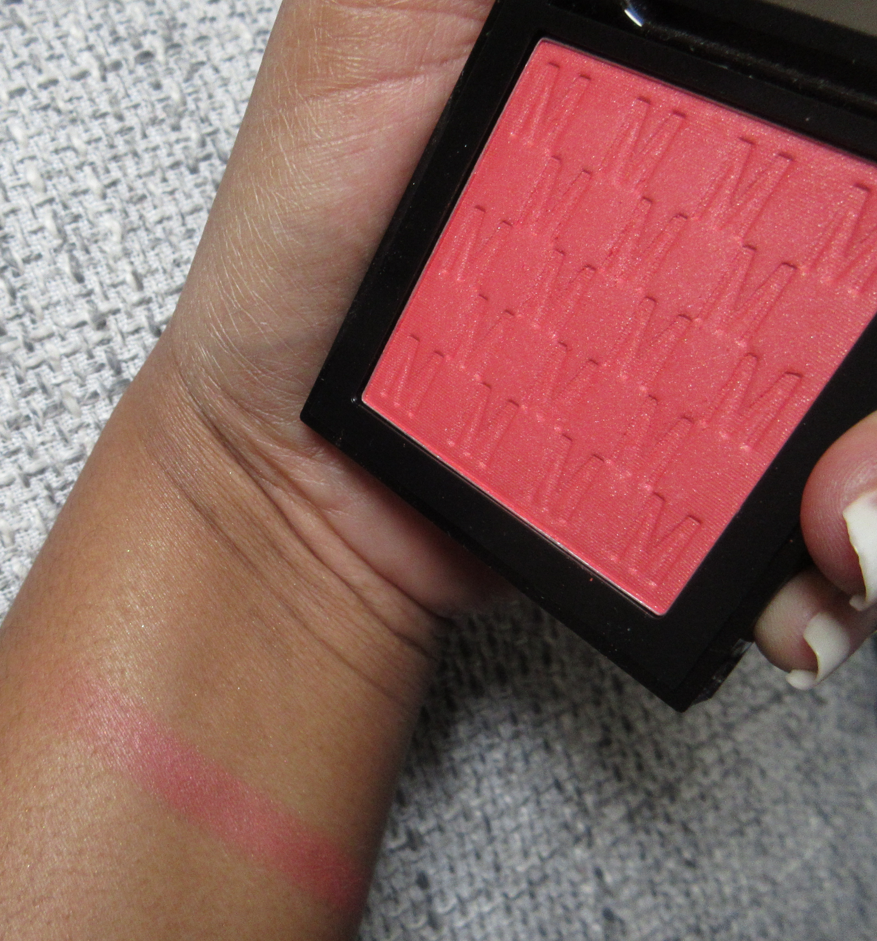

I find it interesting that my camera is able to pick up the shimmer particles quite a bit. I never noticed them as much in my lighting situations back in Germany, though the intensity of light (even natural light) is quite different from there compared to Florida.
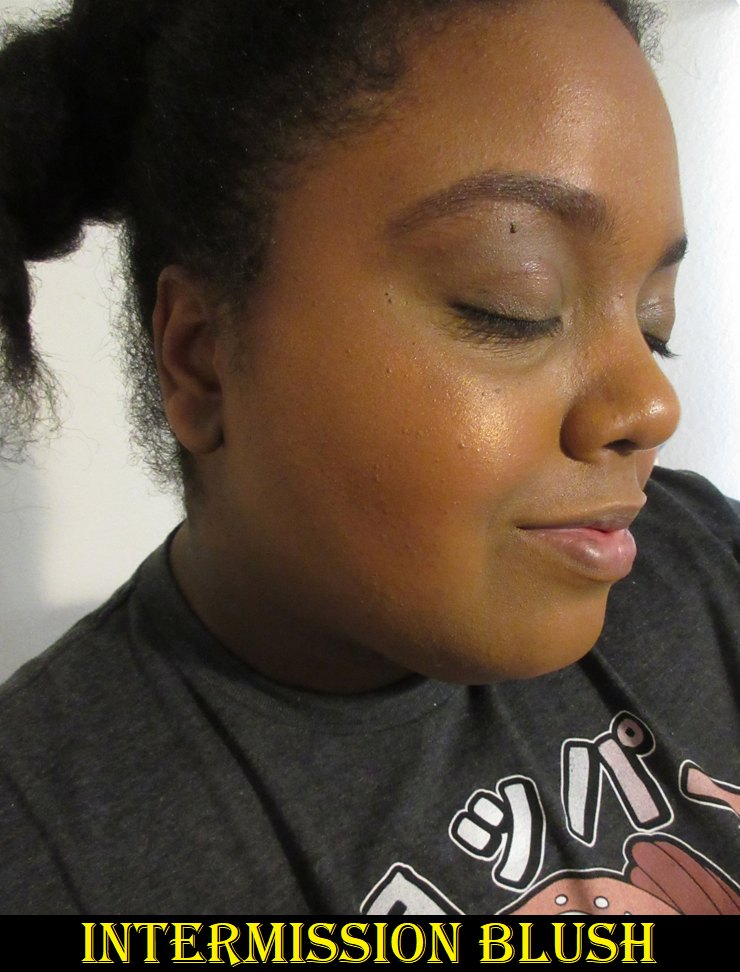
Blush & Glow in Koralline

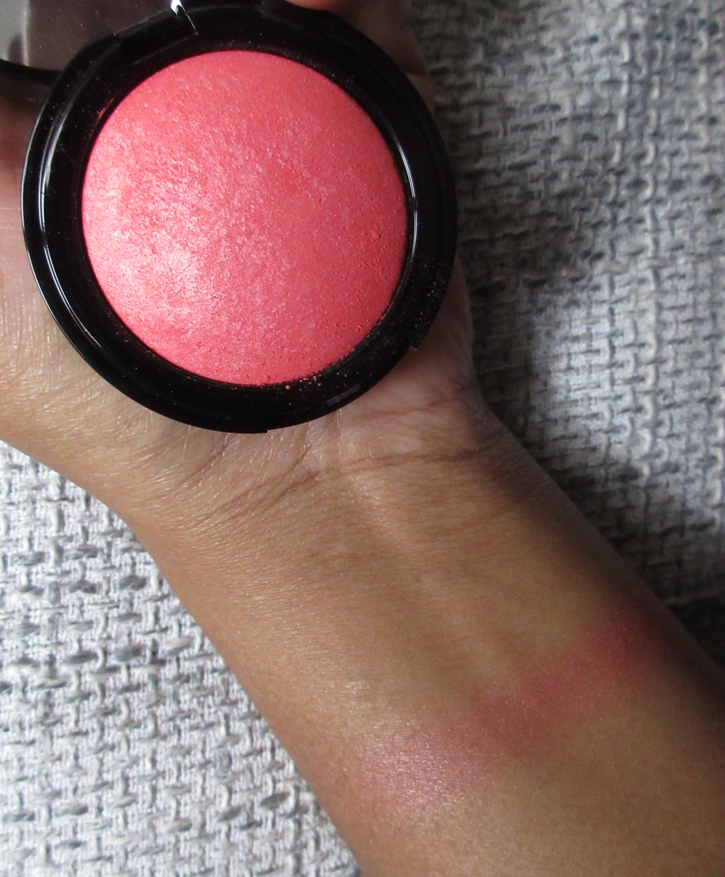
I think Mesauda is dropping the “Milano” part of their name because it’s not listed that way on the brand website; only on Douglas. In addition, the only packaging I could see with “Mesauda Milano” on it was this Blush & Glow product in circle packaging. This product is discounted everywhere at a price around 4 euros with only a few of the shade options available at various places, so I am guessing it’s being discontinued or will return in new packaging to match the black squares of the others.
Koralline is quite similar to Lovebite, but with more pink in it than red. I was hoping this would either be light enough to use as a highlighter or deep enough to wear as a full-on blush. I like the base color, but the pearls unfortunately create a cast on my skin tone in certain lighting situations that makes it look ashy, even though it’s absolutely deep enough of a blush shade for me (or would be without the pearl pigments). This has happened to me before with some highlighters that have a base color deep enough for my skin, but the shimmer itself is too dark or too light and that makes it unflattering on my skin tone. I had issues with pearl pigments in my Hourglass vs Guerlain post as well, and even some of MAC’s Mineralize Blushes, which is why it’s the only blush formula from MAC that I’m very picky about. It’s a bit funny that the day I took the photo, it happened to show on my camera the prettiest it’s ever looked!

The blush otherwise looks quite pretty on the skin, is smooth, contains “Jojoba oil with emollient and moisturizing action,” has decent longevity, and does remind me quite a lot of the MAC Mineralize Blush formula. However, because of that pearl (or the combination of the pearls with the “holographic pigments”), and the way it reflects in light, I planned to declutter it. However, seeing how it looks on camera, I will reconsider it.
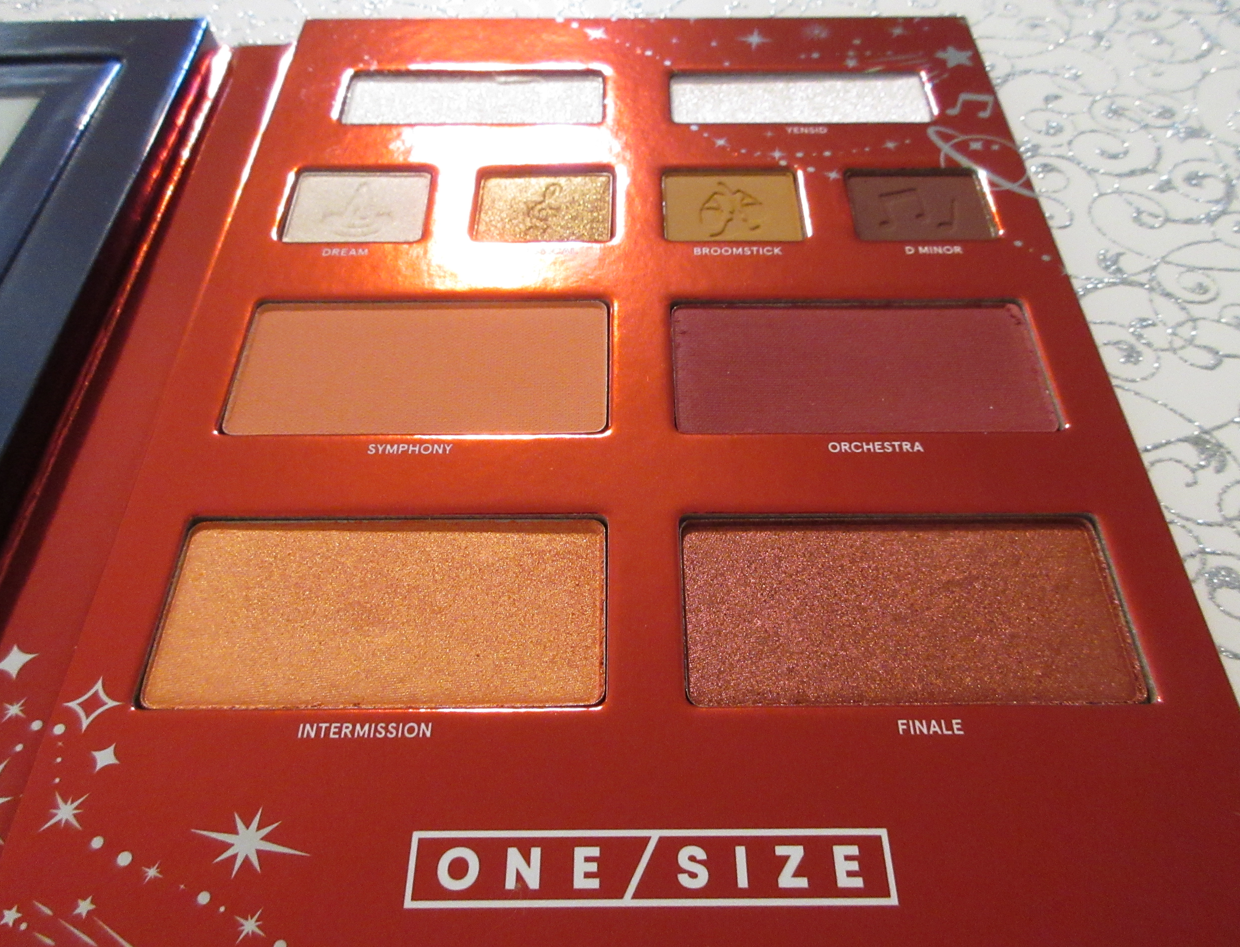
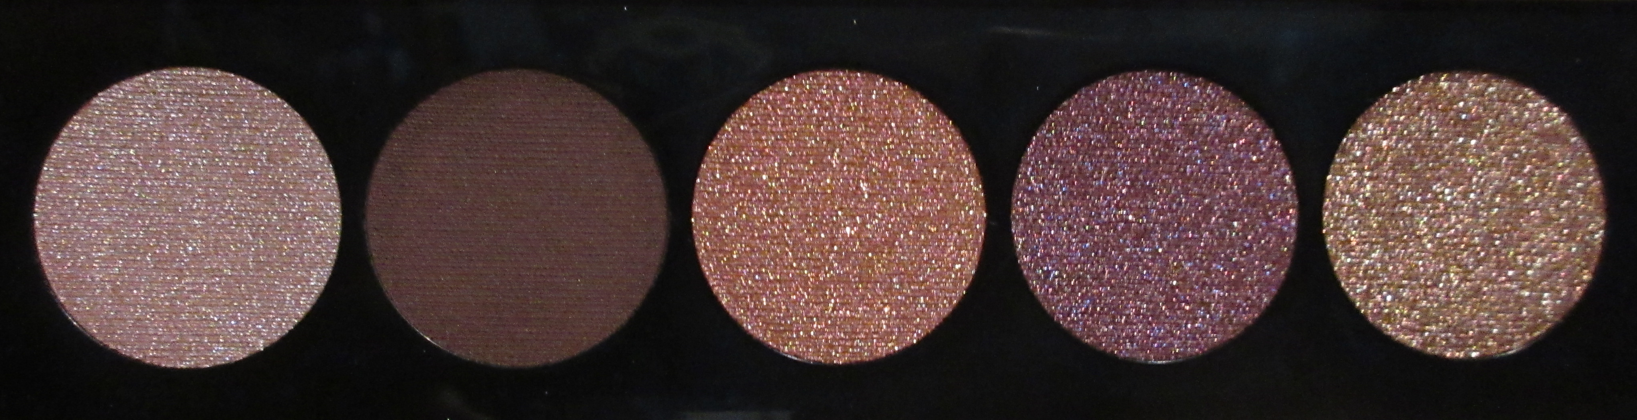
Gold N-Roses Eyeshadow Palette


Photo from the Mesauda website (above) versus how it looks in person (below).
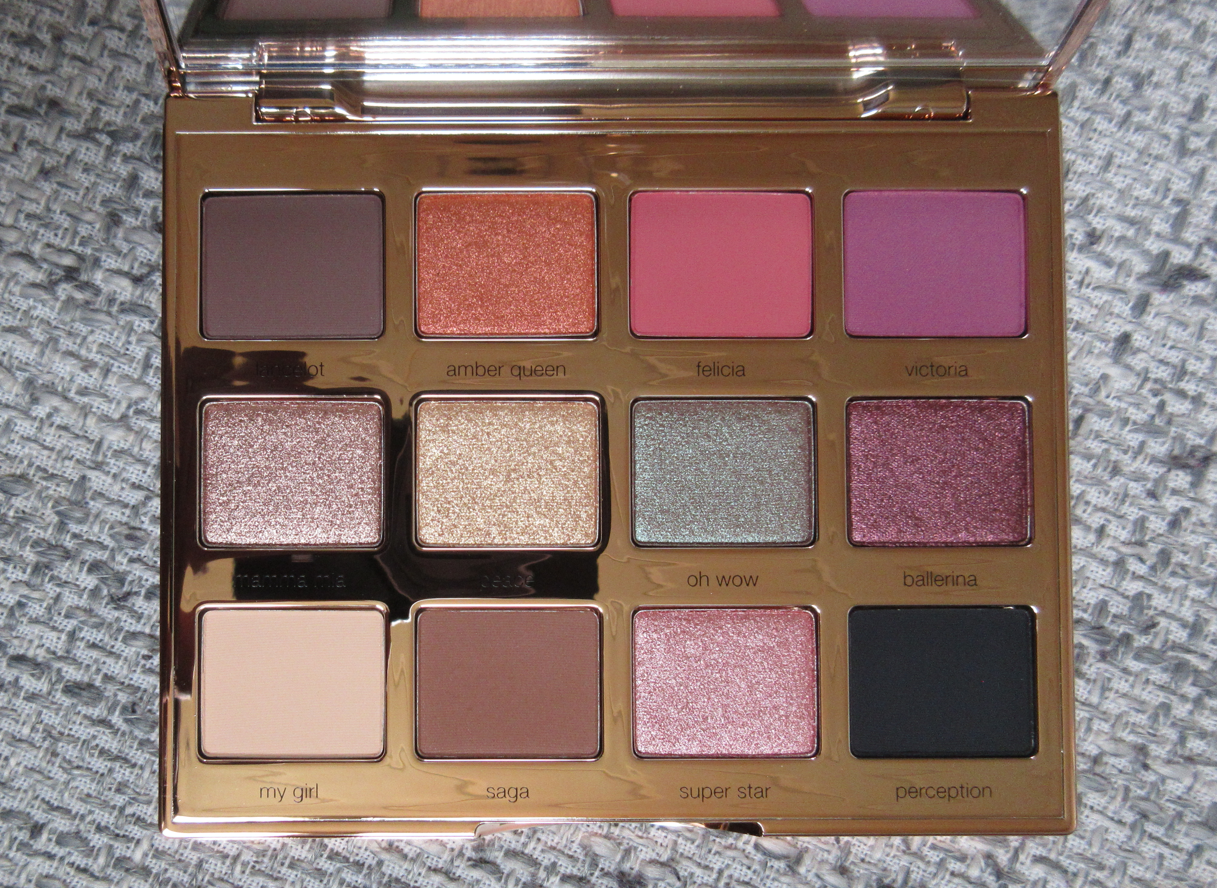

The online photos on the website don’t do this palette justice. The colors are much prettier in person and I was thrilled to see it contains a duochrome called Oh Wow. These eyeshadows are thin, yet give good color payoff, while being in tones that are on the softer side. For instance, instead of an intense red, we have Felicia which is a deep pink-red. Rather than a vibrant purple, Victoria is more of a muted magenta. This makes the palette perfect for someone who likes neutrals, but also enjoys dabbling in “wearable” colors or having festive options for specific outings/occasions.
The mattes take noticeably longer to blend than I’m used to, but not so long that I would call them “bad.” They just require a bit of effort. I recommend using a brush with bristles thicker than squirrel (like goat or synthetic) with them. Most of these are opaque, but Perception is extremely patchy. From the first time I swiped it on my fingers, I could see spots where my skin was showing through, and this wasn’t the case for any other shadow in the palette.

I understand that some brands prefer to make their black shadows buildable, but it gives a smoky worn out look when I use it since it doesn’t build to be entirely opaque. I like smokier looks, but not necessarily on the grungy editorial side. This shade is still usable, but I’d prefer to reach for another palette’s black eyeshadow.
As for the shimmers, I prefer using them wet to aid in the shiny look and ability to layer them up for average intensity.

Because of the way the plastic packaging feels, the shape of the pans, and the layout, this palette reminds me of Tarte and Persona palettes. However, I prefer the formulas from those two over this one and would prefer to pay the $4-$8 increased price for that quality. Because this palette hasn’t been in my possession for all that long, it still feels exciting to have, but I honestly don’t foresee myself reaching for it more than a few times after this review. I like this, but I can’t recommend it over similarly priced palettes on the market.
BARE HARMONY 3.0 Palette in 205 Hidden Green
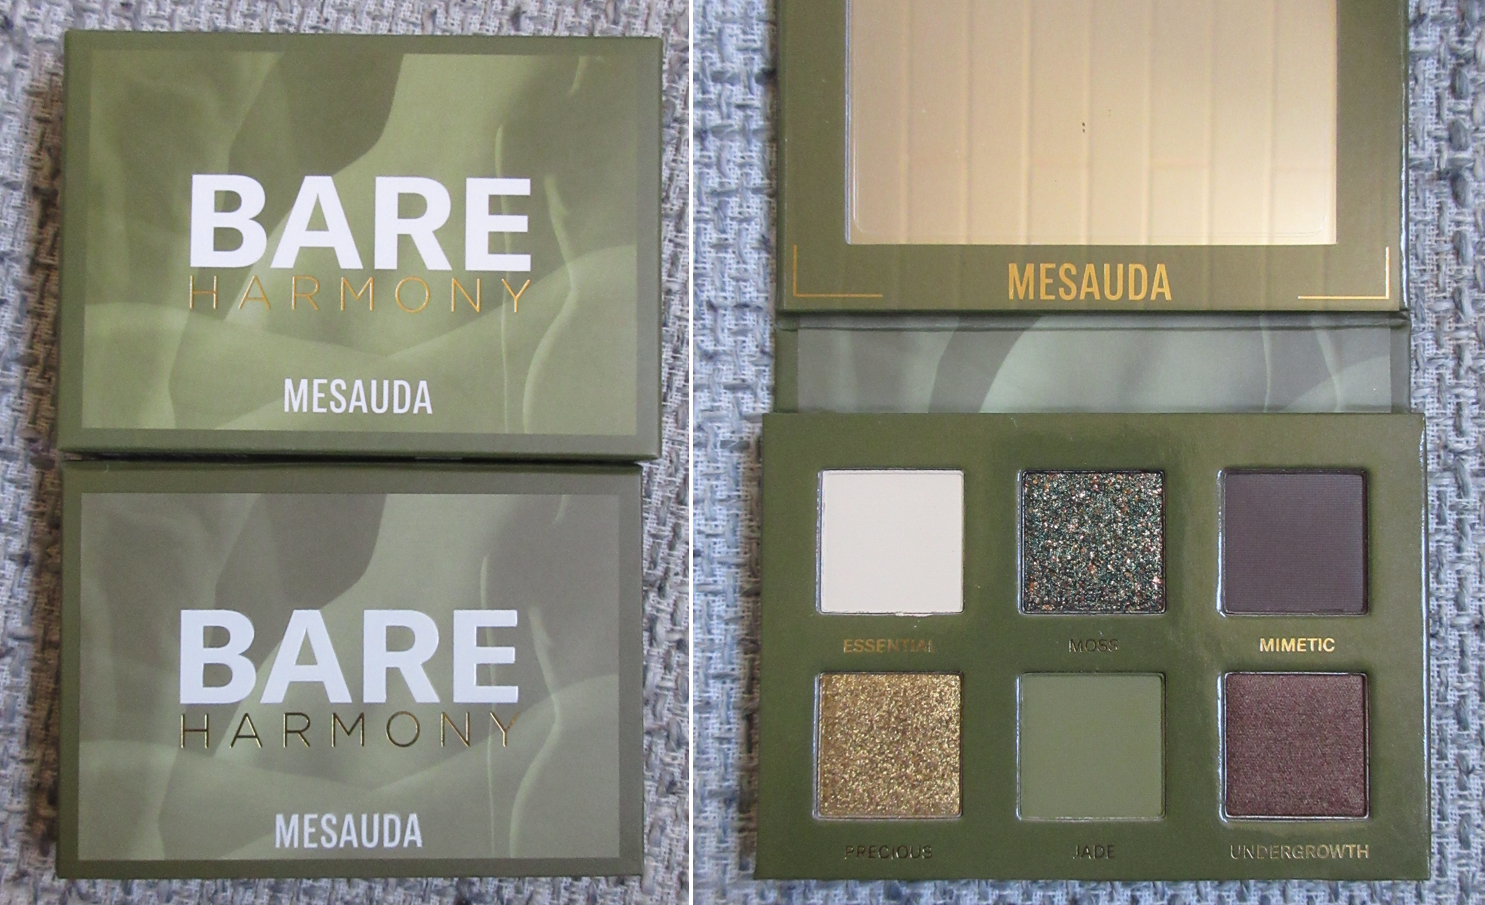

My experience with this particular palette has additional positives and negatives over the Gold N’Roses palette. For starters, I bought it because I forgot to bring a deep shimmer or satin brown shade on the trip with me. Plus, I’m a sucker for pretty green eyeshadows and I was so intrigued by the look of Moss. It’s a combination of various green and gold/bronze shimmer, but it doesn’t have that true duochromatic effect. There’s no shift, but it’s undeniably still pretty.

I like that the pigmentation level is cranked up for these mattes, while still being just as thin. However, they require even more work than my other palette for blending. I don’t know if it’s necessarily worth that trade-off since blending time is more tedious to me than being able to get strong color payoff the tiniest bit quicker. As for the shimmers, they are wetter, creamier, and shinier than in the Gold N’Roses palette. My only issue was with Precious, because I had trouble picking up that shade on my brush without it either dispersing everywhere on my eyes in a low pigment scattered effect (because the particles aren’t bound together as much as the other shimmers) or coming up in a giant chunk if I pressed too hard into the pan. Essentially, I had to resort to spraying my brush every time I used it in order to get it to stick on my eyes in the area I wanted with minimal mess.

So, even though this palette is trickier to use, the color story is more my speed and how much more dramatic I can make my looks is why I think I might actually reach for this palette a bit more than Gold N’Roses. I have so many gorgeous palettes now in the green, brown, yellow, and gold color scheme that once the “new” feeling fades, I wouldn’t be surprised if I stop using it after another month or two and go back to using my favorites. As for whether or not I recommend Hidden Green, even though the Natasha Denona Mini Gold Palette is a few dollars more expensive and contains much less product, I believe that’s way more worth the purchase than this one. I don’t regret buying this one though because it was needed while I was overseas and I enjoyed it while my eyeshadow options were limited.
Other Products (Images from the Brand Website)
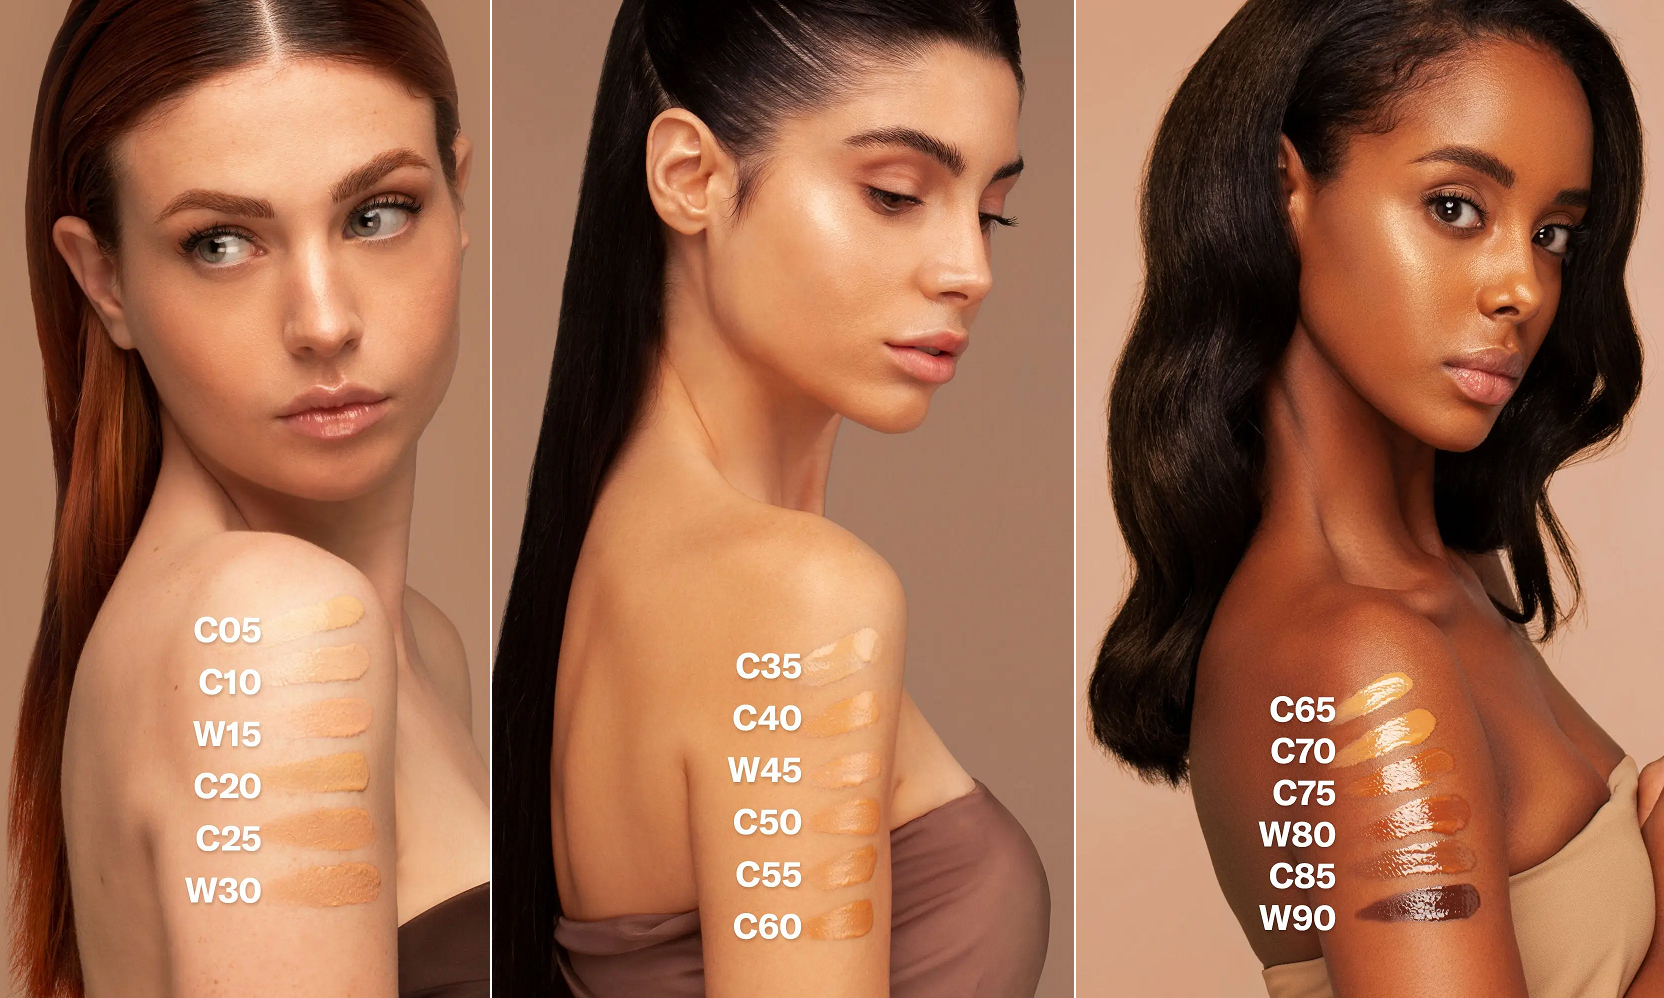
I was very curious about this product, but I don’t have a good shade in this line. I’d be somewhere in the 73 or 74 range, but I’d need a color that didn’t have that strong of an orange tone. I cannot speak to how these shades look in person, but it appears that the light to medium range is well covered and much closer in depth between shades. There are huge gaps though from C70 and onward, plus C75 and W80 don’t look like real skin tones. They look like corrector colors on the darker end. It’s not enough for brands to have dark shades in their line. They have to be colors that actually match people, or else it seems like they didn’t invest as much time and effort in the creation of those colors and they are just there for show to look more inclusive than they are.

I didn’t try the concealer for the same reason of being unable to find a color that would work for me. W90 is too light and too pink, but C95 is too dark. The range is missing quite a few tan to rich options, but this line does a better job looking like real tones (except the peach one P01 still looks like a corrector).

Talk about a shade jump! The difference between 107 and 108 is staggering! Once more, I did not have a good color match. If this was the translucent type of powder, more people could perhaps be able to pull off using the last two. However, the website states, “The formula is rich in micronised mineral pigments for improved coverage and even application all over the face.” This talk of coverage leads me to believe it’s the pigmented kind of powder that could be used to boost the coverage of foundation. In this case, the range is definitely limited for those who aren’t fair to medium.
As decent of a job as the brand has done with the products I reviewed today, there are certainly areas that could be improved if they wanted to fill out their current range as their brand grows. I wish them the best and hope that this happens. I’ll be keeping my eye out on what they’re up to when I return to Europe toward the end of this year because they make some nice products of interest to me.
That’s everything! Thank you for reading!
-Lili ❤