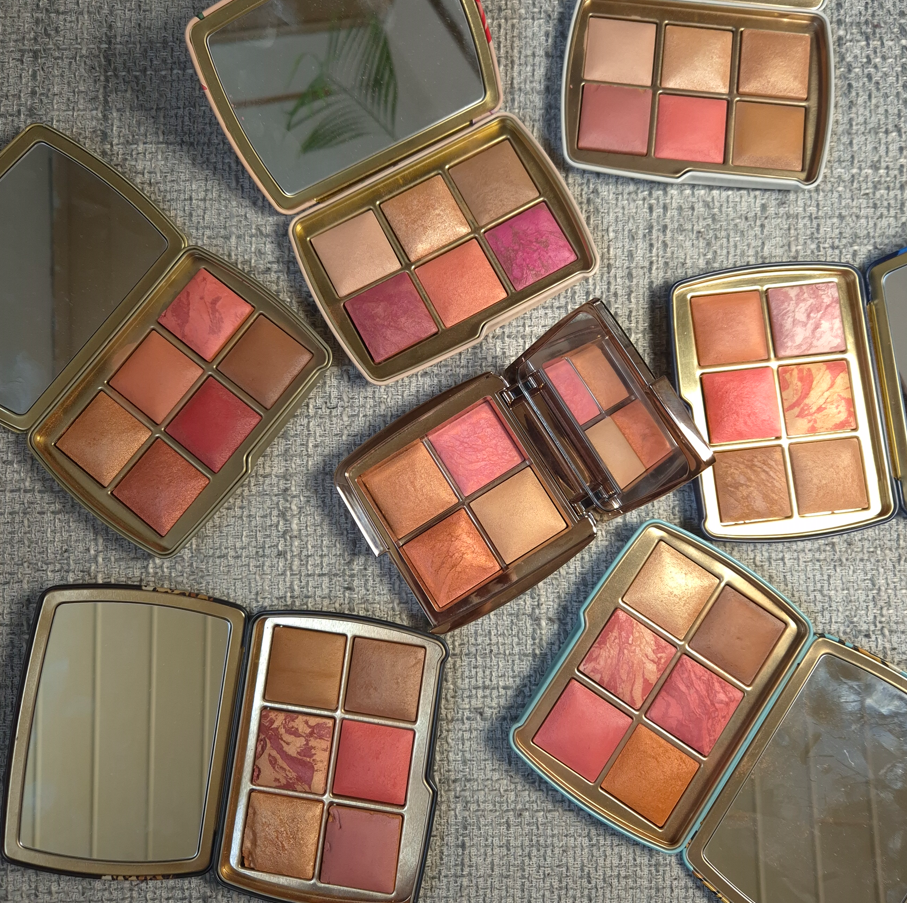
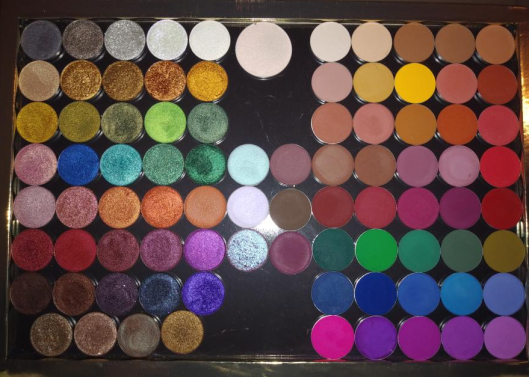
This is how the palettes looked after I rearranged some of the powders and posted the photo on Instagram. I made some drastic changes afterward, that I will discuss in this post.
I did it! I summoned up the courage to do Round 2 of depotting and rearranging my Ambient Lighting Edit Palettes! This time, I had to do things old school because I left my Z-Palette branded Z-Potter behind in the US (and the brand only ships them within North America). I could try to look into purchasing a portable induction burner here, but I don’t depot often enough for it to be worth it.
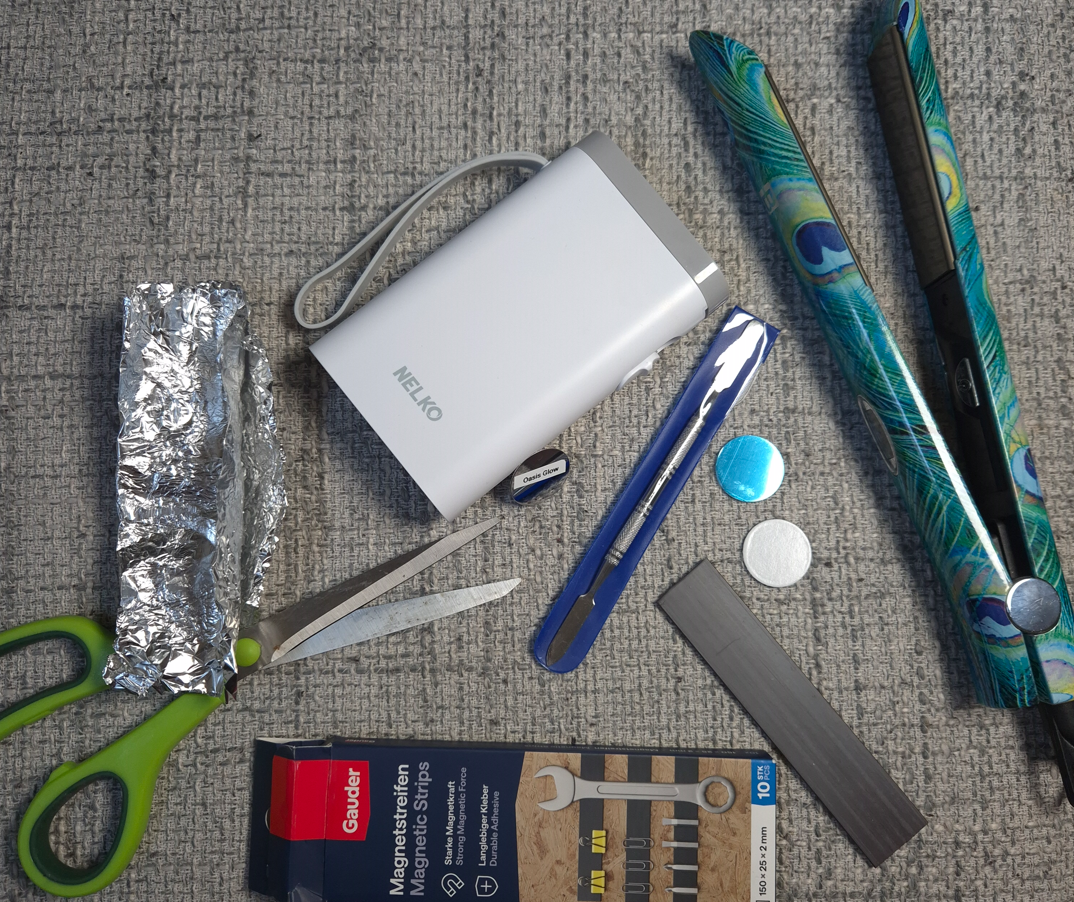
I won’t be giving instructions on the depotting process because I wrote a very detailed post already in Round 1. Only a few aspects changed this time around: One was my heating tool, a titanium flat iron, that I set at around 310°F-340°F for the tin palettes and had to bump it all the way to 380°F with the plastic quad. Another change is that I sought out magnetic strips that are specifically intended to hold objects on a wall. I figured that should ensure the adhesive backing and magnetic grip are both strong enough for palettes that will always be laid flat anyway. Lastly, my husband bought me a label maker, so I could print and stick the shade names onto the metal stickers instead of writing everything by hand.
Since I hadn’t dealt with the plastic Hourglass palettes at the time of Round 1, I will give the warning here that they are much more difficult to depot than the tin ones. The plastic palettes have more glue and they are set way tighter/flush to the sides of the component. Meaning, it is even harder to wedge the cosmetic spatula between the tile and walls of the compact. I couldn’t get them out without scraping at least some of the edges. In addition, the bottom of the compact will be partly warped/melted because it requires so much heat. My husband thinks keeping the palettes at lower heat, but for a much longer amount of time might work too, but I didn’t have the patience to try that method.
This is an example of how the plastic palette looked once two shades were depotted (and you can see where I quit midway while attempting to depot a third). I used the aluminum foil between the plastic and my hair straightener to avoid dirtying the plates.
The first two customized palettes I’m going to show are the ones I said I would make in my Swan Palette and Dusk Quad review. The arrangements aren’t the exact same because I tried to avoid depotting the powders that I planned to keep within the same palettes anyway.
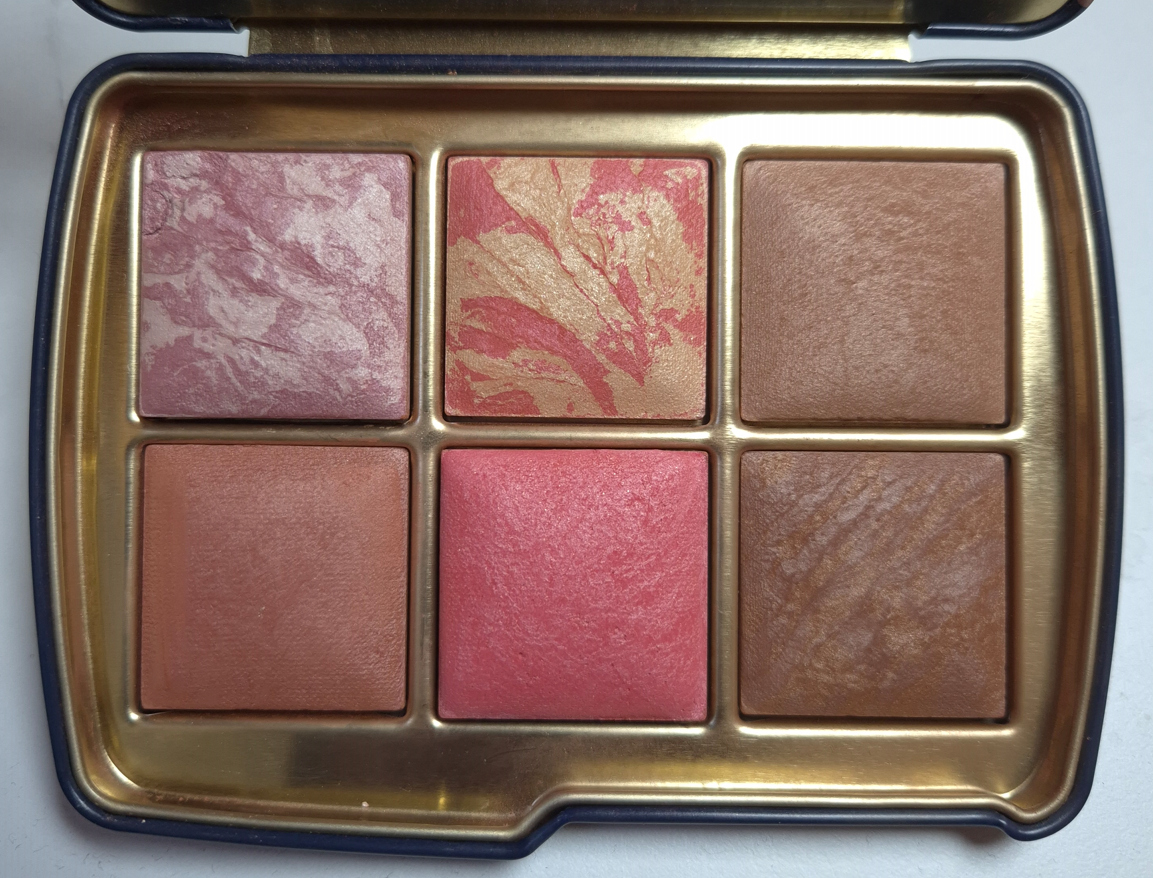
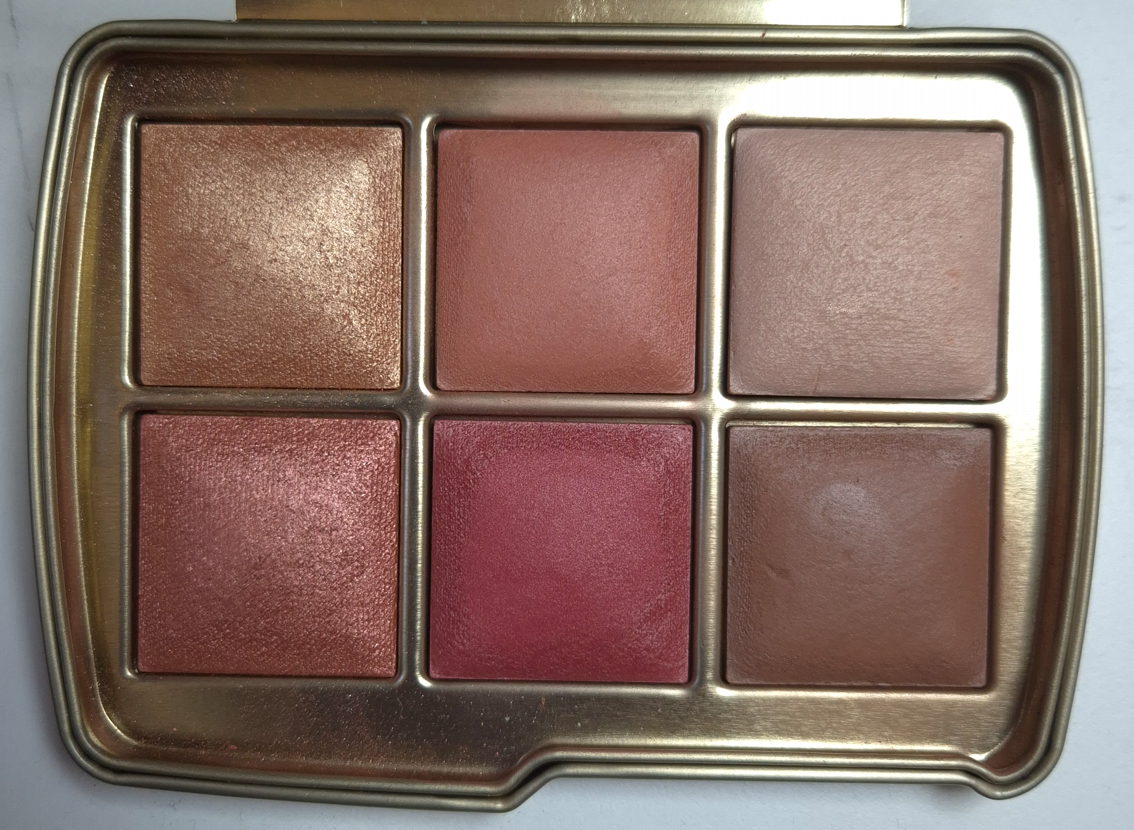
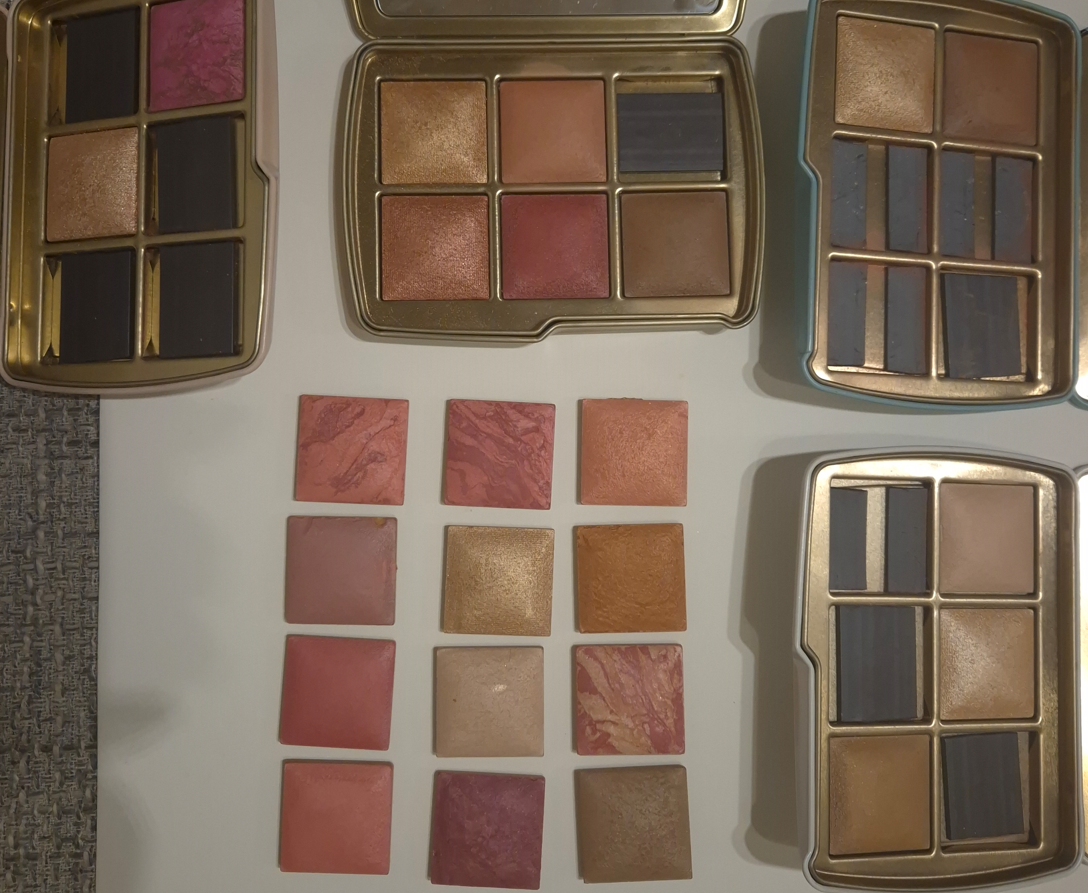
The “Panda” Palette (in Leopard Packaging that used to hold the Snake Palette shades)
Original Snake Palette vs Current Snake Palette
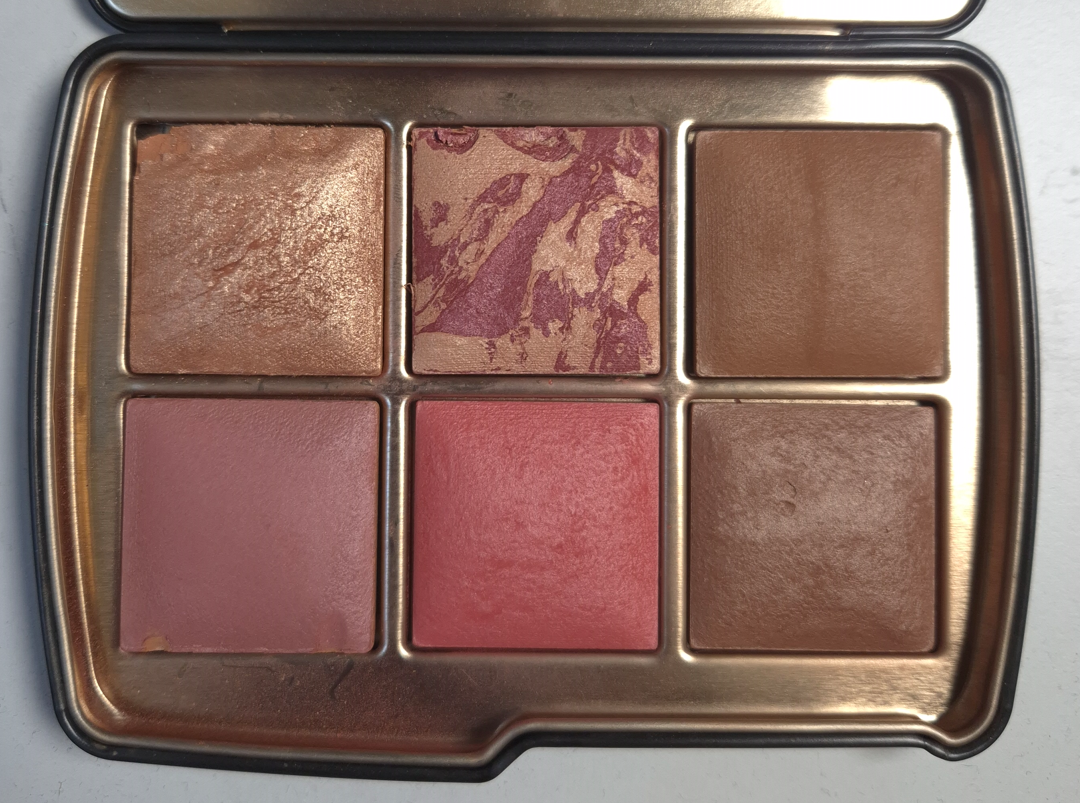
Solar Glow (Highlighter) – Fox At Night (Blush) – Dusk Quad, Permanent Shade Eternal Light (Finishing Powder) – Lotus, Permanent Shade Mood Flush (Blush) – Sculpture and Dusk Quad Mystic Flush (Blush) – Snake Solar Bronze (Bronzer) – Snake
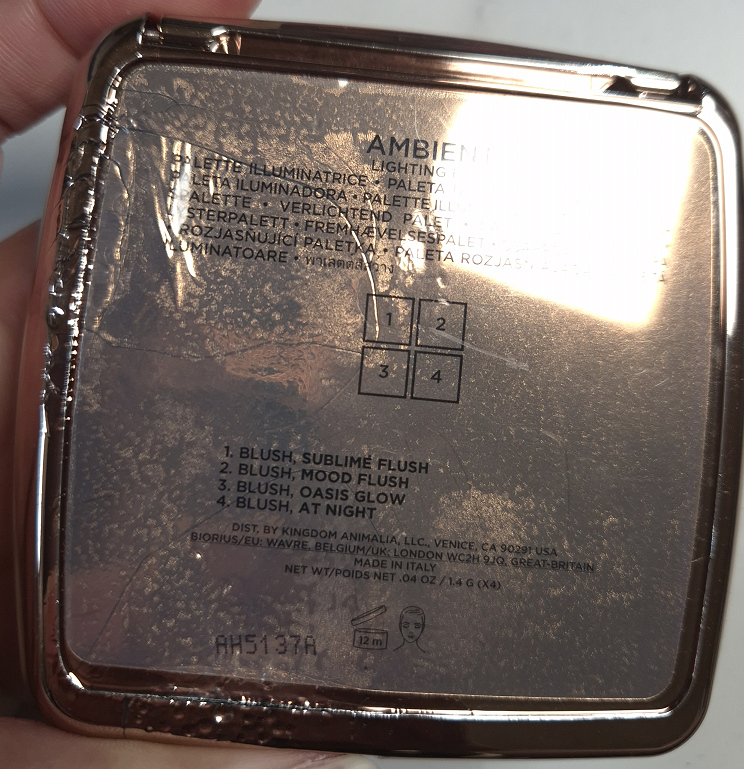
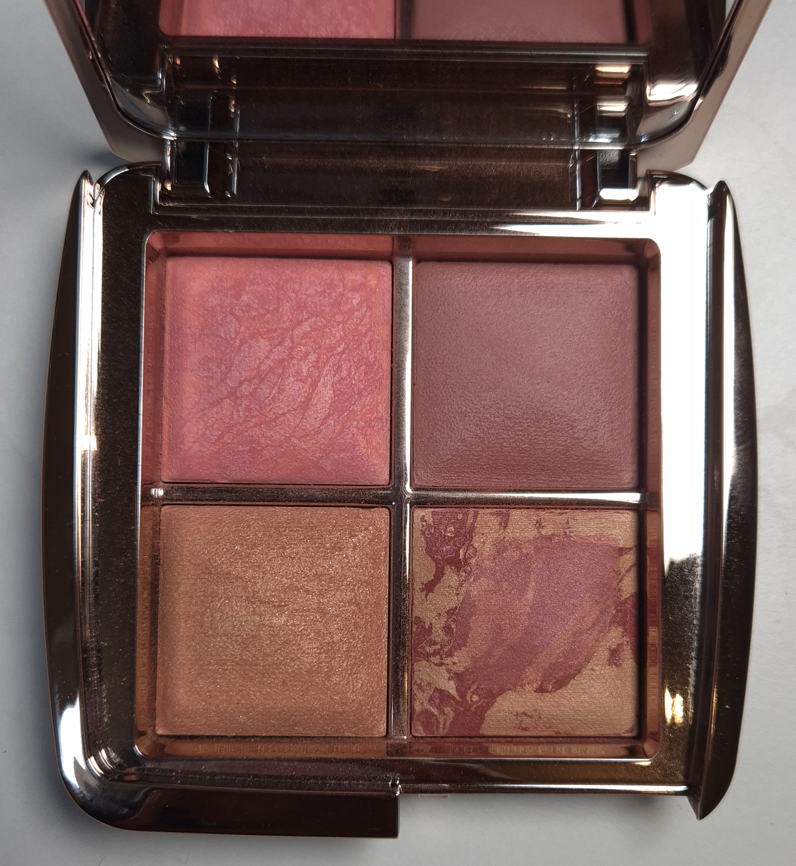
This is my “main” palette, the one I intend to keep within easy reach in my makeup collection. It’s a bit of a shame that my perfect palette has the most dings and nicks from the depotting process. For some reason, the glue in the Fox palette was a silvery color. Hourglass usually uses a clear glue, unless the orange-yellow residue color isn’t from the tile. The glue under Amethyst Haze was thin, so it was easy to pop it out. I expected the same ease from the Solar Glow Highlighter, but it was so stuck in the pan that I not only dug into the powder, a few small pieces of terracotta/clay tile broke off the edge in the process. This was the first time I’d ever broken the actual tile, and the amount of glue was 5x thicker than what was under Amethyst Haze. It was such a thick layer and felt like silicone/rubber. It was also the strange silver color. As for At Night, that came from the plastic palette with such little space to place my cosmetic spatula, so damage was unavoidable. I dug a bit into the baked tile as well.
I already talked about my reason for choosing these shades in that Swan review, but for those who didn’t read it, they are essentially a mix of my favorite shades that suit me the best and I can wear them all year round.
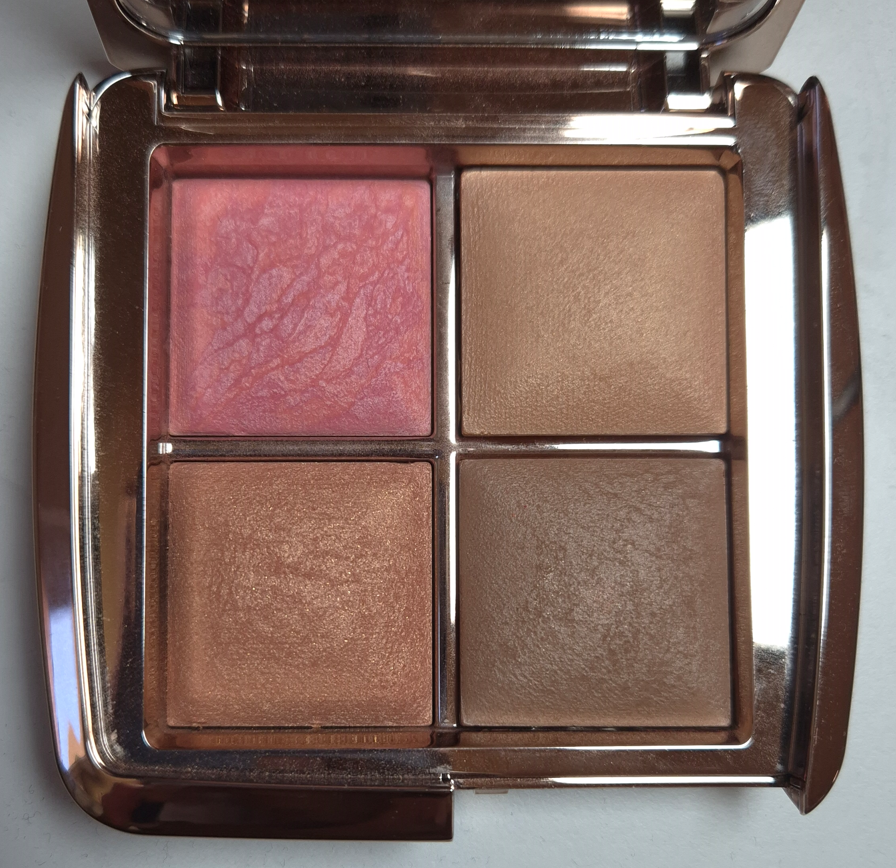
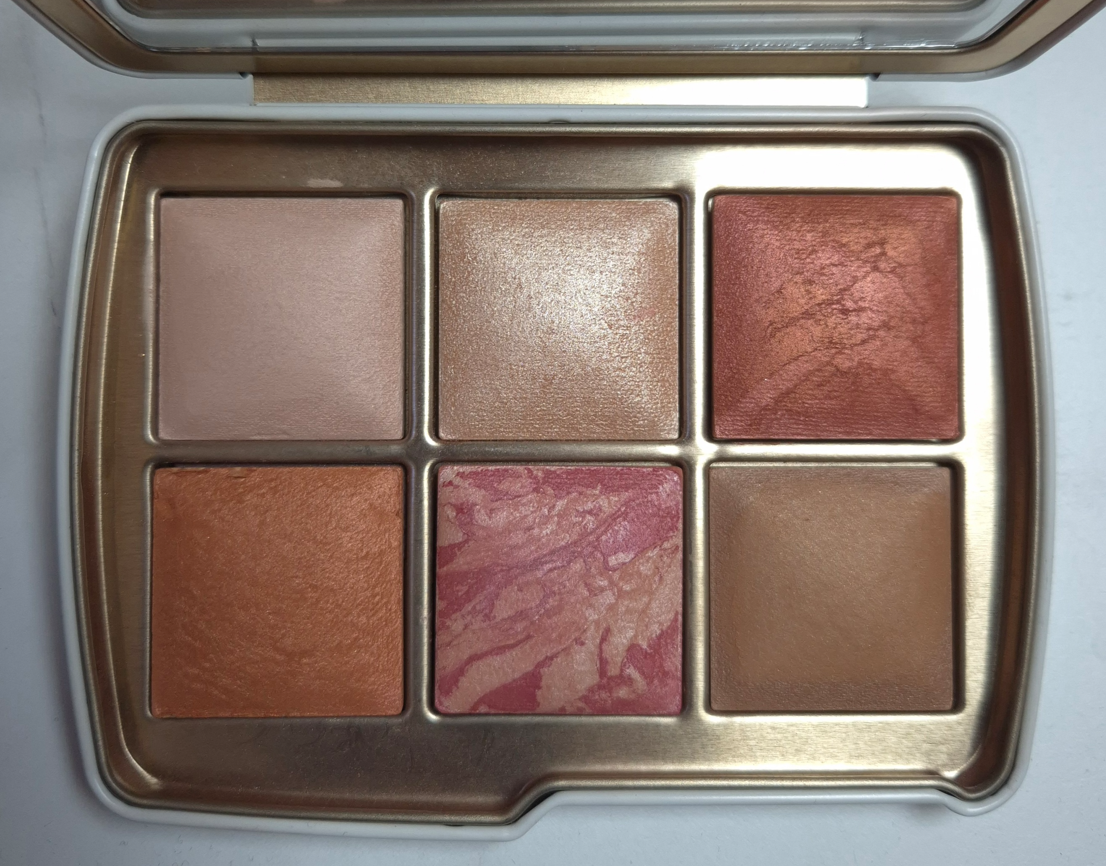
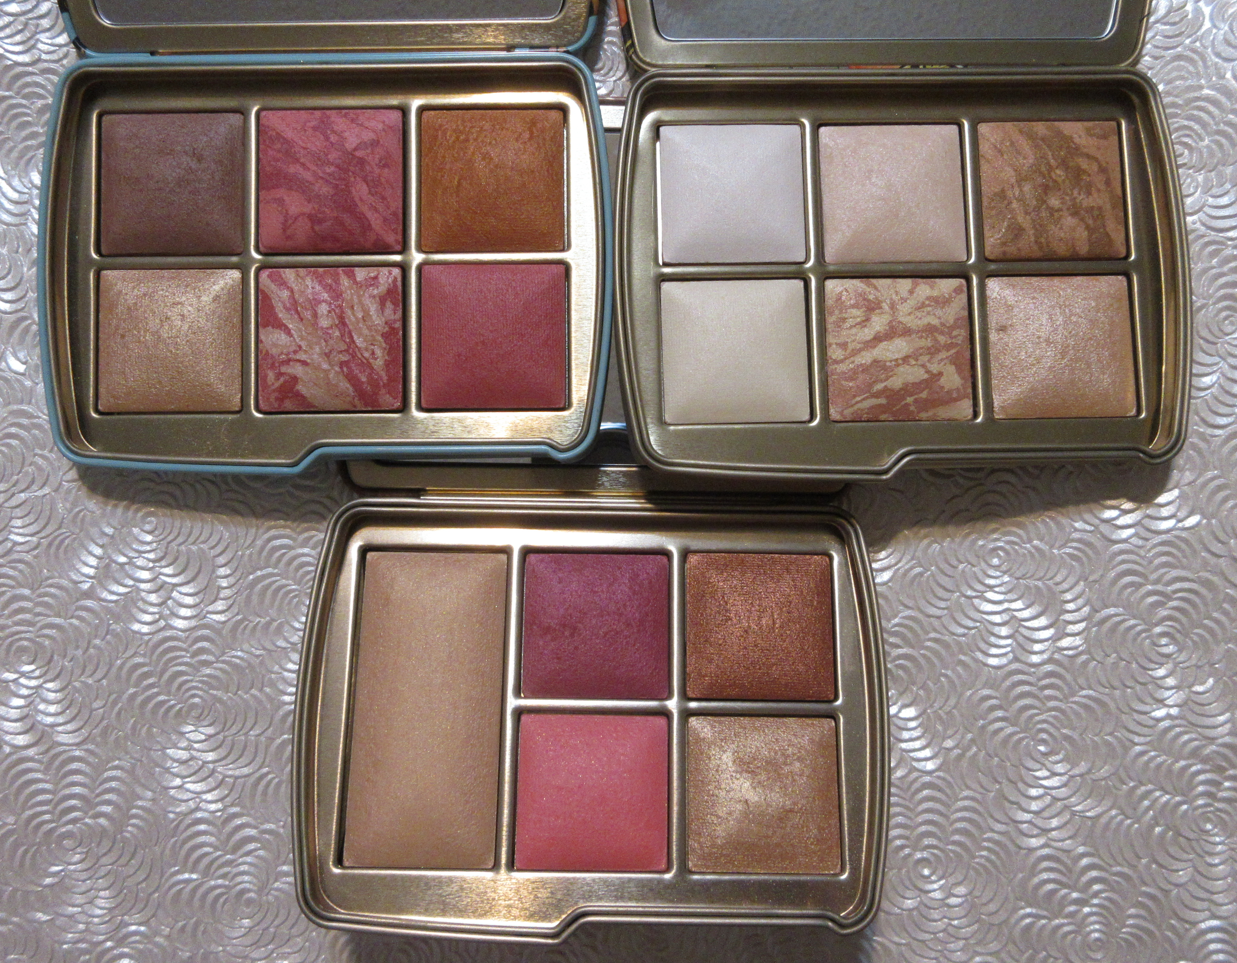
The “Rabbit” Palette (in Fox Packaging)
Original Fox Palette vs Current Fox Palette
Mood Exposure (Blush) – 5 Holiday Palettes, Permanent Shade Lucid Glow (Blush as Highlighter) – Fox, Ghost Quad, Sunset Quad, Barney’s Volume III Desert Light (Finishing Powder) – Fox Canyon Heat (Blush) – Fox Luminous Coral (Blush) – Swan Bronze Fusion (Bronzer) – Fox
The original photo was taken on a sunnier day, so it looks a bit warmer. The second photo heavily relies on artificial light, as it has been cloudy all week. Please excuse those differences.
This palette is one that I will get more use from when I’m back to my winter shade. It comprises of some of my favorite powders that aren’t exactly deep skin friendly. Even though 4 out of 6 powders are from the Fox Palette, the addition of the two other blushes makes this the kind of color story I could envision Hourglass releasing as a “medium” palette in the future.
If I can get Oasis Glow out of this palette (and most likely put Lustrous Bronze Light instead), I will turn this into a completely unusable quad. I don’t want to throw the powders away, but I don’t need Radiant Light, Sublime Flush can look a bit ashy at times, and I can’t use Natural Bronze at all. Considering the standard packaging, it would be ideal to store my least used powders. I would then put the quad in my “makeup cemetery,” the box where I keep makeup I don’t use anymore, but don’t have the heart to toss out.
Initially, I just swapped out Luminous Coral for Amethyst Haze, but upon further reflection, I thought it would be cooler to make a blush-heavy palette. If I’m not sure if I want to wear the blushes from my main and winter palettes, I’m most likely going to find something I like in this one (especially if I’m in the mood for pink).
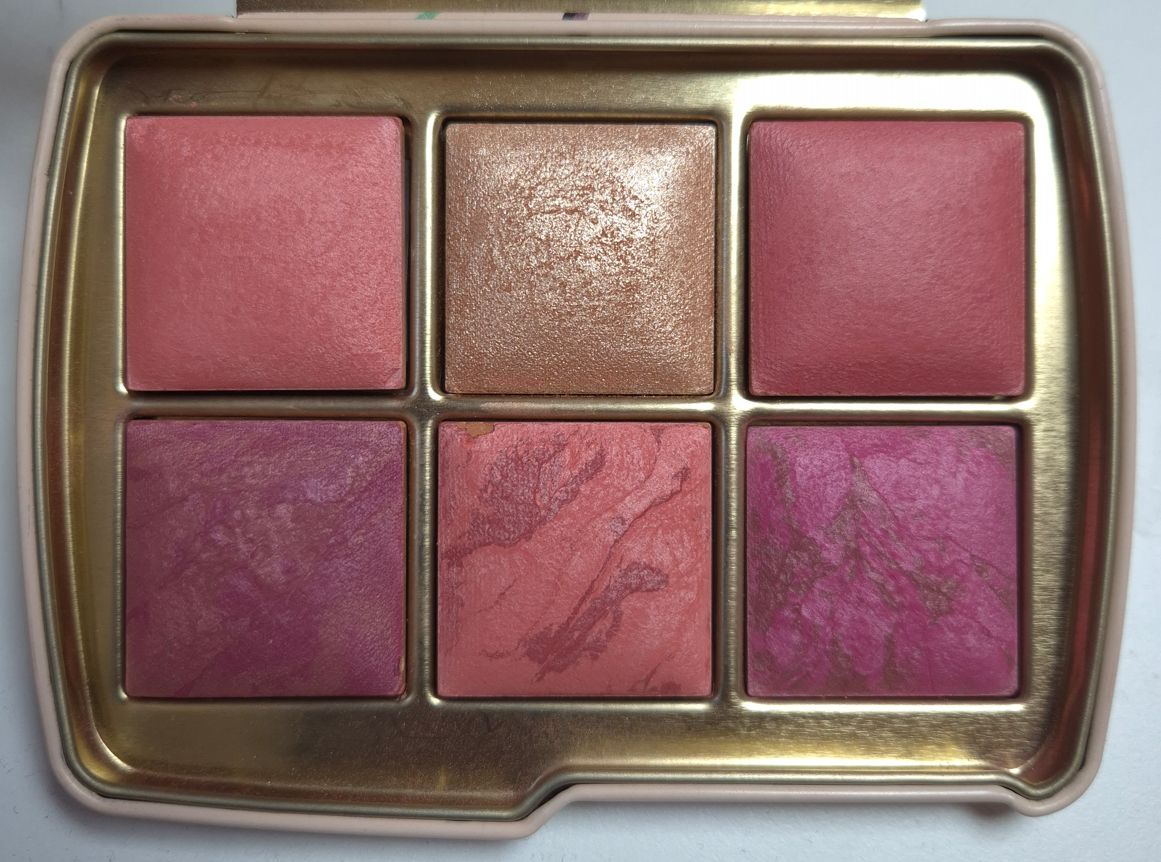
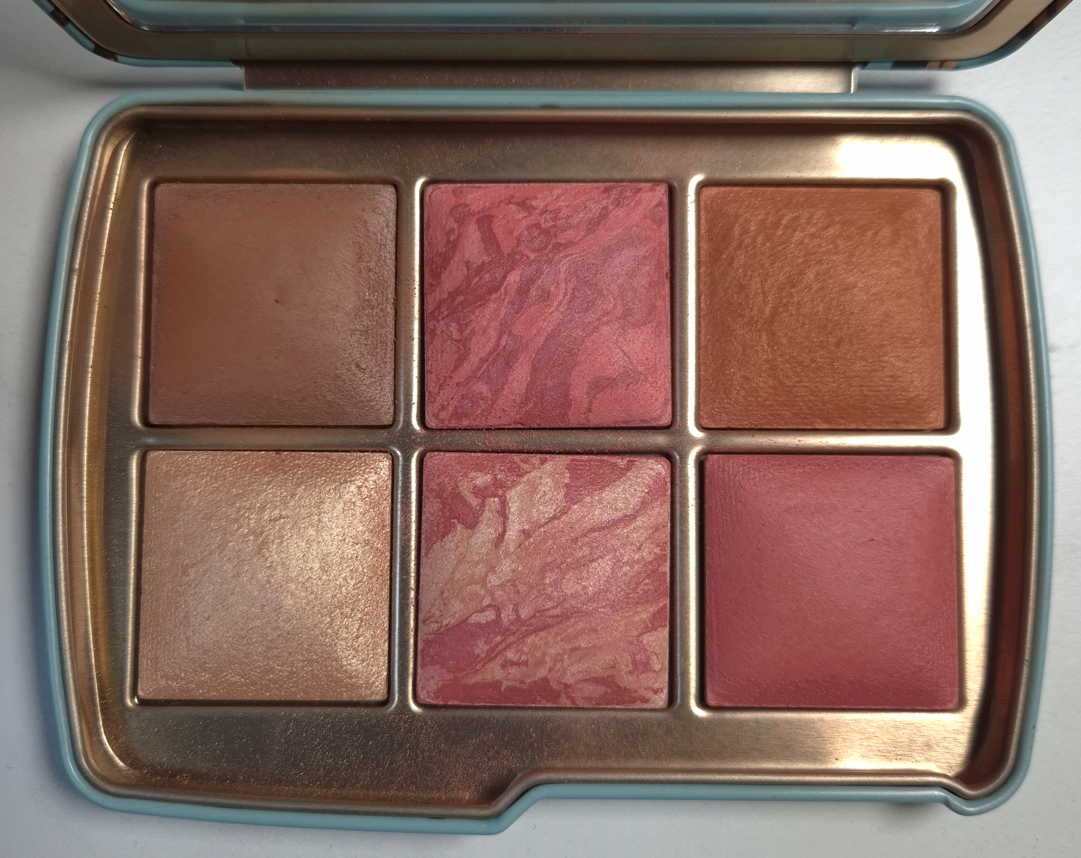
The New Lotus Palette (in Dragon Packaging)
Gilded Strobe Light (Highlighter) – Lotus Desert Flush (Blush) – Lotus Dim Light (Finishing Powder) – Swan, Leopard, Many Others, Permanent Radiant Rose Strobe Light (Highlighter) – Lotus Red 0 (Blush) – Lotus Solar Bronze (Bronzer) – Lotus
I only swapped out Eternal Light for Dim Light. Since Red 0 is one of my most intense Hourglass blushes, I wanted to have something in here to help tone the color down, other than Desert Flush. Plus, I didn’t want to alter Lotus too much. It’s one of the deepest color stories Hourglass has created, and I would like to keep it that way in my mind, especially since this isn’t a palette I reach for that often. I may as well not mess with the arrangement too much if there’s very little benefit in doing so.
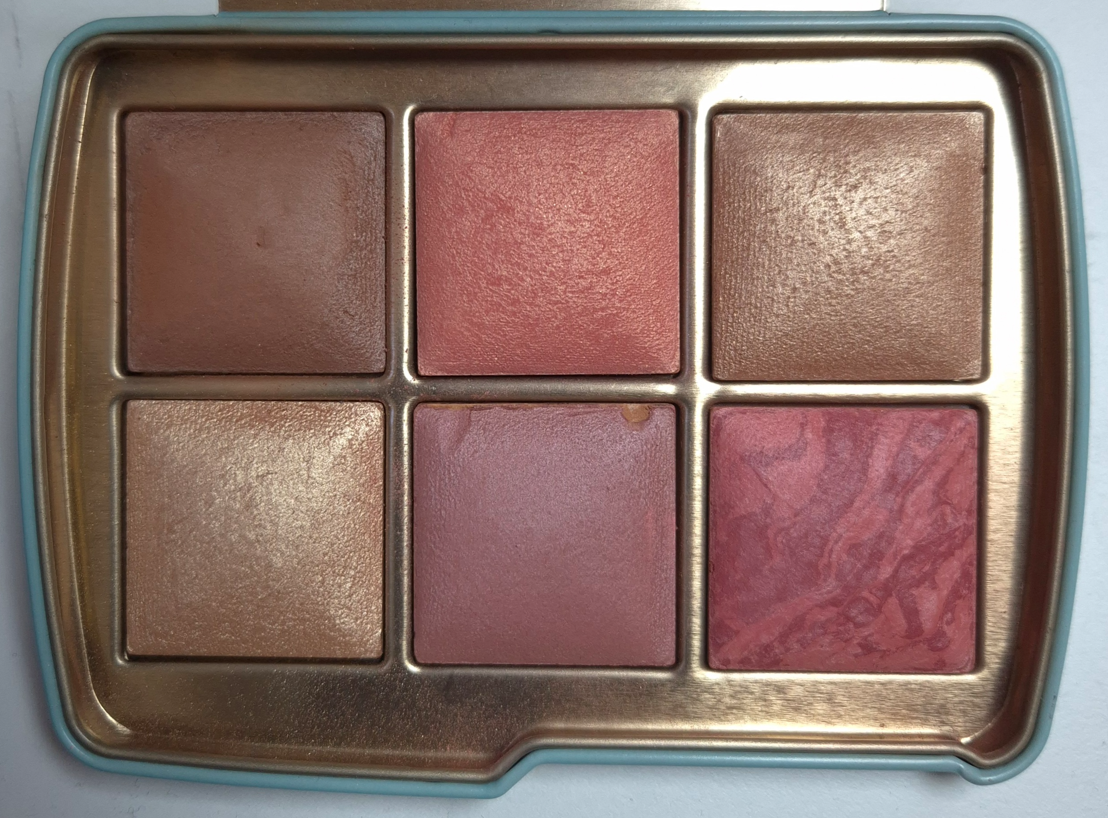
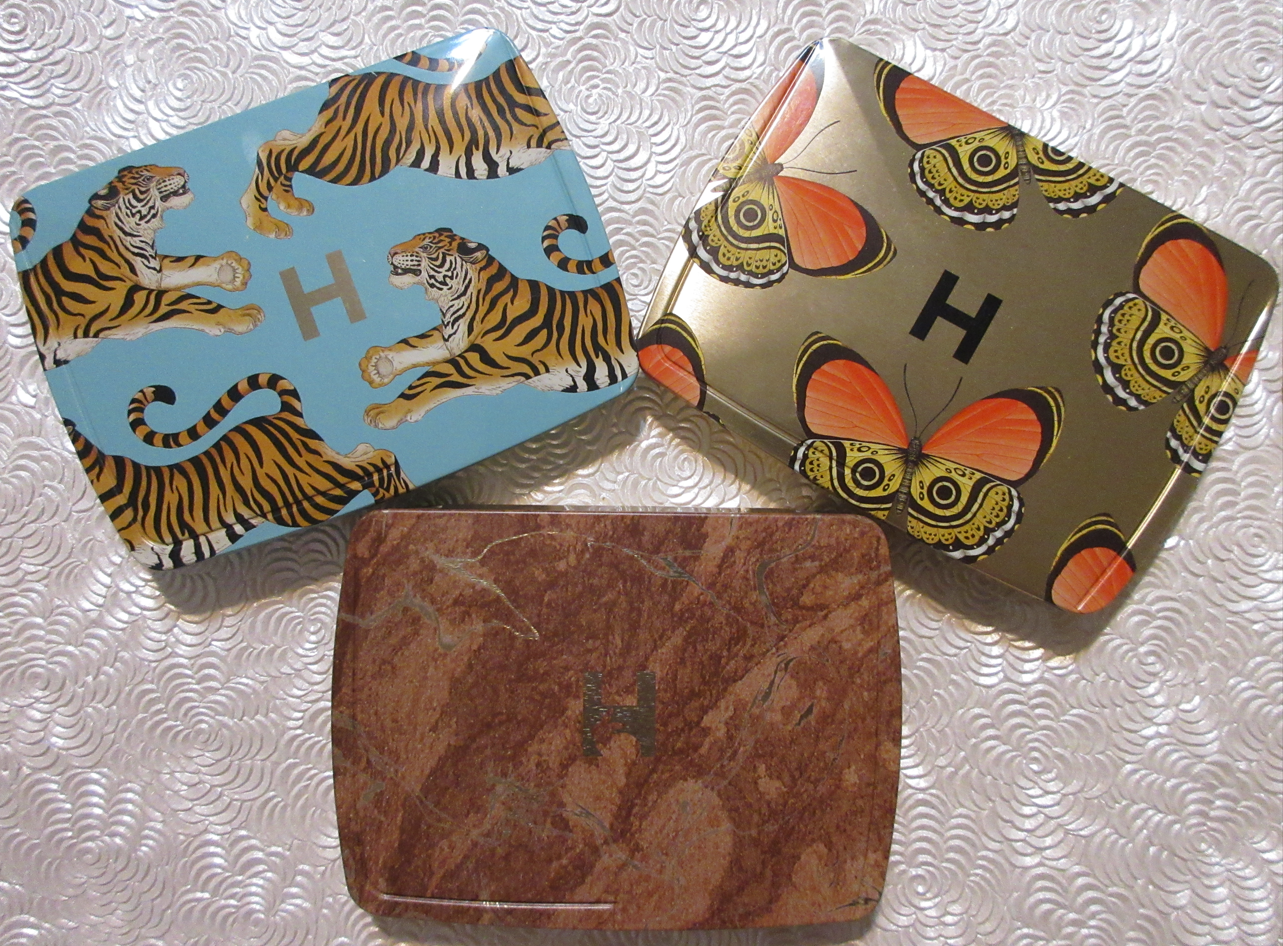
The New Owl Palette (formerly Leopard Color Story)
Original Palette vs Current Palette
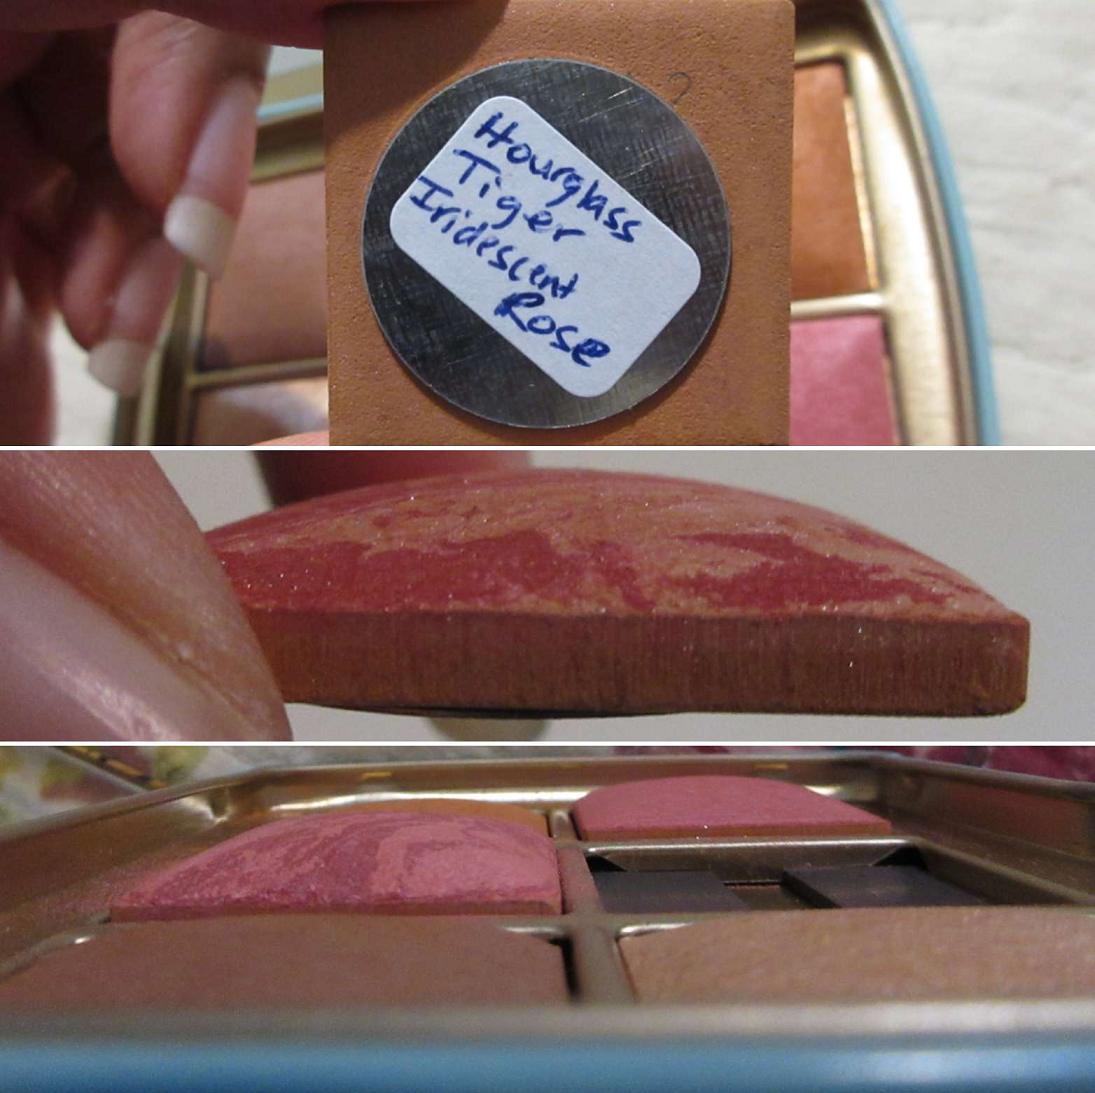
Dim Light (Finishing Powder) – Leopard, Swan, Many Others, Permanent Celestial Strobe Light (Highlighter) – Leopard Sun Beam (Blush) – Snake Burnished Glow (Blush) – Tiger Iridescent Rose (Blush) – Tiger, Leopard, Horse Lustrous Bronze Light – Leopard, Elephant
I can use most of the shades in here, but the chances are slim that I would actually want to pick them over my new versions of Snake, Fox, and Swan. Considering Owl never had its own color story, and I wanted this palette mainly for the packaging, I felt it was a good place to store less used products. I can store Owl away as if it’s just a collector piece.
Tiger (and technically Butterly) was the first Hourglass Palette that I made big changes to. It was the proof of concept that rearranging the powders could make me use them more. It may not look very used, but I took it traveling several times and this was my main face palette until the Snake Palette was released and I started to use that one more, specifically for the bronzer.
Although I removed Sunset Glow, which was my biggest reason for continuing to seek out this palette, I added my backup of Mood Flush which is one of my favorite shades. Plus, Infinite Strobe Light is technically a workable highlighter on me, and Sunset Flush can work as a highlighter too. So, I consider this a wild card palette. I don’t think I’ll have much of a reason to crack it open for a long time, but it still contains products I have enjoyed in the past and may feel the urge to use again in the future.
I should probably note that rather than putting magnetic strips on the tin directly, I could have just attached magnets to the bottom of the powder tiles and that would stick just fine to the metal bottom. The reason I didn’t do this is so that I could store the Hourglass powders in any empty magnetic palette I want (that’s deep enough of course). I figured that would give me more storage possibilities.
I hope you’ve found this post interesting! Which palette combination do you like the most? Have you tried depotting these powders too, or are you waiting for Hourglass to relaunch their custom quads and/or introduce custom palettes?
DISCLAIMER: I am describing the process I used, along with some do’s and don’ts for complications I ran into while depotting. However, I am not a professional at this. I will try to be thorough, but there may be steps I forgot to list. Attempting to do this may put you, others, and your property at risk. Use the utmost caution or just don’t attempt this at all without the proper tools and protective gear. I am not responsible for anyone getting harmed for following the steps that I’m sharing, which isn’t even intended as a guide. I’m just sharing my experience and perhaps those with some depotting experience may be inspired by it. I do not recommend this for beginners. It took me years of smaller depotting projects to build up enough confidence to do most of the things I mentioned in this post. Reader discretion is advised. Using common sense and critical thinking is also a must! For the love of all things holy, please be careful if you try these! lol.
Also, all links in this post are normal non-affiliate links.
De-potting isn’t just a way to condense and uniformly organize a makeup collection. It can also be used to rearrange palettes or swap products in and out of their original packaging and/or empty magnetic palette. Often times, when I watched depotting videos on YouTube, the person doing it would destroy the original palettes or compacts. However, I have products in packaging that I love and want to preserve, if only I could customize the makeup within it. So, it has been a goal of mine over the years to find a way to reuse palettes and compacts, especially if I’m not using the item because the makeup inside is too old or didn’t work for me, and replace it with a product I would reach for more often if it was in prettier packaging.
There are different levels of depotting that can be as easy as removing a pan from a palette that is already magnetic (such as most Natasha Denona eyeshadow palettes) or the most challenging ones that require both careful disassembling prior to then using heat and figuring out how much heat to apply to remove the pan without melting/burning the original packaging if the goal is to try and save it. Sometimes you might be surprised to learn there’s no pan at all and the product might be on plastic net/mesh instead. Sometimes the pan is made of aluminum instead of tin and will require a magnetic metal base to be added before it will be able to stick into a customizable palette. So, this sort of task can be super easy or complicated. I will give plenty of examples of the things I learned in this process with various projects if you’re interested in continuing to read on!
PROJECT 1: Making Palettes Magnetic and Interchangeable
Every year, Hourglass comes out with these holiday palettes and I owned four, yet none of them were perfect for me. If I want to use a blush, highlighter, and bronzer all in one, I would have to pull out multiple palettes which was extremely inconvenient. So, I finally had the guts to do what I’d seen Stefsedge and Grishan Roofdo in depotting their palettes. I took it another step further in trying to make my palettes interchangeable, so that I could always swap out an even more appealing product of this size in the future if I wanted.
The process on how to do this involves:
A Heat Source (and potentially metal plate or aluminum foil if the metal within the packaging is too far from the heat) plus heat-resistant gloves for extra protection.
Metal stickers that will fit the size of the product if that product is not already attracted to magnets.
Label stickers if there isn’t already a removeable label or one that would fit on the product.
Magnets in various forms like circles, squares, sheets, etc.
Pre-measuring to make sure the magnet isn’t too thin to not hold the product, but not too thick to where the magnet plus the product will prevent the lid from closing.
A cosmetic spatula and/or something thin like a bladed object to stick between the product and the packaging to be able to pry/lift it out.
Glue, just in case.
Paper towel or something to lay the powders on that may potentially get messy.
Liquid agent that helps remove glue from surfaces like Parian Spirits or Alcohol.
Tip: If the item is in a pan already, using a magnet to touch the rim or around it and see if it has a pull will indicate whether or not the metal will require a magnetic metal sticker.
My heat source is the Z-potter I bought quite a few years ago on Black Friday. Some people use an induction hot plate/countertop burner, hair dryer, or flat iron to heat up the bottom. I’ve only attempted to depot my aluminum Hourglass Ambient Lighting palettes, not the plastic ones, so I have no idea if the plastic ones would melt in the process, but here is a video for that type. And here’s one for the exact palettes I’ve partly depotted.
Anyway, the first thing I prepped in advance was writing the brand and names of the items on label stickers and attached them to the metal stickers (not the side that you peel away). Then, on my Z-potter, I placed the portion of the products I wanted to heat up within the indicated heat circle. I tried to avoid heating all pans at once because I didn’t want to loosen the glue too much of the products I had no intention of removing. I used setting number 3 for a minute or more and then used my box cutter to lift the powders out one at a time face first into a paper towel and then peeled off the sticker on the metal pan to attach onto the back of the clay tile. Because it already had soft warm glue residue, I didn’t think it was necessary to add my own extra glue to attach the metal sticker onto the tile, but that might be required of some projects because the adhesive bond is sometimes weaker than the magnetic pull. I’ve had other products where I lifted the product and the metal tile detached from the product and remained clinging to the magnet. So, one may or may not want to add the tiniest bit of extra glue (making sure that when pressed down the glue doesn’t seep out onto the edges of the tile. Also, the fact that these baked powders are on tiles helps to make them less fragile while prying them out. Baked/domed products on plastic drives me nuts because they’re so easy to fall out of packaging without even intending to depot them.
I repeated the process of removing the product from the palette, adding a metal sticker to the bottom, and so on until all powders I wanted removed were off to the side. If there was any residue of glue within the empty wells (none that I could recall) it would only require a little alcohol or Parian spirits sprayed on a paper towel to wipe it down/clean it up. Don’t spray the Parian spirits directly into the empty well because the sprayer might get droplets onto the other powders still within the palette. Also, wearing gloves might be a good idea since it leaves a strong orange-alcohol smell that one might not want to get on the hands or fingers.
Then, I cut my magnetic strips into the appropriately sized pieces to fit the empty well and stuck them to the bottom. This might be another time when one might consider using extra glue or not, but my strip magnets tend to adhere very strongly, so I don’t find extra glue necessary. Also, my strips weren’t thin enough to cover the entire well, but it’s not necessary either. Two streaks were enough. And they don’t need to look pretty since no one is going to see the magnets once the powders are placed back on top. So, that’s the process! I didn’t have any broken products; I just nicked a few with my nails. When looking at them from the side, it’s visible that the powders with magnets holding them down underneath are raised higher than the ones that are glued down, but it doesn’t look that bad to me. I love how it turned out!
I took the white marbled palette on the bottom right completely out of the equation since none of those worked for me (any indication of the powders being used was when I mixed them with other products in DIY makeup attempts). As for the Butterfly palette on the top right, I could only use the blushes, so I took those out and replaced those empty spots with the bronzer from the Universe Unlocked palette (bottom left) and the too-ashy strobe powder from the Tiger palette (top left). This turned my Butterfly palette into a palette of completely unusable products for my skin tone. Rather than trying to make that one magnetic, I used a little Glue-All (so it wouldn’t be impossible to be removed again) to secure those powders back in the pan and I sold that new custom version of Butterfly.
This left me with the Tiger Palette and Universe Unlocked. I wanted those Butterfly blushes in the Tiger palette, so I put one in the newly empty spot that was formerly housing the ashy strobe powder. Then, I took the deep copper highlighter out and put that into the empty space in Universe Unlocked where the too-light bronzer used to be. That gave me room to put in the last Butterfly blush. So, my new Tiger palette has the only powder dark enough to be used as a bronzer, my favorite of Hourglass’ highlighters, and arguably my favorite four blushes out of the Hourglass ones in this size. I also like the coral blush from Universe Unlocked, but I preferred to keep that one in its original palette. Currently, the Tiger palette is the one I keep on my vanity since it’s full of favorites.
PROJECT 2: Prioritizing the Packaging Over the Product
The Hourglass project was simple, whereas this one was my toughest yet!
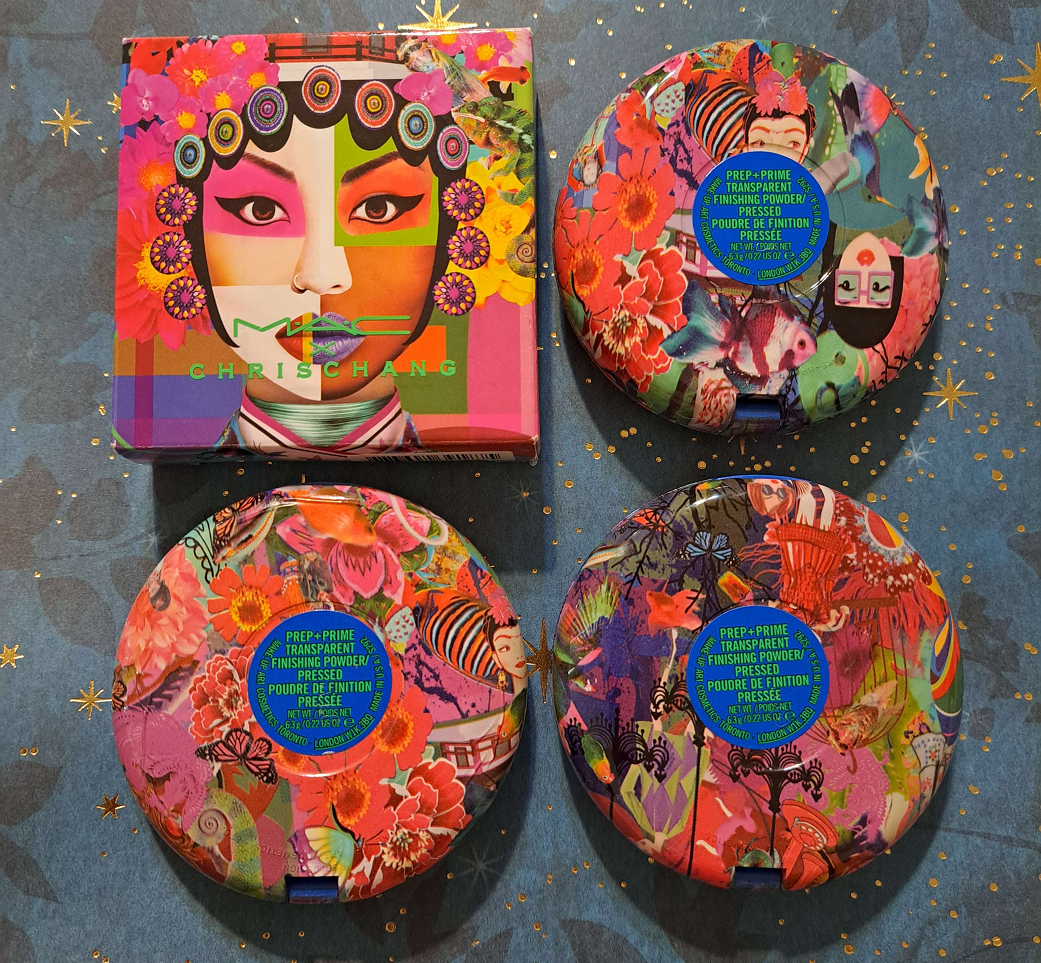
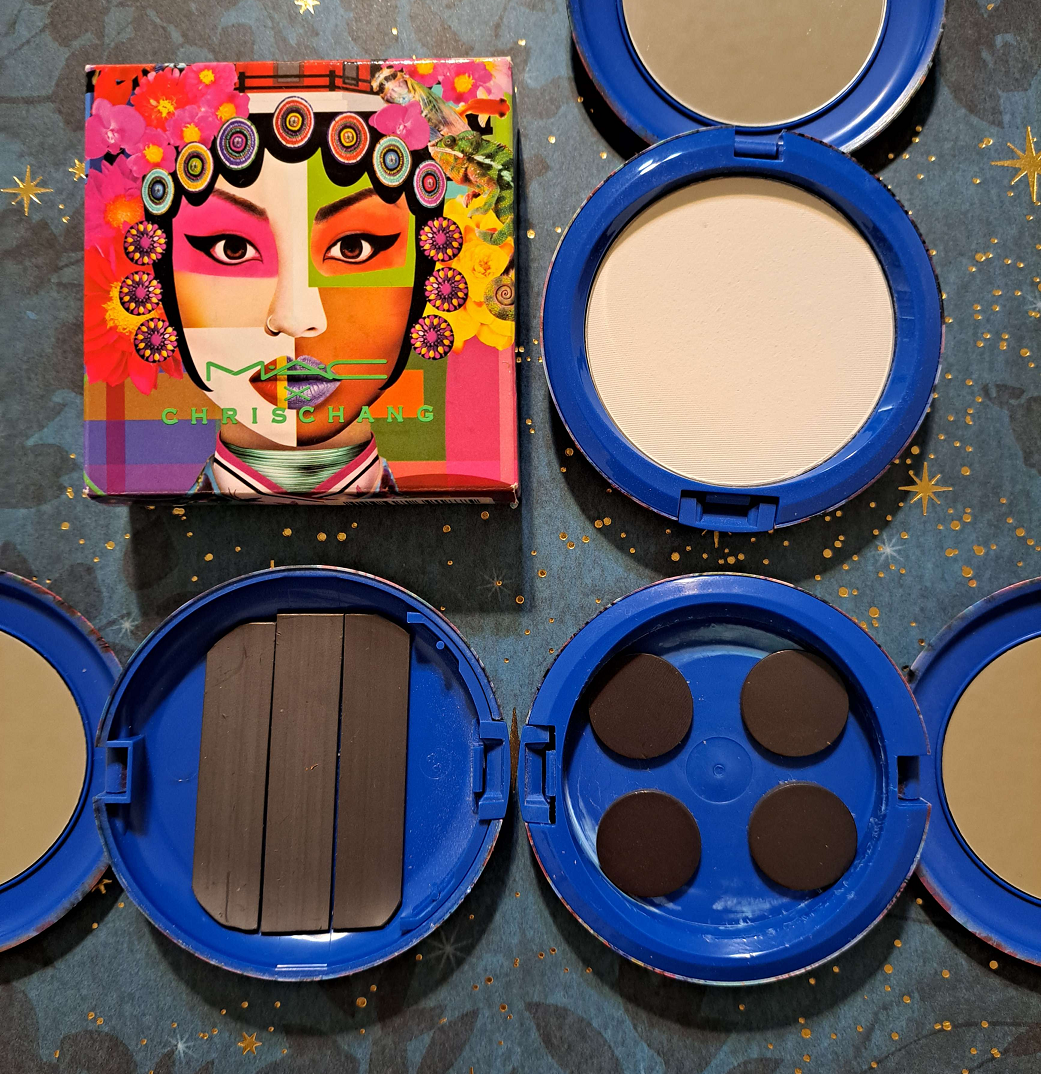
The MAC x Chris Chang compacts are one of the most treasured packaging for makeup that I have because of how different they all looked to each other and nearly all equally beautiful. The original one that I purchased is kept on my collector shelf in the box and with the original powder inside that I only used a few times because I didn’t think it did anything for me. The two others I bought pre-owned for the purpose of making the compact magnetic, so it didn’t matter what state the original product was in nor the fact that they were used.
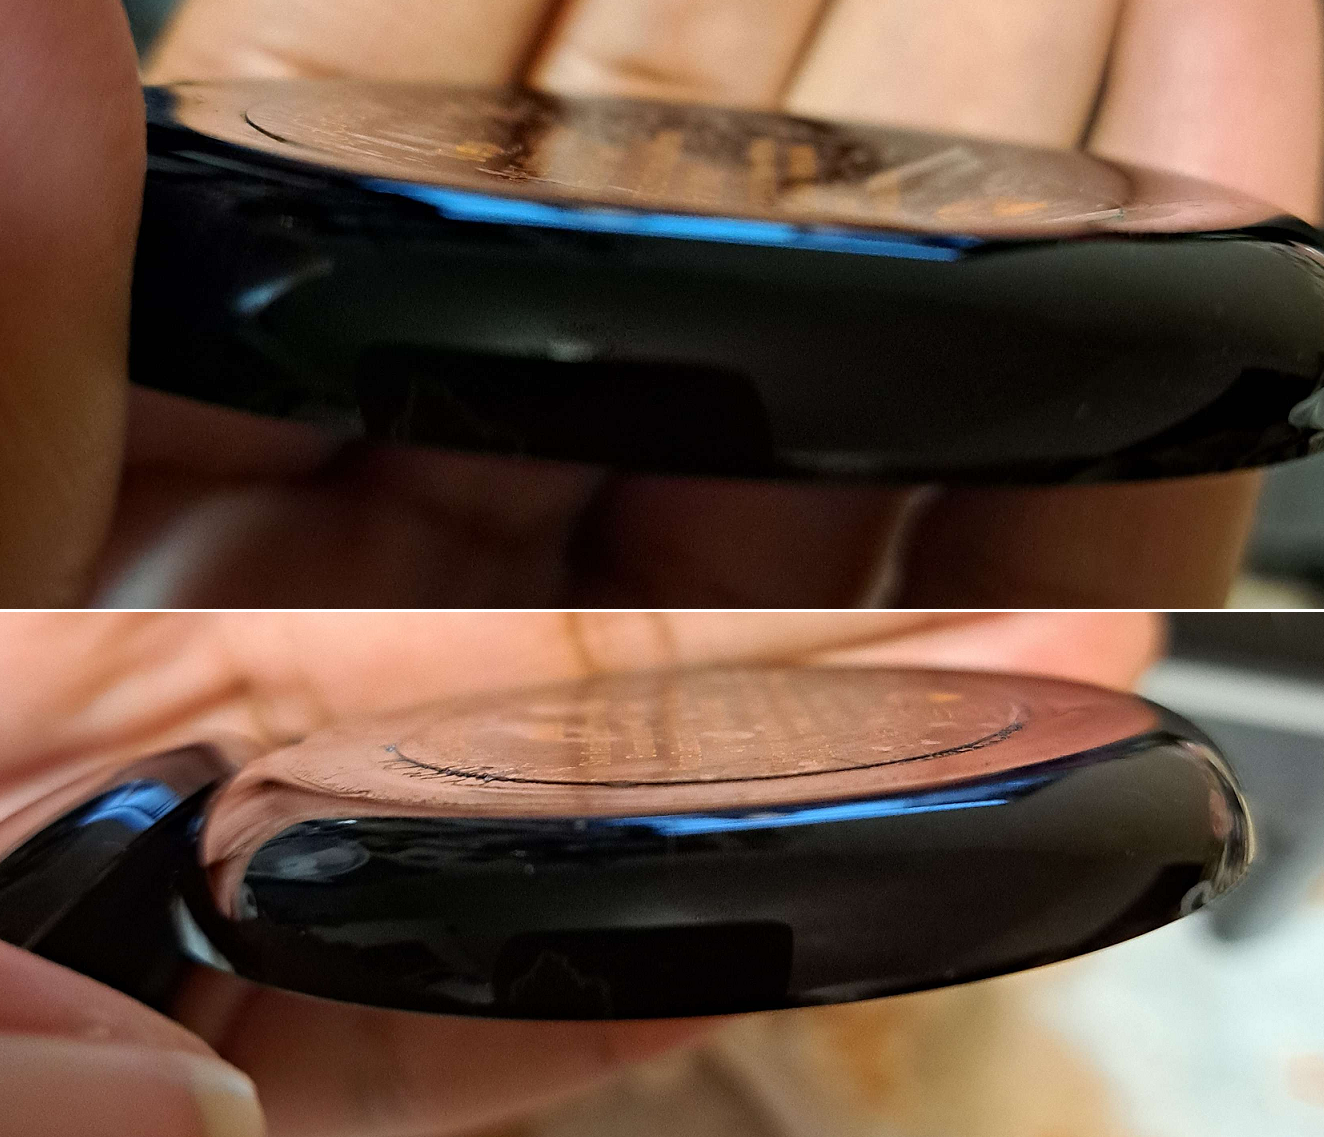
For my first attempt, I didn’t remember the pans are housed in a removable piece which would have made things a lot easier. So, I put the compact on the Z-Potter, and unfortunately, the pattern started to warp, but I noticed it in time before it got too bad.
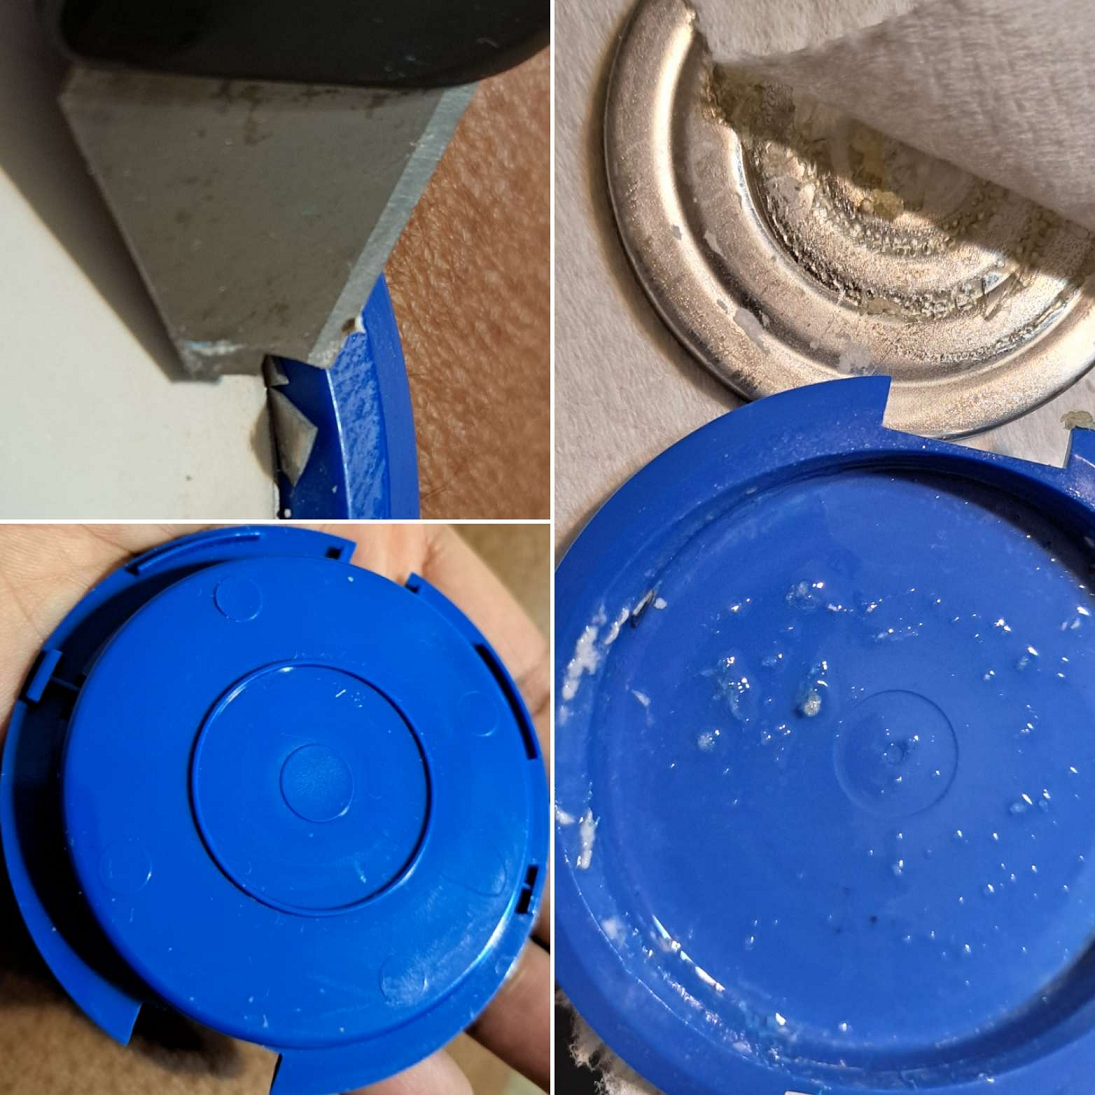
Then, I tried just not using heat and prying the pan out with my box cutter. I broke off the tip and still couldn’t get it out. The glue in these compacts is extra heavy duty! In that attempt, the powder started to break apart, so if I had wanted to pry out the pan without breaking the powder, I would have failed at that. Once I popped out the holder piece, I realized it had three parts to it: the main compact, the holder, and the lid opener. I put the holder piece with the pan on the Z-potter and used setting 3, which was too hot for it. It started melting the bottom of that holder piece and it started to bubble and lift upward. In the heating process, I also warped the lid opener and main compact enough that it shuts, but with a very thin gap that won’t be as big a deal for a dry powder, but I definitely wouldn’t want to put a cream or creamy powder in it. The holder also didn’t snap back flush into the main component either.
Where the tiny gap is visible near the hinge is where I start trying to pry the holder out of the compact.
I’ve already had a product (will be discussed in the Pat Mcgrath section) that warped upward, but I managed to use heat and a blunt object to press it back down to flatten it. However, this did not work with the MAC plastic. It went down but still not perfectly even. I couldn’t get it to flatten without melting/burning the underside. In the end, to make this compact usable, I had to just toss the holder into the recycling (the powder pan was also cleaned out and recycled). I then attached magnets to the bottom of the actual compact. This might make whatever product I put inside more susceptible to breaking if I accidentally drop the compact, but at least it’s still functional now despite my mistake.
In theory, I could have left the botched compact as is without adding magnets and just removed the holder out of a different MAC panned product with basic packaging and put it in this one instead. However, that would only allow me to use this for MAC products specifically, instead of any brand with a pan size that would fit.
For my second attempt on my other compact, I tried a combination of using the box cutter to pry a big enough wedge between the space to allow me to pour Parian spirits to seep between the holder and the pan so it could start loosening the glue underneath. I didn’t mind spraying directly onto it because I wasn’t trying to keep the powder in that one either. Unfortunately, I couldn’t get a big enough wedge of space for the Parian Spirits to have done very much and I broke the blade even more to the point of needing to throw it out for safety reasons.
So, I very carefully used my nails and cosmetic spatula to lift a space and go around the edges to carefully pop out the holder from the main compact. I set the compact aside, put the holder in the middle of the Z-potter and used setting 2. I alternated between letting it get warm at the bottom, then flipping it upside down to warm from that direction as my way of trying not to let the same spot get too hot for too long while using my other box cutter to keep testing when the glue was loose enough to be pried up.
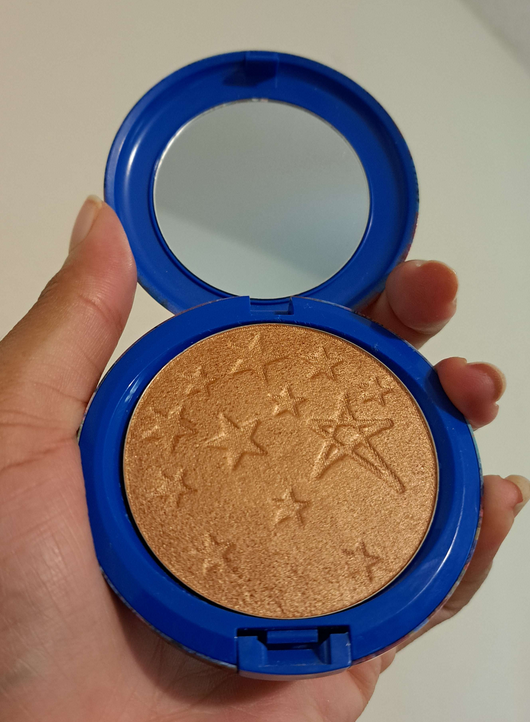
Once the pan was free, the bottom of the plastic was still covered in glue, so I unscrewed the spray top of the Parian spirits bottle and poured a little into the holder and let it marinade in there for a while before wiping it clean and repeating the process when needed. I managed to successfully get that pan out without burning/melting the holder this time. I cleaned out the aluminum pan of glue and powder and put the pan with the recycling. This time, I was able to keep the holder, so I put a few magnets on the bottom of it before snapping the holder back into the main compact.
Now, I have one of my favorite highlighters, the Charlotte Tilbury Hollywood Glow Glide Face Architect Highlighter in Sunset Glow, in this gorgeous compact! I’m so happy to finally have a way to get use out of the MAC compacts and see them within my collection instead of being set aside! There are so many times I’ve spent money purely on packaging and I was tempted to get this year’s Lunar New Year pressed powder compact from Charlotte Tilbury just to put this highlighter in it, but I’m glad I didn’t waste my money getting something I don’t need (I own that powder in smaller packaging) by repurposing what I already have.
PROJECT 3: Adding Extras to Packaging.
You know those eyeshadow and blush compacts that come with brushes in them? I never use the brushes and end up tossing them, so then I have giant empty spaces that could have either made the compact smaller without it or could have held extra shadows. In the photo example below, I didn’t add a magnet to it, but I showed examples of various eyeshadows (Natasha Denona Midi Size, Viseart medium and small sizes, and Melt Cosmetics) that could fit in that space if I added a magnet to the bottom. Of course, the magnet needs to be strong but thin in order to hold the shadow securely on it without lifting the pan so high that the lid won’t close. Turning the empty space into a magnetic spot will give the ability to take extra shadows for traveling.
Also, in the event that an eyeshadow falls out if it was on a mesh, gluing it to the bottom is an option, but so is re-pressing the shadow into an empty eyeshadow pan, adding a magnet to the empty well, and placing the pan back in there. It, once again, leaves room for future customization. One just has to do those measurements to make sure it’s not too big.
PROJECTS 4 and 5: Condensing Makeup Out of Bulky Packaging and Making a Single Portable Item for Travel
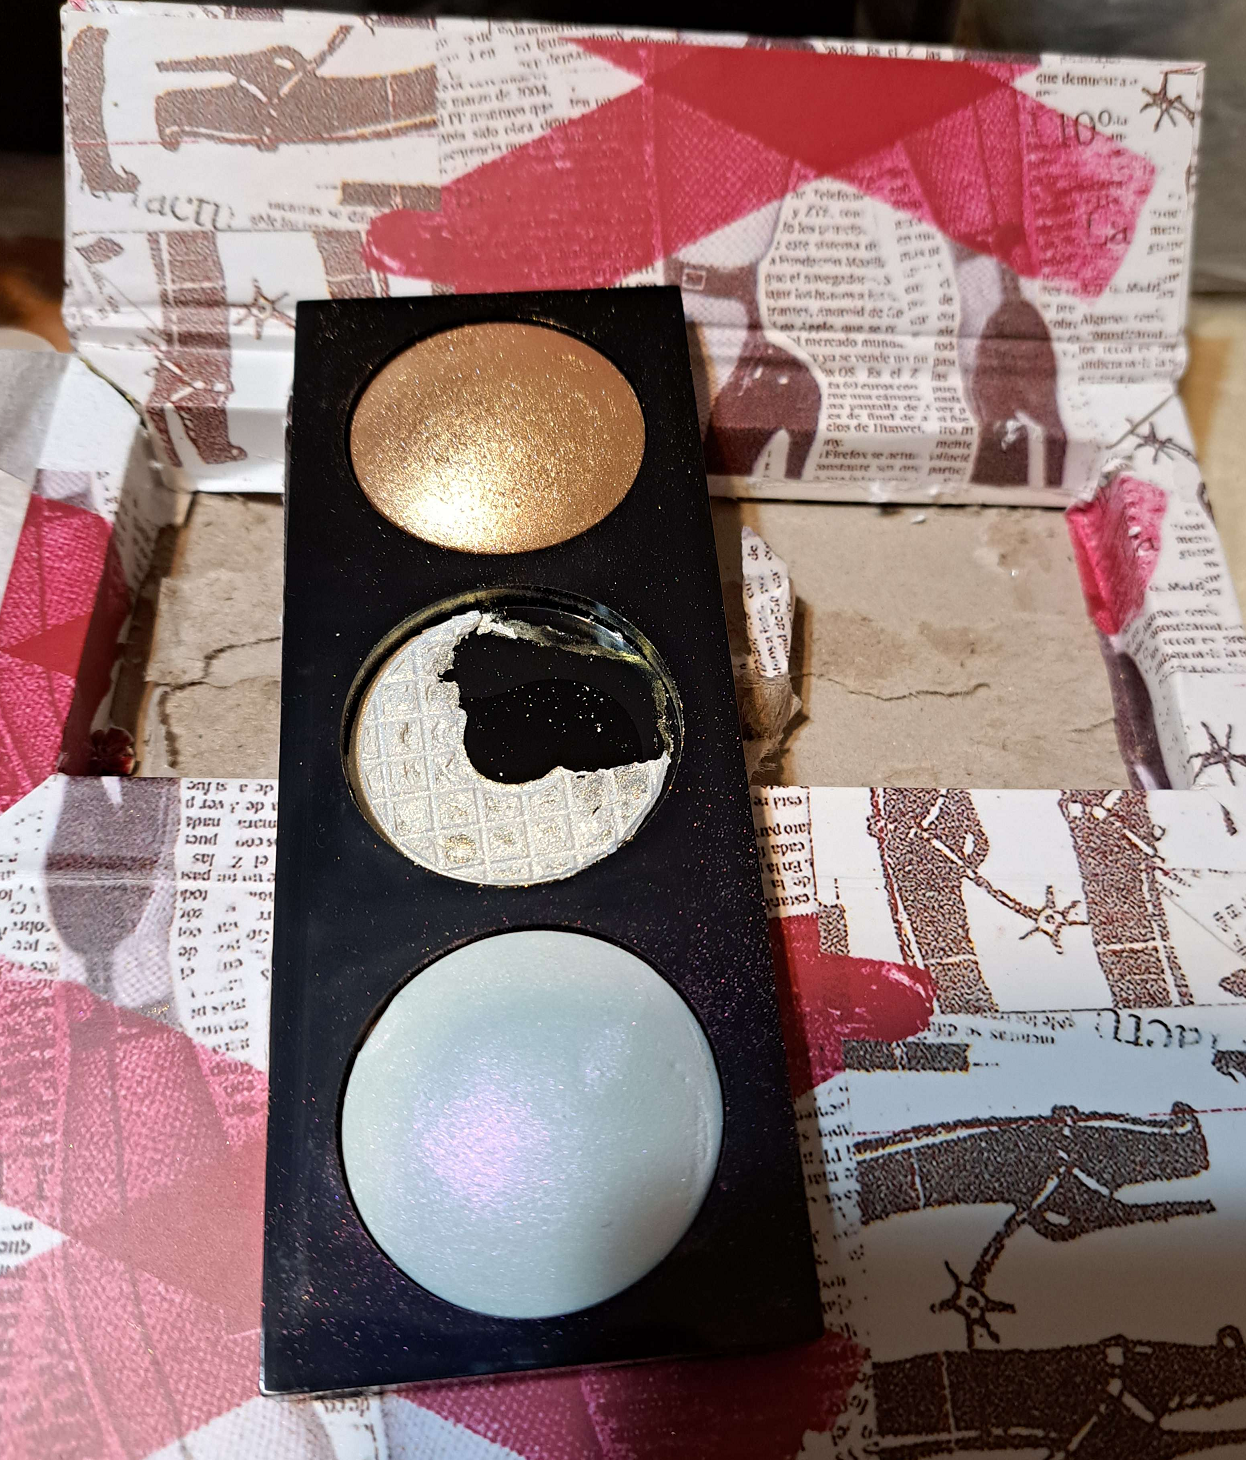
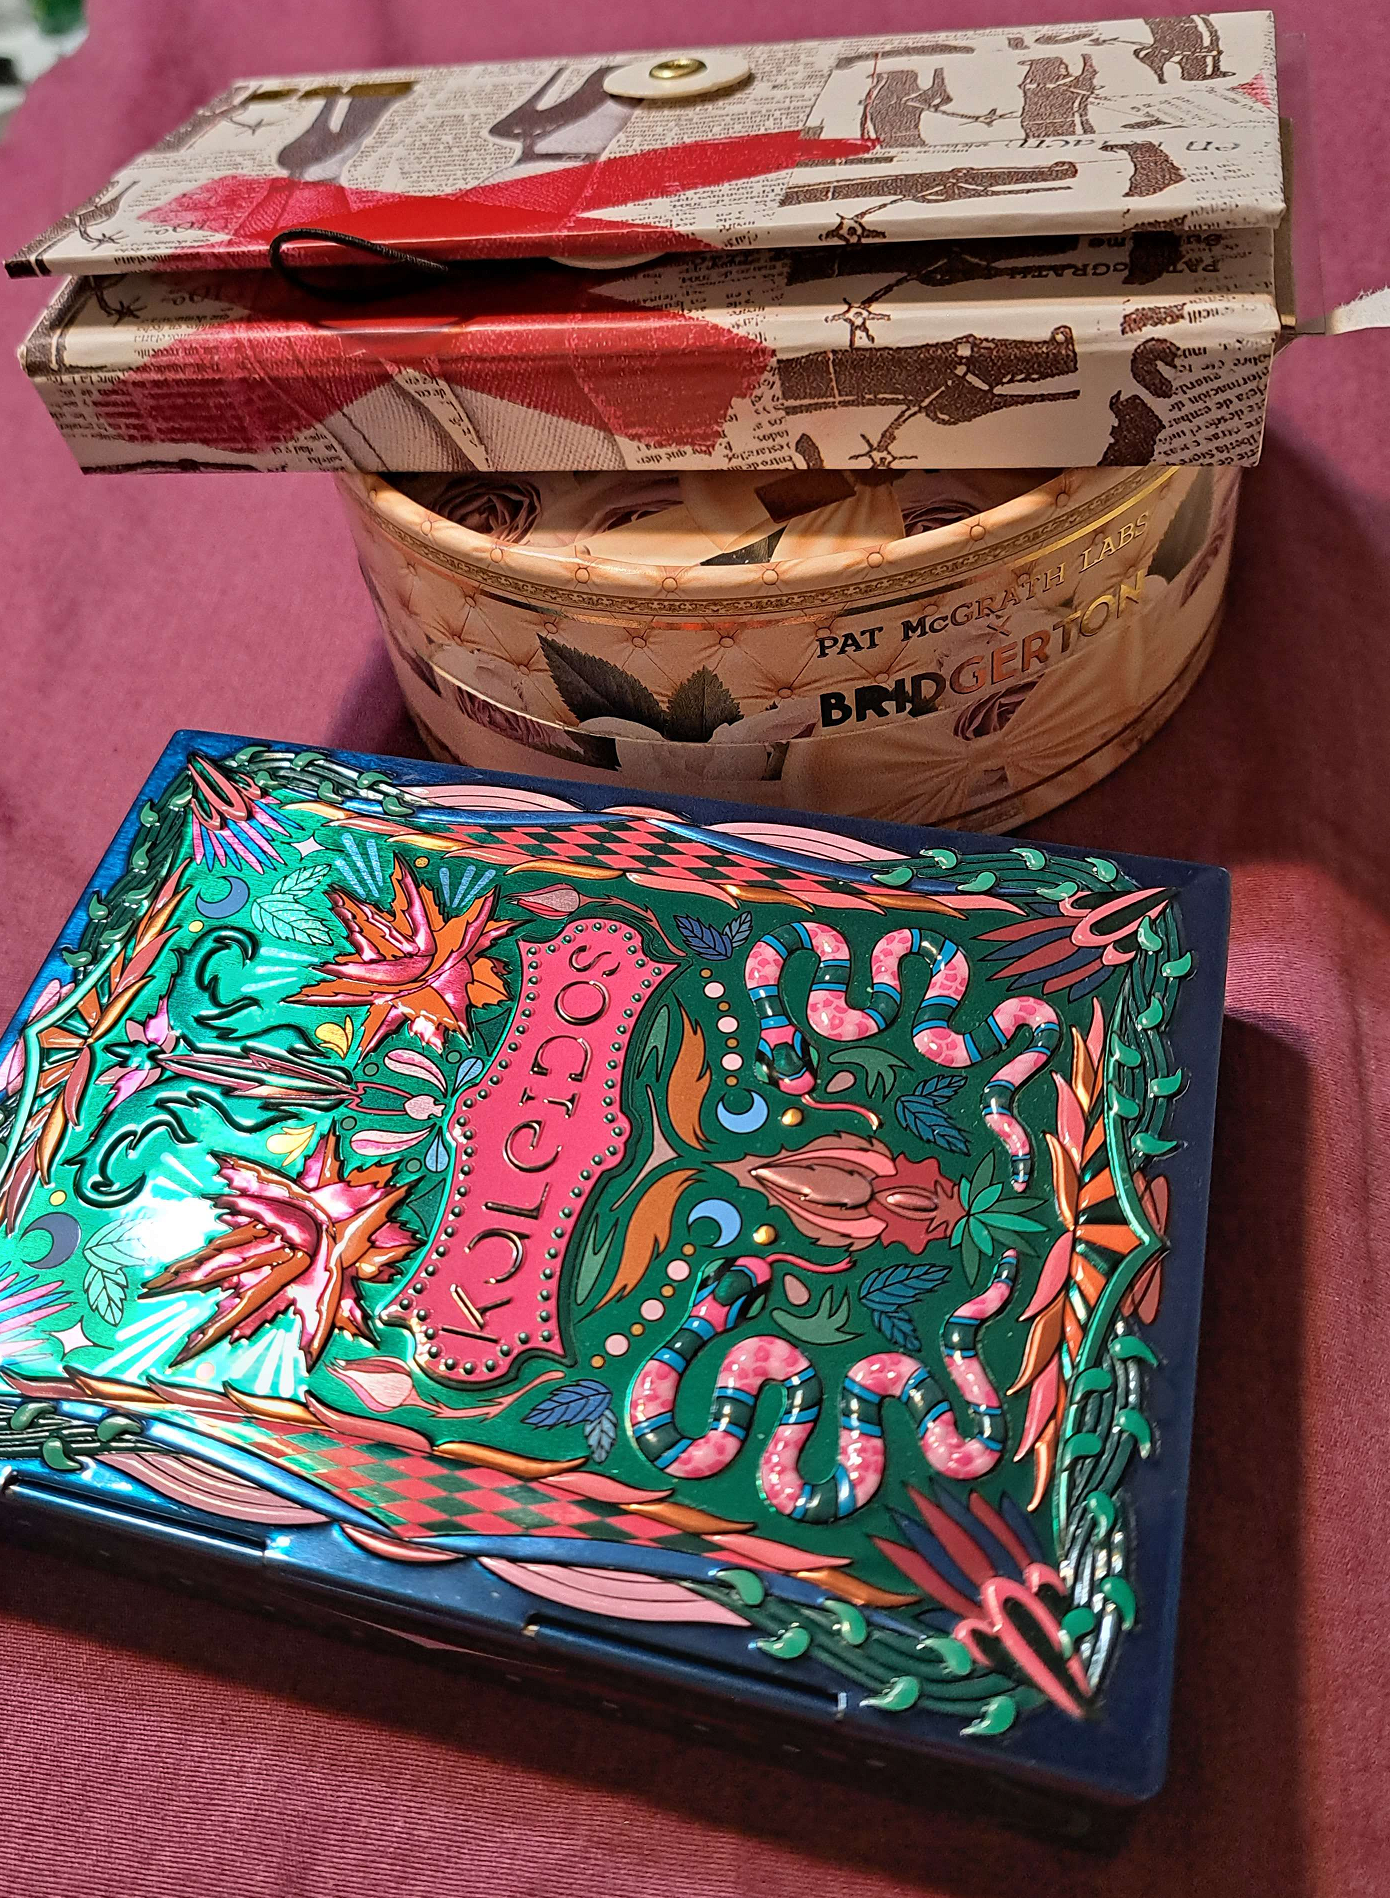
The Pat Mcgrath Blushing Delights packaging was excessive compared to the size of the actual makeup within it, but because it fit the Bridgerton theme so well and the print was cute, I kept it intact despite how much I craved depotting it. However, once I noticed the edges of the paper lifting in multiple places on the cardboard, I figured it was time to get rid of it. I was thrilled to see the blushes were on tiles as well, since that made it even easier to slide a knife underneath and remove them from the packaging without even needing heat!
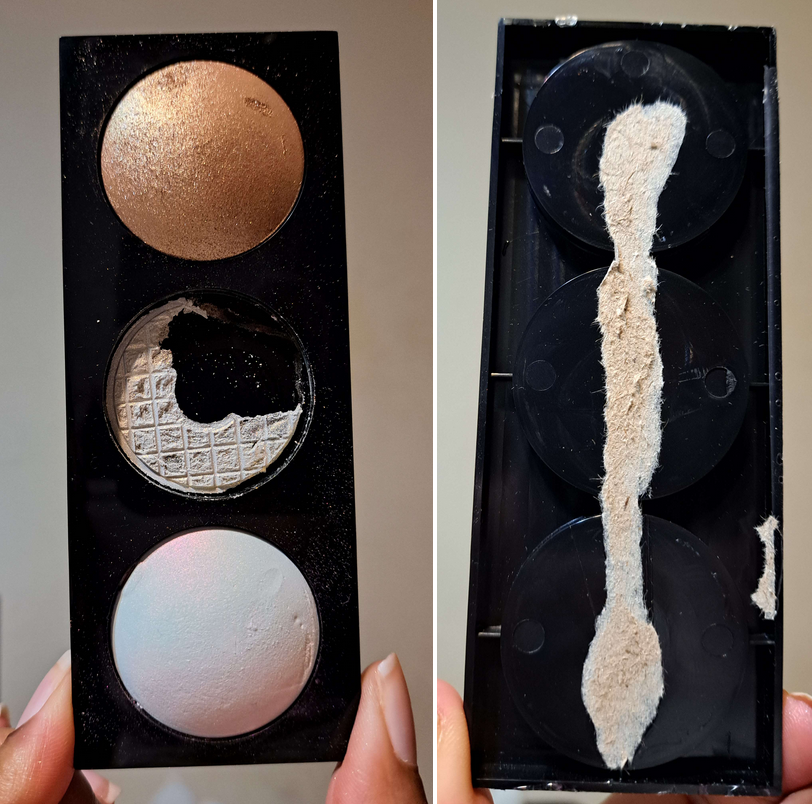
All I did was fill out sticker labels, slap them on the metal stickers, and then place those on the tiles. Before doing this, however, I do need to warn that baked blushes and other domed products will be raised much higher, which limits where they can be stored. These don’t fit in a traditional Z-palette or any of my cardboard empty magnetic palettes. My MAC double-sided palette is deep enough (that I turned one side into a magnetic palette by adding a thick magnet sheet), but I keep that stored with my other unused palettes because it’s so heavy and thick that it’s only worth using if it’s entirely full and not just to hold a few items. Where I stored the blushes will come later because I knew I wanted to keep my favorite shade, Aphrodisia in its own compact. I’m one of the few people that doesn’t like like the Pat Mcgrath Under Eye Setting Powder, so I didn’t mind getting rid of the powder and keeping the compact to house the blush. I figured it would fit considering that powder is also a baked product and chances are high that any domed type of packaging will be suitable for turning magnetic and housing other domed products. I somehow expected it to be on a mesh, so I wasted my time trying to cut off most of the powder, then prying the sides, before realizing this would require heat. Since there was no metal to warm up, I put it the Z-potter on setting 2 or 3 and laid the compact on top of the metal plate that came with the Z-potter. Then, I pried out the tile with my cosmetic spatula, but the bottom had bubbled upward.
Unlike my MAC compact, I was easily able to heat the bottom again on the same setting and use the handle of my hand mirror (with a flat rectangular shape) to press the raised parts back down while the plastic was warm and malleable. I continued moving the blunt object around the pan to make sure the rest of it didn’t start rising back up too. When I was satisfied with the whole thing being nice and flat, I transferred it to the spot without heat, turned off the machine, and then continued to press down on the compact to ensure it remained flat while cooling off.
I used the handle of my mirror because it was within reach, but I could have used anything hard and flat like the handle of my Tarte Buffer Brush, a bottle, etc. Whatever item is used will likely get glue on it though, so to avoid that, one could try putting something between the plastic and the blunt object, such as a paper towel. Or, clean the glue off the surface before trying to warm up the item to flatten the plastic back down. The heat setting should not be so hot that it melts whatever blunt item is used, like a thick bottle, but just keep a watchful eye out for that just in case.
Then, all I had to do was place magnets in the PML compact and voila! A single portable baked product case! As for all the rest of the blushes, I took one of my spare Kaleidos tins and removed the plastic lipstick holder piece, and placed magnets on the bottom of that. I didn’t place the magnets uniformly in a line in case I wanted to put larger domed products in there and didn’t want to run into the issue of only blushes of a certain size being able to fit there because they couldn’t be placed staggered within the container.
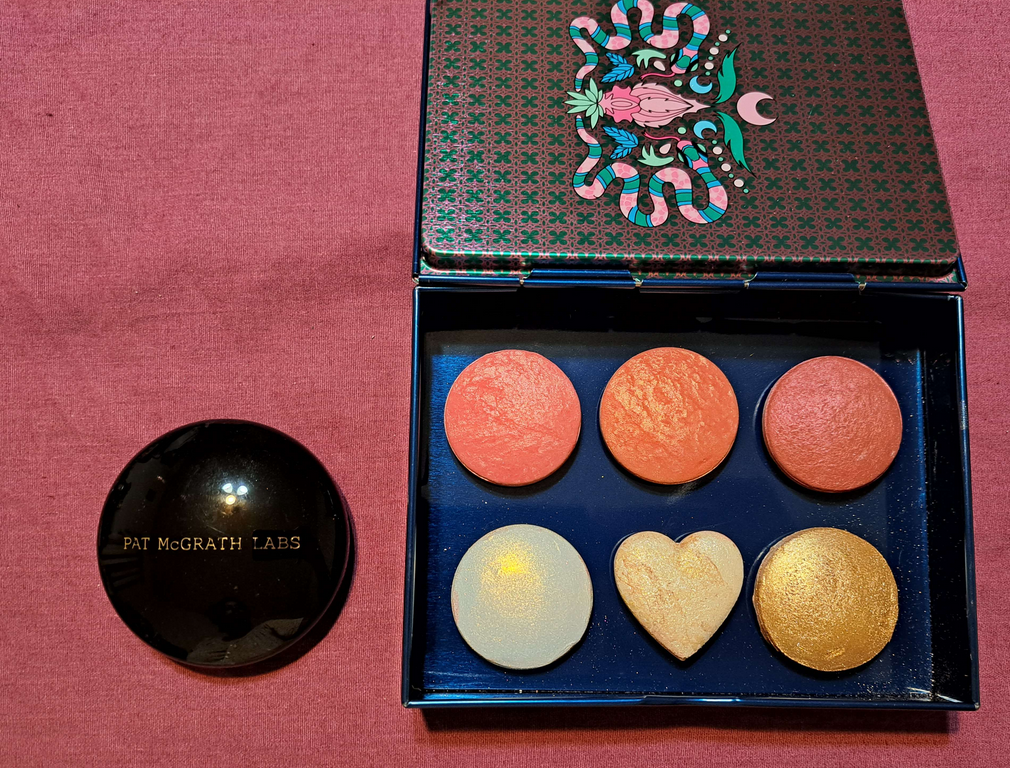
These weren’t the only Pat Mcgrath products I depotted that day. I had the Pat Mcgrath Highlighting Trio with the center shade having fallen out ages ago that I just kept loose in the packaging. I almost never reached for these because of the pretty but cumbersome flap style packaging. So, I started off with cutting the space around the black plastic holder within the cardboard packaging and then lifting out that plastic piece. Since the Kaleidos tin is attracted to magnets, I could have actually stuck magnets on the bottoms of the plastic holder and placed it at the bottom of the container, but considering the fragile nature of the highlighters, I decided not to. Instead, I heated up the plastic holder on the metal plate on setting 2 very briefly before using my box cutter to pop out the mesh. I don’t know if heating it at all was necessary, but I did it anyway.
Once they were all out, I scraped the excess product off the underside of the highlighters and glued the metal stickers onto them. I saved them all initially, but then the pink iridescent highlighter came off the mesh from the other side, which would have required that I glue that side directly touching the bottom of the highlighter onto the plastic. Considering how old these highlighter trio powders were, I figured I should just let the pink one go. Honestly, these other two are too sparkly for my taste now, but I’m not ready to let them go until they break!
Between the two pieces of packaging, these are now taking up significantly less space!
PROJECT 6: Transplating/Transferring Makeup Permanently from Faulty Packaging to Better Packaging
I know my Becca Shimmering Skin Perfectors are ancient, but I just can’t let them go! At least, not my favorites. The limited edition one called Champagne Gold was an item I was waiting patiently for to go on sale, but it sold out everywhere before that could happen! I had to deal with the regrets of missing out for over a year and a half before I happened to see them being sold on the Nordstrom Rack (technically Hautelook) website. The joy I felt over finally getting my hands on it, even though I didn’t use it a ton, is something I’m very nostalgic about. However, that original packaging had that rubberized gummy texture that is super sticky and gross feeling to touch. I had a pretty gold plastic compact from Becca with the shade Gold Lava inside that I never used because it was too glittery, so I decided to just get rid of the Gold Lava pan and put Champagne Gold in there instead.
The first thing I did was remove the Gold Lava sticker and put the original Champagne Gold sticker in that spot instead. Then, I put the old gummy packaging onto a piece of foil and put that onto my Z-potter. This wasn’t because it needed the foil specifically. I just didn’t want to get any of the sticky gummy part onto the surface of my depotting device. The compacts have holes on the bottoms, but because they’re still glued in, I didn’t want to risk breaking the powder, so I wanted a little heat to make it a gentler transition process.
Then I set the older compact with the aluminum foil to the side and put my gold compact in the circle to heat up. I then pulled the Gold Lava pan out before immediately put the Champagne Gold pan in the compact and pressed down so that the glue remaining on the bottom would stick to it. After it cooled off, I held the whole thing upside down (with my palm underneath just in case) to see if it stuck properly and it did! I didn’t try to make it magnetic because there’s no room for even the thinnest magnetic sheet. I have a few other original brown packaged highlighters, but none of those are sticky yet, so I’m keeping them in those for now, but may repeat this same process with the Own Your Light shade I have mixed feelings about and put Bronzed Amber in that ombre packaging instead.
PROJECT 7: Condensing Multiple Samples into One Container
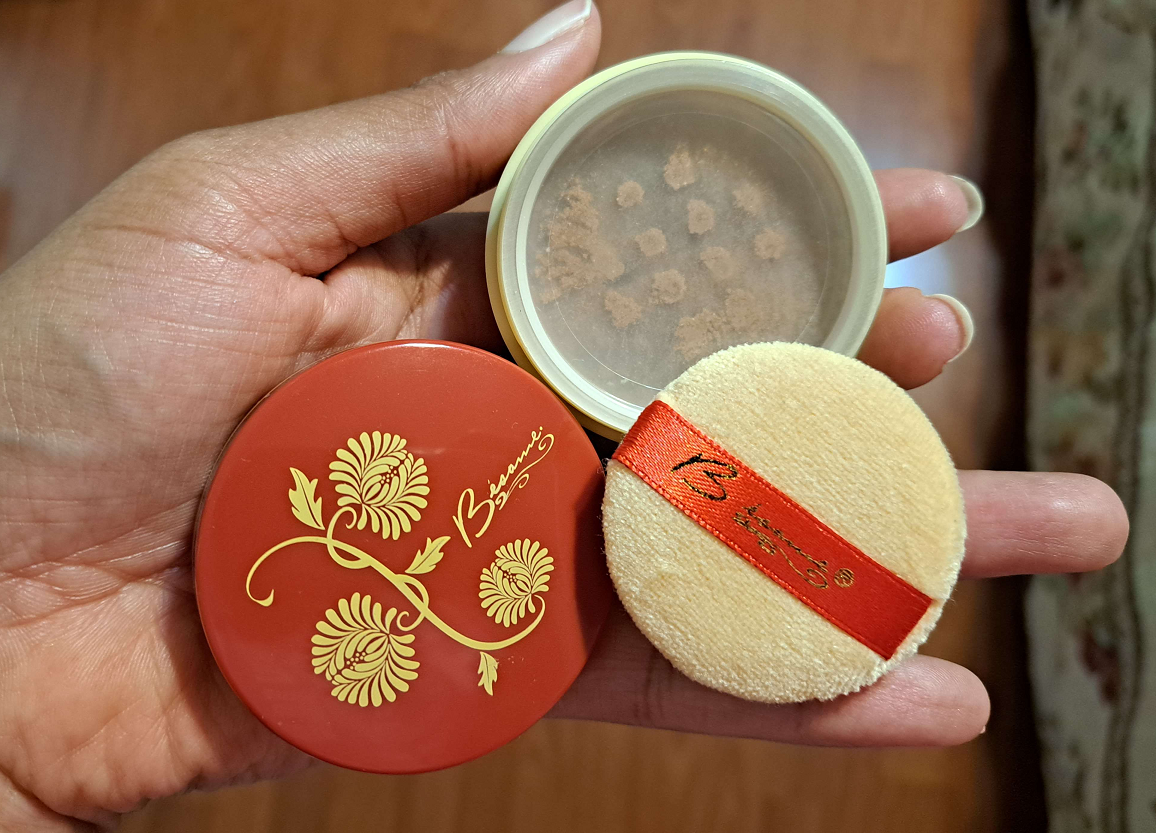
If I have samples of things that would take multiple uses to try out, I make it a habit to find a tiny container to put the product in and limit air exposure. In this first example, I have two different shades of One/Size powders, but I didn’t notice a difference in the color on my face, so I wanted to put both of them into a larger container because it was a pain trying to evenly coat my powder brushes on such a small surface. I had a Besame loose powder container I had been saving, so it was the perfect way to make use of that as well.
I began with removing and cleaning the sifter lid, dumping out the remnants of the old powder, washing it, drying it, and setting it aside. I then removed the sifters from the two different shades of One/Size deluxe size samples, putting them in the clean Besame jar, and then mixed the two shades together before putting the Besame sifter lid back on top. The original mini powder puff that came with the Besame powder was never used, so even that was able to be saved!
Another example is that I tried each individual shade of the Dior lip balm and the colors weren’t significantly different enough on my lips to prevent me from scooping them all into a single jar. I have leftover empty lip balm jars from my past DIY projects, but those were too large for such a little amount of product. It actually came in handy that I now had two tiny jar containers in the form of those newly emptied One/Size powder sample jars. I just removed the sifter on one of them and cleaned out the jar before adding the balms into it. If I had any empty Laneige lip sleeping mask sample jars that are regularly available as a free gift with purchase from Sephora, I would have used that instead.
The photo of it below, admittedly does not look pretty, but I could have used a spatula to smooth them all around or even applied a little heat to melt the balm down enough for it to flatten out evenly into one smooth surface before it cools back off. However, I didn’t bother with that because there wasn’t much left. If I had 2-3 additional balm sample packs, I would have put more effort in making it pretty since it would be in my possession for longer.
I believe I mentioned I was going to declutter the Coloured Raine cream blushes in my recent review of the brand, but I kept the two smaller ones for reusing purposes. I had two sample packs of Rose Inc blushes and I wanted to save them so I could customize my blush looks. Even though Foxglove is my favorite color and the one I have in the full size, knowing I had three additional colors in samples is what kept me from purchasing more of them considering how infrequently I reach for them. So, I originally put them in a lipstick jar, but I had the idea to dump out the Coloured Raine blush, sterilize the pan, and use a spatula to spread out the three shades in a neat gradient of Anemone, Azalea, and Dahlia. The amount shown below is the end result of two trios of sample packs.
Since I didn’t want these to dry out, I thought it was a safe bet putting cream blushes in a container that was intended for cream.
BONUS PROJECT, PROJECT 8: Hiding Logos on Packaging/Making Packaging Better
There was a controversy with Ofra several years ago and I haven’t felt comfortable featuring them on my blog or showing their products ever since. However, the compacts are magnetic, and even though they are quite bulky, it felt like a shame to just toss them in the recycling. I wanted the ability to use them as backup compacts, and especially since these are tall enough that I can put a domed product in there. So, I took the sticker off the back, used a tool to pop the pan out of the compact from that hole showing at the bottom that was hidden by the sticker. I put that sticker onto the bottom of the metal pan instead. Then, I used Parian Spirits to clean off the bottom where the sticker used to be.
As for the front with the logos, stickers were a quick and easy way to hide them while also making the compacts look prettier with a beloved design. The sticker on the left was purchased from Redbubble. It’s a 3 inch by 3 inch sticker, which barely fit the lid dimensions. The sticker on the right was one that I got from Clionadh Cosmetics that has been coming free with every order.
In the future, if the edges of the stickers start to lift or is potentially getting dirty, I will consider putting a layer of Mod Podge Dimensional Magic on top. Other types and brands of sealer will work too, but I like the way it feels like plastic after a thick enough layer has been applied. If you’re handling Dimensional Magic though, be very careful not to get it on other items or skin as it’s an absolute pain to remove from fingers.
Using things like stickers, washi tape, scrapbook papers/cardstock, and so on, are ways to select prints and patterns that suits the makeup lovers’ tastes and elevate boring packaging into something truly special. I’m sure I’ve shown this multiple times before, but I treasure the look of the Huda Beauty highlighter palette that I did the same things to.
So, these have been some projects I’ve been doing lately! I’ve purchased a few more custom stickers in different designs from Redbubble, but I’m sure there are plenty of other places to get neat stickers. My first projects were made with stickers and washi tape from Amazon.
On a side note, one of my best friends has a Redbubble store which is how I discovered the website and other artists in the first place. If you’re interested in checking it out, it’s here.
My first Coloured Raine purchase was in November 2017. For two years, their eyeshadow formula was in a league of its own at the top. I even preferred it over my expensive Viseart, Natasha Denona, and Pat Mcgrath shadows! This year, I took a deeper dive into other indie brands’ makeup. Although I no longer know which brand can claim the #1 spot in my collection, Coloured Raine is still tied at the top. Their gorgeous forest green shade, Forbidden, is my all-time favorite eyeshadow (not counting duochromes or multichromes). I purchased nearly all their eyeshadows, and I even have a few duplicates, because I love them so much! However, rather than trying to complete my collection, this post motivated me to pull a Marie Kondo on all my single/depotted shadows and just keep the ones I love.
Because the quality of Coloured Raine shadows are so consistent across the board, there isn’t much to say about them except that they’re highly pigmented and blendable with the smoothest creamy texture. This is the case among all types: mattes, shimmers, metallics, etc.
I will make note of any shades that stand out for negative or especially positive reasons. I will also be discussing more than just eyeshadows. This review will include comments on a few blush/highlighter duos, sponges, and empty magnetic palettes.
THE EYESHADOWS
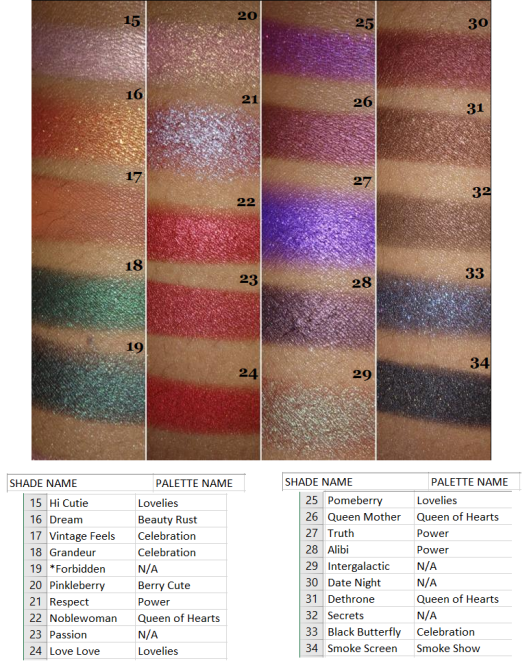
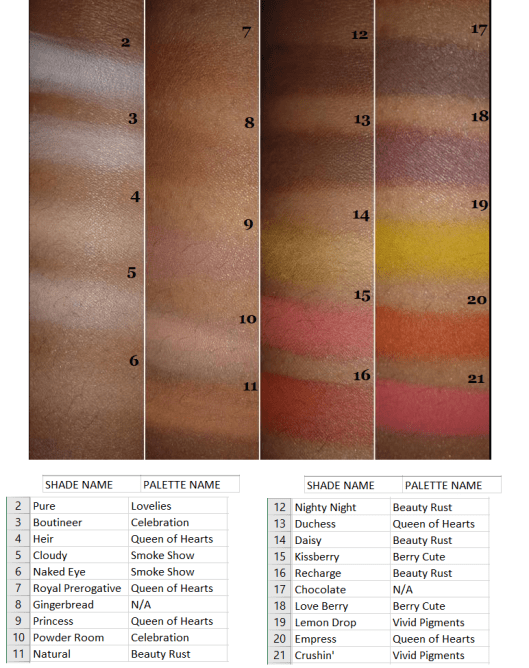
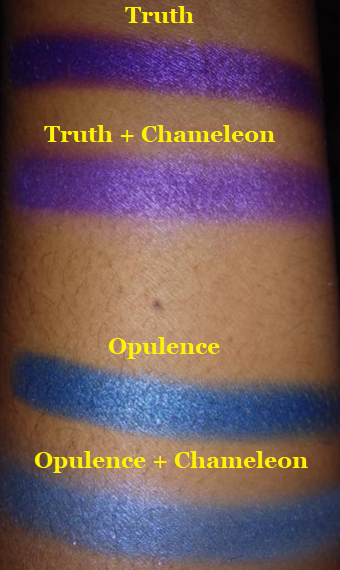
There was a time when I purchased Coloured Raine shadows to make quads as Christmas gifts. Your Majesty (which I somehow had three backups in my collection) and Malibu from this set of swatches were among them. I should note that I did take Super Star out of my collection since it was so similar to Rosé. I parted with Nightingale as it is too common of a color. Paradise Isle looks like a more sparkly version of Unexpected, yet I couldn’t part with either shade. I was also surprised to discover the Blue Magic shade I’ve purchased for others, I didn’t have in my own collection. I kept seeing Opulence and assumed it was Blue Magic. In the pan, Opulence has a purple tinge that doesn’t translate to the eye, as the purple disappears once it’s rubbed onto the skin. Since I’m just left with bright blue on my skin, I wonder if I’m still missing out by not having the Blue Magic shade. It looks like it might just be a darker version. If I get it in the future, I will update this post as usual. I also have to comment that Legacy is such a cool shade! It’s whitish-pink in the pan but pinkish purple on the eye, making it a nice topper shade. As with other iridescent shades, I wouldn’t use this on its own, except for the inner corner or as an interesting brow highlight.
I have enough dark greens, so I removed Grandeur from my collection. Noblewoman won over Passion. And even though Smoke Screen was the only black shade with gold shimmer in my collection, I rarely use any form of black other than matte, so I took that out as well. I would like to reiterate that this had nothing to do with an issue of the formula. I was so tempted to keep them all, but I needed room to add Safari Raine and the upcoming Juicy Boost collection. I could have used another empty magnetic palette (I have so many) but I don’t think I need over 100 eyeshadows from any single brand.
I got rid of all the white shades in this set. I’ve never had use for a white eyeshadow, and I prefer using highlighters to highlight under the brow or to use a cream shade to blend out shadows. Choosing between the dark brown shades was surprisingly difficult, so I only removed Chocolate since it looks like the kind of brown I have the most repeated in my collection.
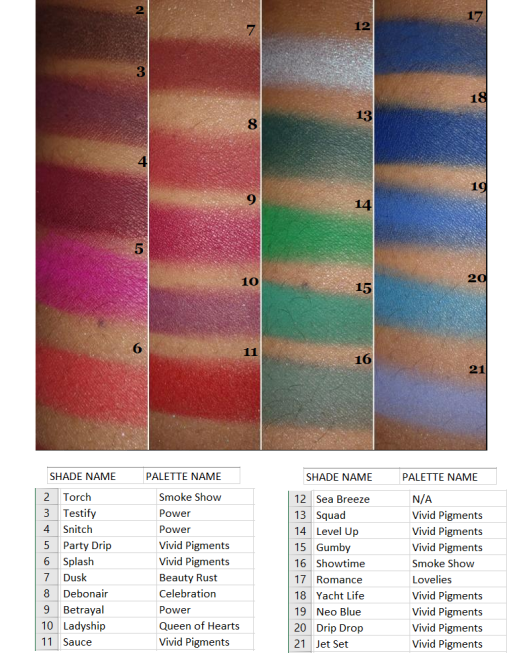
I got rid of Snitch and Torch for the same reason as Chocolate in the previous round of swatches. I noticed that the palette with the most shades I decided not to keep was from Smoke Show. Prior to getting the Safari Raine palette during the last restock, Smoke Show was the last palette I added to my collection as it had the least appealing color story for me. The shade I wanted most, Showtime, I didn’t keep either as it couldn’t compete with those stunning Vivid green pigments.
Side Note: I’ve always wondered if Coloured Raine is the reason Colourpop had to discontinue selling their Smoke Show palette and rename it Blowing Smoke. Coloured Raine’s palette came first and the name is trademarked. Even though the color story between the palettes is different, I believe one of the stipulations of a trademark breech is if it would cause confusion. Since they both have ‘Colour’ in their names, to have the same palette name on top of that seems like sufficient grounds to me!
I purchased the shade Chameleon with my Safari Raine order, so I’m including it here as well. It’s a purple iridescent shade that I don’t think looks that nice on its own. When used as just an inner corner highlight, it had an interesting darker purple glow, but it’s not the texture or pigmentation that I’m looking for. The swatches for this shade I intentionally built up to see what’s the maximum pigmentation I could get when certain spots refused to deposit color, and I was still not happy with the results. I would rather reach for an iridescent from other brands over this one. It’s one of the few shades in their entire collection that I wouldn’t recommend. The one application I’ve found to be somewhat useful for this is adding a lighter pearly finish when topped on other shades. I recommend just skipping this one.
The Celebration palette had the second most eyeshadows I decided not to keep, having decluttered 5 out of 13, which is still a decent amount to have kept. Raise a Glass, Flammable, and Misty Nights were removed. As a purple eyeshadow lover, I would love having a lot more purple shimmers from Coloured Raine. The Power palette definitely satisfied some of my purple eyeshadow needs, but I will always want more, even though I have plenty of purples from other brands. Here is a comparison of CR’s Power Palette to CP’s As You Like It palette.
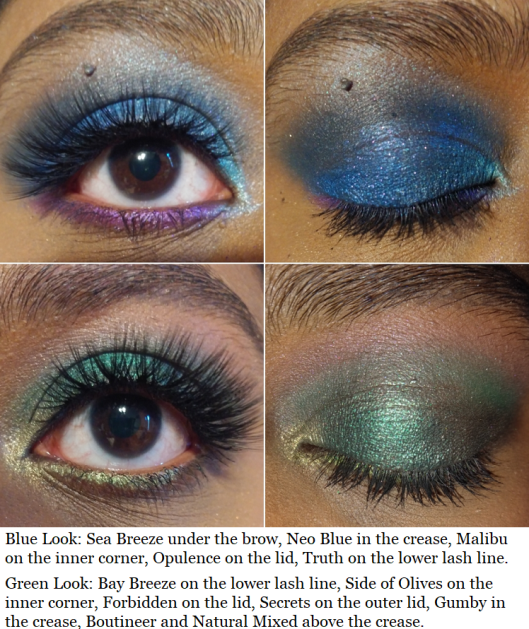
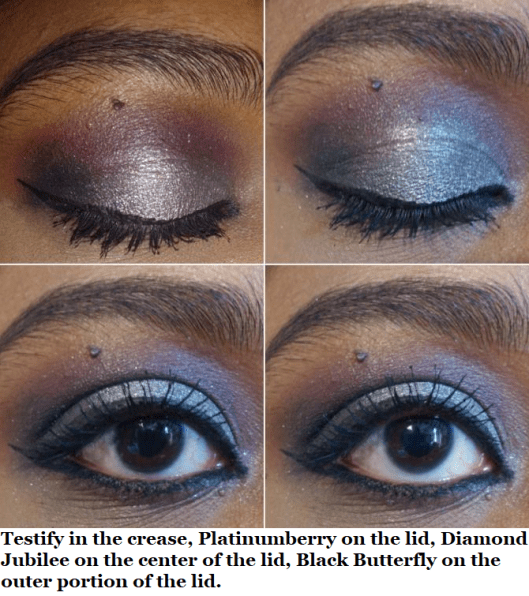
And here are some eyeshadow looks!
SAFARI RAINE
CR had one final restock of this palette, so I have it in my collection now! They’re also selling the shades individually, which is appealing since I planned to depot the shadows anyway. However, at $6.99 each, that would cost $62.91 to get them all when the palette is just $29. I have no issues with Coloured Raine charging them at their standard eyeshadow price. I just made the most cost-effective decision and I’m glad they kept the original Palette price instead of raising it due to the hype that Jackie Aina played a part in restarting.
Although I’ve only had time to use this twice, I would say that the quality is on par with the other shadows. The only shade I had a little trouble getting to show on my skin was Congo Basin (even after trying with the ABH primer which I use to make shadows really stand out). Even to the touch, it felt a little grittier than the others. It reminded me of the texture of the Snitch from the Power palette that I didn’t like. Purples of that shade do tend to have that texture, but I’ve never had a green eyeshadow feel like this. Regardless, I did manage to get it to show a little.
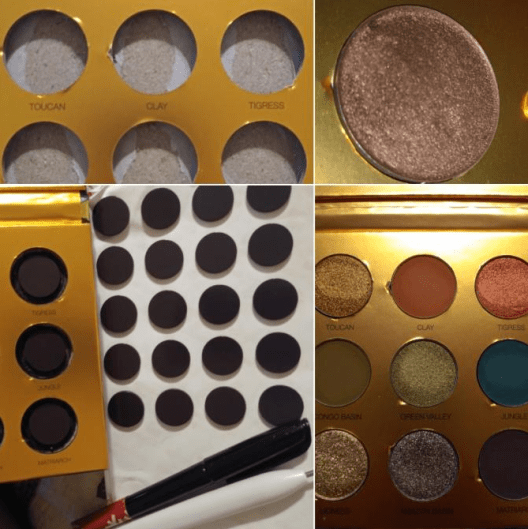
Because the palettes were so sought after, I felt bad about completely getting rid of mine after depotting it. So, I turned it into a magnetic palette. I removed the shadows from the palette, colored the wells with black marker (I didn’t want to wait for black paint to dry) just to make it look more aesthetically pleasing. You can cut around the magnet to fit the size of the wells (keeping the sticker on the back) and place the pan inside to make sure the magnet isn’t too thick. Although I had thinner magnets and magnetic sheets, I wanted to use up my thicker ones, so I used them anyway. It made the pans stick out from the top a little, but the lid still closes, which is most important. I stuck all the magnets in the wells and that’s it! When depotting, I always clean off the glue (this time using Parian spirits) and place a sticker label on the bottom so I can remember the shade name and palette it came from.
The Blush/Highlighter Duos
I have 2 out of the 4 Blush and Highlight Duos from the Power Collection. I didn’t buy the one called Prove My Loyalty because it has an icy white highlighter best suited for pale-light skin tones and a dark red matte best suited for dark-deep skintones. Anyone can wear any makeup they want, but the pairing of those two was…an interesting choice in my opinion. I’m not sure how many people can find use for both of those together. I also didn’t purchase My Day One because both the highlighter and blush looked like they might be too dark for me.
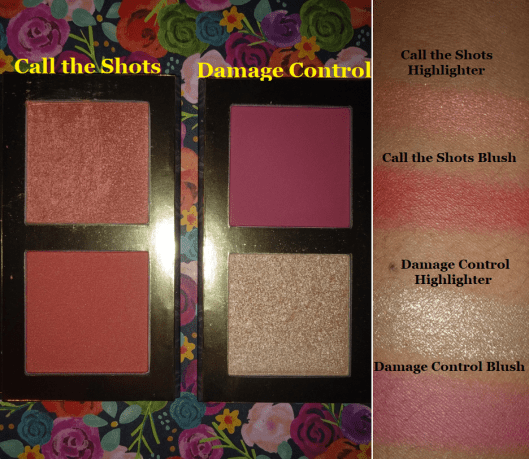
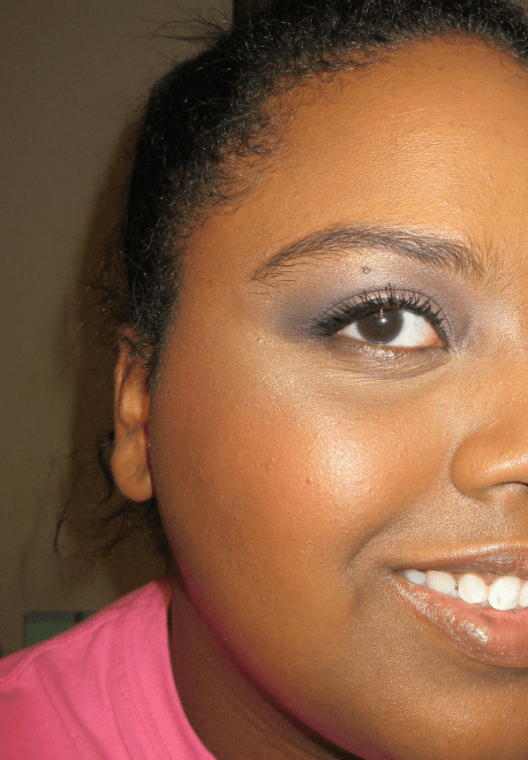
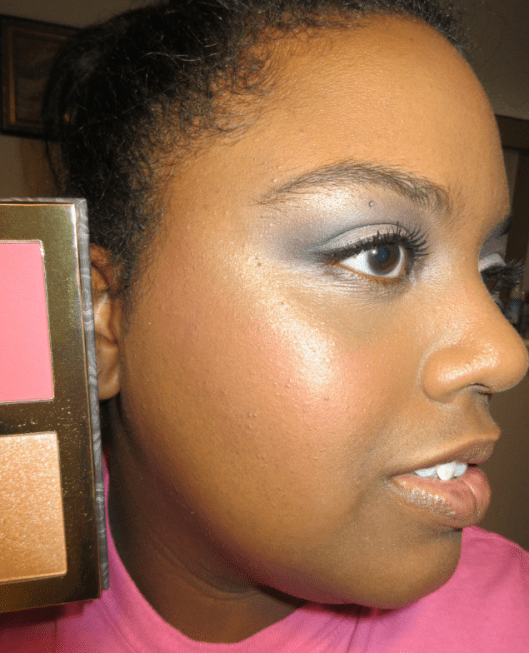
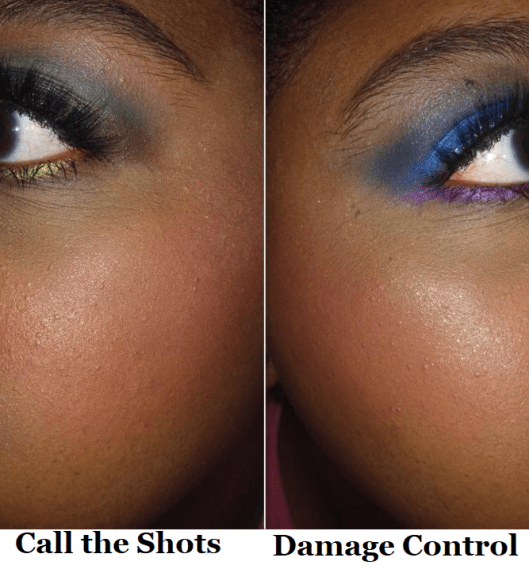
I purchased Damage Control first. Here are some old photos with it.
I like the blush portion. It’s very pigmented, so it requires a light hand or very fluffy brush with it. The highlight shade is beautiful, but too glittery for my taste. I prefer finer shimmer particles in my highlighters.
The other duo I purchased is named Call The Shots. The blush has a little more warmth to it, which suits me a bit better, although the color difference between this blush and the previous one isn’t that obvious when I use a sheer application. This highlighter has more of that shimmer finish I prefer, but I typically don’t reach for this shade. I love golds. Lately, I have been more interested in blush toppers, which this color is great for, meaning it won’t go to waste. I just know I won’t use it as often as I should.
These duos are fine, but don’t really ‘wow’ me. Although I don’t think $25 is too much considering what you’re getting, if you can snag them for 50% off (as they’ve been on sale multiple times) then I’d be more likely to say they’re worth checking out at that discounted price.
THE SPONGES
I don’t know why I keep buying sponges when I’m 90% more likely to use a brush to apply my foundation and concealer. If I don’t use a brush, I use the Blendiful from Tati Beauty because I can get my products on and blended in half the time.
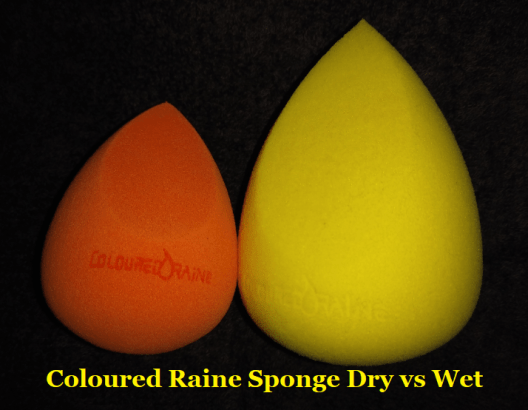
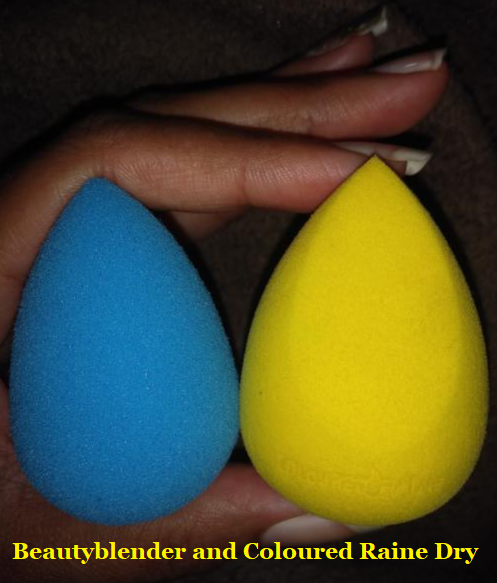
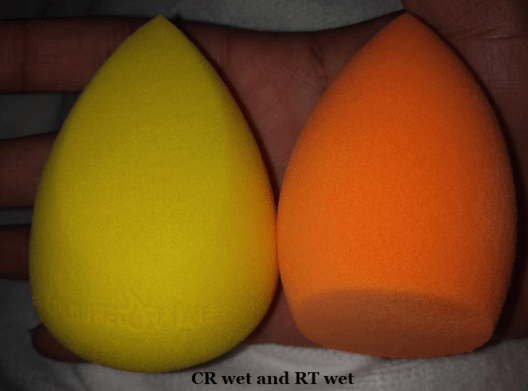
In any case, the only traditional beauty sponges I have used so far are from Beautyblender, Real Techniques, and Coloured Raine. The Real Techniques sponge is nice, but the one from Coloured Raine easily surpasses it. I cannot decide which I like more, though, between BB and CR because they both are better at different things.
Softest: When it comes to the softest sponge, Beautyblender wins. The Coloured Raine sponge feels a bit dense when dry but softens up after it is damp. It swells to the largest size among the three sponges. The Real Techniques sponge is a lot harder and remains a bit hard even after being wet.
Precision: The pointy tip of the CR sponge fits perfectly in the crevices around my eyes when applying concealer. It easily wins, followed by the RT flat edge and finally the BB which has no flat edge and the tip is still a bit rounded, which impacts the precision. That being said, I don’t often use a sponge with my concealer, as I want the most coverage under my eyes and a sponge does sheer things a bit. So, this benefit isn’t the most useful in my everyday life. However, when I was on vacation last year and wanted to bring minimal brushes and wanted a backup sponge, I took the CR sponge instead of a BB.
Smoothest Foundation Application: A nice blended look can be achieved with all the sponges, but the BB does it the fastest, followed by the CR one.
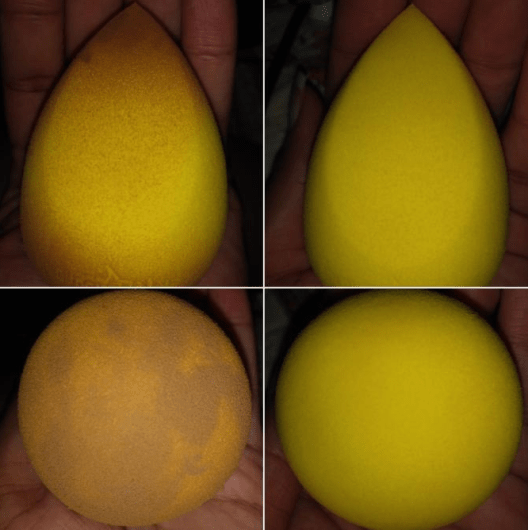
Easiest to Clean: The BB and RT sponges take about the same time. They work well with the Beautyblender solid soap. The CR sponge is the hardest to clean and doesn’t work as well with the BB Solid. I have better results when I use my regular makeup removing face wash on it. It’s possible that I perceive it as being more difficult to clean because I’m using the yellow one, which is probably easier to see stains. I won’t know until I start using my orange (or green if I can find that one) CR sponge in the future.
Most Durable: The CR sponge definitely lasts the longest and hasn’t torn on me yet. My RT sponges start to get tears in them after the first 3-5 uses thanks to my long nails when I’m washing them. My BB sponges tear on me between 1-3 uses. I don’t know if there has been any changes to the beautyblender because the first two I ever had years ago had to be thrown out before it ever tore. But now my beautyblenders don’t last as long.
Prices: RT = $5-$6. CR = $6. BB = $20.
Side note: BB sells silicone (or silicone-like) cases to put sponges in to let dry and keep away from dust and other particles. You can find adorable dupes for 50-75% cheaper on sites like Amazon and Ebay. I have the official one along with the dupes and although the official one is thicker/sturdier with more breathable holes, there isn’t that much of a difference. My kitty ones get the job done and they even have ridges on the bottom that lets them stand upright, unlike the official one.
EMPTY MAGNETIC PALETTES
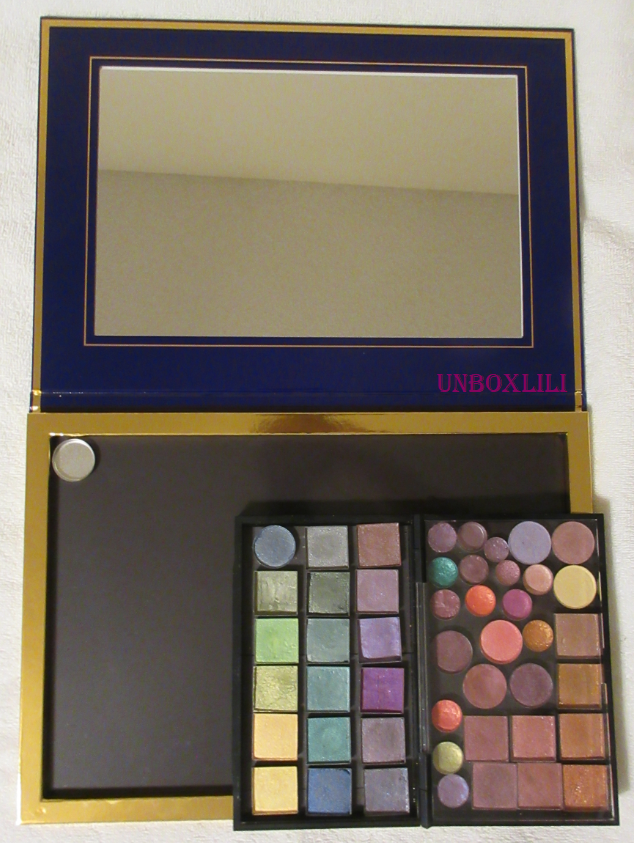
I have the Book of Shades (which holds 72 standard size eyeshadows), four of the 96 pan Power palettes, and one purple 96 pan palette. The collector in me still wants the pink one I don’t have.
On my previous trip, I made use of one large z-palette, but I missed having an even wider variety. That’s why I bought the Book of Shades. I wanted it for times I plan to travel for longer than a week.
The Book of Shades fits comfortably at the bottom of my makeup train case and is a safer way to house my shadows than carrying multiple palettes separately. It’s heavy but that’s the tradeoff for being so sturdy and keeping the eyeshadows secure.
There are 3 pages (each page holding 25 pans) and each page has removable plastic sheets that you can write the shade names on with a dry erase/washable marker. Or perhaps in permanent marker if you don’t intend to swap them out. I’m not sure. I don’t have a need for the sheets since my shadows are all labeled on the bottoms of the pans, but it’s a nice addition. There’s also a mirror on the other side of the cover.
I’ve talked about the 96 pan palettes multiple times on my blog. I can’t take it traveling, but I prefer having these over the book of shades because of the freedom of being able to place any sized eyeshadow pan I want in them, it holds more shadows, and I can see everything at once. It’s harder for me to figure out what shades I want to use when I have to flip back and forth between pages. That’s why I also prefer this over the smaller sized flat empty magnetic palettes. The last photo is what my palette looks like now.
That’s all I have for today’s post! I tried to keep it short after my massive Japanese brush review. Although I enjoy making large comprehensive posts (for ease of keeping everything in one place), it means they end up being incredibly long. That’s why I decided to wait until I could at least include Safari Raine in the review, though not long enough to wait for the Juicy Boost collection. At the time that I’m writing this, we haven’t seen anything yet besides the outer packaging.
I have apost in this blog about creating DIY custom palettes, but today’s topic is for those trying to find good quality pre-made options at the best prices.
When discussing how many eyeshadows will fit, I am referring to the standard eyeshadow pan size of 26mm. Tax and shipping are not considered in the price listings.
COLOURED RAINE
Holds: 96 pans
Materials: Cardboard, Mirror
Price: $45 (bought for $22 during the Christmas sale)
This CR palette is the largest I own and also the thickest of the cardboard palettes. However, I can’t give them bonus points for durability because that extra sturdiness is necessary to bear the weight of all these eyeshadows. The bigger the palette, the stronger it needs to be. At the sale price I paid, this is almost the best deal out of all the palettes I have. The full price is decent but not better than the Juvia’s Place palette. CR added to the production cost by including a mirror, but it’s a useless feature because it isn’t practical to lift a palette of this weight and size up to my face to apply eyeshadow. The top lid can fold back into a tent position very well without sliding. The magnets inside are strong and I could hold this upside down without worrying about pans falling out. Overall, I’m impressed with the quality and recommend it to anyone seeking a huge palette.
“ADEPT” vs AUTHENTIC ADEPT
Holds: 48-55 pans (depending on the arrangement)
Materials: Cardboard, Mirror
Typical price range: $19-$23
I learned of this brand from BailyB on youtube. At the time, Adept’s marble palettes that she linked from Amazon were flat and not double-sided. When I saw the same thing with “minor flaws” on ebay for at least $5 cheaper, I purchased it from there. The one I received had a bent corner, which I didn’t mind. The problem is that the magnetic sheet looks flat to the eye, but it is raised in certain areas. Because the depth of the palette is extremely shallow, the top cover doesn’t close properly. For this palette to be useable, I have to arrange them around the bubbled portions, but the top layer of the shadows still leave an imprint on the inner lid and mirror. As I mentioned in the CR portion, a mirror in a palette of this size is useless. It’s made of the thinnest cardboard and is the only flimsy palette I own.
As for the legitimate Adept palettes, the cardboard ones come in the traditional and foldable shapes. The ones made of plastic are double-sided. The pricing for the plastic trademarked Adept palette seems reasonable at $34 to house 95 standard shadows inside, but I can’t verify the quality without seeing it in person. I decided to include them on the list because someone like BailyB endorsed them, but I can’t personally recommend them.
JUVIA’s PLACE
Holds: 40 pans
Material: Cardboard
Price: $15*
The retail price was listed at $20 when I originally purchased this, though I did get mine on sale for $10 a year ago. Funny enough, palettes of this size and smaller could benefit from having a mirror but this one does not. It’s made out of sturdy cardboard (much stronger than the Adept knockoff despite being smaller). If you can’t get the CR palette on sale, this is the one I recommend most. If you don’t want to use the link, just know that you have to type in the search bar “magnetic palette” for it to pop up on the site. For some reason, they don’t have a designated tab for it.
*As of January 31st, 2019, Juvia’s Place is having a 40% off sitewide sale! The current sale price of this palette is $7. It gets further reduced to $4.20 if you use the promo code: Valentine. I’ve been unable to find out how long this sale will last. There are no guarantees it will run through Valentine’s day. At a price like this, my guess is that these palettes won’t be restocked once they sell out. Four palettes, plus shipping, came to $23 which is nearly the same as a single Z-palette!
**EDIT: The sale lasted for one week (02/07/19). Juvia’s Place has sales regularly, so I suggest signing up for their emails to be notified when the next one occurs. Also, there is now a “Limited Quantities” sign on the page. One per customer.
For reference, it’s about the same size as the Morphe Jaclyn Hill 35 pan palette. I highly recommend this one!
Z-palette XL
Holds: 35 pans
Material: Cardboard, Acrylic
Price: $28-$32
Z palettes are generally not the most affordable options, but I included it in my list because it is arguably the most popular brand of custom palettes. Every Z palette, regardless of size, has a handy clear acrylic panel. This feature’s usefulness depends on the way it is stored. While the XL holds more shadows, the large standard sized palette is the more cost-effective option.
Large Z palette
Holds: 28 pans
Material: Cardboard, Acrylic
Price: $20
Sephora and Ulta have their branded versions of the Z palette but Ulta has the better deal when buying in bulk. I purchased mine when they had the “Buy 2 get 2 free” deal, which brought the cost down to $8 each when combined with a 20% coupon. The fact remains that one has to spend $32 to get the deal; while a single larger palette might be all the average consumer needs.
Z-palettes are among the least affordable options, even on sale. For example, Sephora sells Double-Sided Z palettes which hold 56 pans and have been listed “on sale” at $22.50 for at least three years. Again, I can’t account for the quality without handling it myself, but one of the biggest complaints in the product review section is that it has “weak magnets.” That is the last thing you’d want to hear about a palette where half the eyeshadows will be stored upside down. I recommend only getting a Z-palette if it’s heavily marked down.
MAC Pro Palette Large Duo
Holds: 30-36
Material: Plastic
Price: $8 (without inserts) $14 (with two 15 well inserts)
All empty MAC compacts cost $8 and all inserts are $3 each. I chose this particular palette because it holds the most and I like that it is fully encased in hard plastic, unlike the other MAC versions with the clear lid. This also has an acrylic divider in the middle which protects cream products if they are used on one side with powders on the other. It’s also good for preventing powder fallout from getting into other colored pans. Although I love mine, I don’t recommend this palette because of its limitations:
MAC compacts have a metal sheet inside, not magnets. This means that magnetized pans and pans with magnetic stickers will not adhere to the palette because it’s like putting metal on metal. MAC compacts have the reputation of being “solely compatible with MAC products” because they are one of the only brands that attach actual magnets to the base of their pans. In theory, any pan with a magnet should work. MAC’s pro refill products are strong enough to stick to the MAC compacts without inserts, but slide a little in my regular magnetic palettes.
Since I have very few MAC products, it was easier for me to turn my compact into a magnetic palette, rather than attaching magnets to every eyeshadow pan I own. I bought magnetic strips from my local craft store and hot glued them to both sides of the lids. This cost as much money as two inserts would, but this allows me to store 6 additional shadows from any brand (as long as they are magnetized). I did this over a year ago and have had no problems so far.
MAC’s inserts are not limited to just eyeshadows. They also have spaces for standard size blushes, powder foundations, and lipstick wells.
COLOURPOP
Holds: 24
Material: Cardboard
Price: $10
Colourpop offers this palette free if you select one of their build-your-own bundle deals. It’s a great option if you’re already intending to buy any of their pressed powder products. They also have a pink palette that holds half the eyeshadows for $7, so the larger palette is the better price.
For reference, it’s slightly smaller than the Large Z-palette (as pictured underneath).
The cardboard isn’t as sturdy as the others palettes (though still better than the “adept” one). I made the mistake of folding back the lid too far and now the palette’s natural tendency is to stay slightly open. The two metal pieces on the inside don’t stick as well to the bottom magnetic rim. This issue has no impact on being able to securely hold the pans, which it does well, just that I have to be extra careful to ensure that it snaps shut when I try to close it.
HONORABLE MENTIONS
TARTE Tartiest Pro Custom palette – Holds: 30, Material: Cardboard, Price: $17 (on sale for $12 as of 1/31/19). This video here has more information.
MAKE UP FOR EVERXL palette – Holds: 45, Material: Metal, Price: $25.
You’ll find many outdated videos on youtube stating that the price of the MUFE palettes are $14, but this is no longer the case. The true XL palette is only available on the official MUFE website. It is very important to note that the Extra Large palette listed by Sephora for $2 holds six round shadows or three of MUFE’s new rectangular shadow pans and is not the same thing (though it’s nice to keep in a purse or for traveling).
Final thoughts
Juvia’s Place and Coloured Raines’s magnetic palettes are the best deals I’ve found (especially when on sale). I’ve seen other palettes from random unknown brands discussed by Youtubers but often times their links to Etsy, Amazon, and other places don’t work several months later.
So, I recommend sticking to reputable brands from authorized retailers!
❤ Lili
Full Disclosure: This is not a paid review or sponsored post and these are not affiliate links. Any ads shown are from WordPress. I generate no revenue from this blog post.
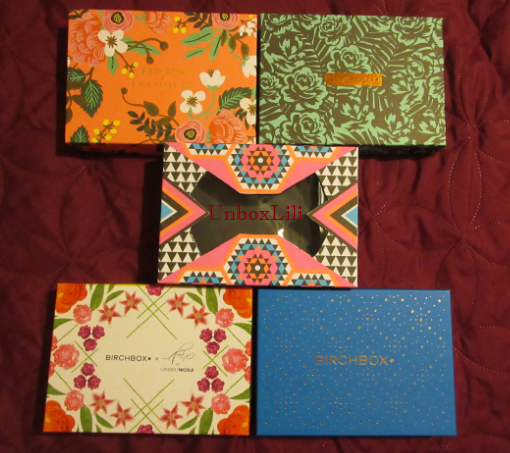
It’s been almost a year since my last post and during that time away from this blog I’ve been searching for ways to utilize and organize the mass of beauty products I’ve accumulated. I began to delve into the world of “upcycling” and although I no longer subscribe to Birchbox, I still have a gigantic collection of their pretty boxes that I don’t want to just throw away (in the recycling bin of course). I’ve always used them as gift boxes but most of the presents I give are too large to fit. I also use them as drawer dividers/organizers but I still have a tower of them left. So below are a few additional ways I’ve put my boxes to use:
Wall Art
This one is straightforward. All you need are push-pins and a ruler to evenly space out your boxes along the wall. Although my design is different, credit for the idea goes to Tiffany Johnson on Youtube. I would not have thought of it otherwise.
Another great thing about it is that they can be interchanged as often as I like! I could have a day when I want to hang all the blue birchboxes or all the purple ones or only the geometics, only the flowered ones, etc.
Empty Magnetic Palettes
Z-palettes are a huge deal in the beauty industry and before their recent (now deleted) Instagram rampage on customers…
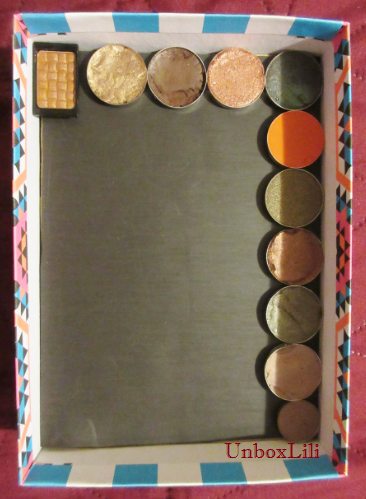
…I was already planning a way to create my own. When you really think about it, Z-palettes are just slim cardboard boxes with colored paper around it, magnetic sheets, and a thin acrylic lid. They can be easily duplicated and many cosmetic companies already have their own custom palettes. You can get them in metal or hard plastic instead of cardboard. Some versions have a mirror on the inside instead of a clear lid. You can also find some very inexpensive ones on ebay and amazon. That being said, none have the cute prints that are on Birchboxes and I still wanted to make my own. The only thing I had to actually buy was the magnetic sheet from Michael’s which cost me $2.99 without a coupon.ITEMS USED:
1 Birchbox or any sturdy box
1 cutting tool (scissors and/or x-acto knife or even a regular knife)
Tape (preferably clear and durable) or glue
1 pencil
1 magnetic sheet (strong enough to hold the weight of the eyeshadows)
ADDITIONAL ITEMS:
1 ruler (I didn’t end up using it but it helps to create an even square on the lid)
glue (any strong bond type of glue will work)
1 foam sheet (to add an additional layer of padding to the palette)
1 piece of cardboard (for the additional layer of padding)
1 sheet of plastic (doesn’t have to be acrylic but it should be thick, unwrinkled, and easy to clean/not stain)
*The foam I’ve had from multiple subscription boxes and mailed packages. The sheet of plastic I used came from hosiery packaging but additional household sources can be the plastic around products like my hot glue gun, markers, insoles, the plastic cover on bakery boxes, etc. It took me only a few minutes to find supplies around the house.
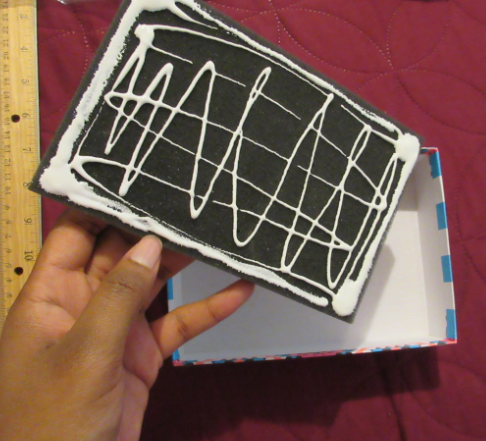
Part 1(skip this step if you don’t want the added protective layer)Make sure the piece of foam fits the dimensions of the box. Then use it to trace around the cardboard and magnetic sheet and cut those so they all are the same size. Then glue the foam to the bottom of the birchbox, making sure to spread an even layer (paying extra attention to the four corners).
Peel off the backing of the magnet and attach the magnet sticky-side down to the cardboard. Use a little glue if necessary for extra adhesion power. Then apply glue to the other side of the brown cardboard in order to attach it to the foam layer already inside the birchbox. Now your custom palette has extra protection!
Part 2
If you skipped part 1, cut the magnetic sheet to fit the dimensions of the bottom of the birchbox. Remove the paper backing and attach it to the bottom, adding extra glue if needed.
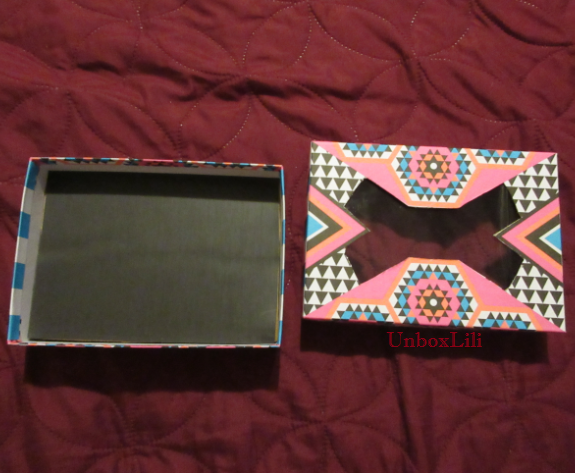
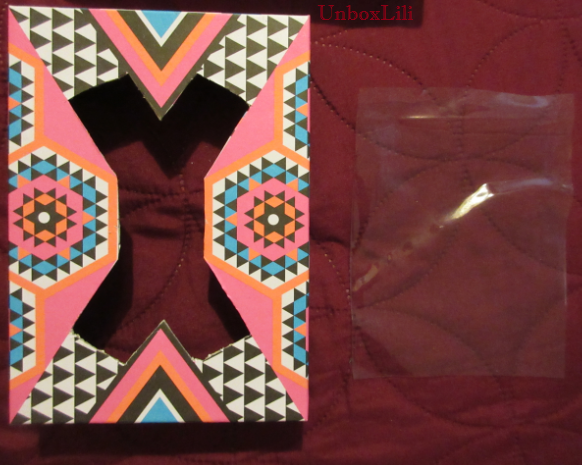
Now we’re moving onto the lid. In my example, I followed the pattern of the print but you can use a ruler and pencil to trace a rectangle underneath the lid and then cut it out to form a hole in the cover.
Cut the sheet of plastic to fit on the underside of the Birchbox lid. It should be large enough to cover the hole with a little extra room. When you tape or glue the edges of the plastic to the box, you don’t want tape lines to be visible once the lid is flipped over.
And that’s it! I like how sturdy this feels (it can even be stored upward but give the glue a day to dry before use). If you find this to be too bulky you can always cut the edges of the lid and base by half and then line it all with colorful tape to hide any jagged edges. In fact, next time I will line the edges around the lid hole with solid colored washi tape before I tape the clear plastic underneath. This has room for a minimum of 24 MAC sized eyeshadow pans.
I have SO many Birchboxes left that I should start gifting these to my eyeshadow loving friends. And with all the different Birchbox tops just imagine the number of unique magnetic palettes you could create too!
But really this could be done with any cardboard box, magnetic sheets, plus cutting and pasting tools. An ordinary box can be easily spruced up with printed paper or washi tape. 🙂