
 It’s been almost a year since my last post and during that time away from this blog I’ve been searching for ways to utilize and organize the mass of beauty products I’ve accumulated. I began to delve into the world of “upcycling” and although I no longer subscribe to Birchbox, I still have a gigantic collection of their pretty boxes that I don’t want to just throw away (in the recycling bin of course). I’ve always used them as gift boxes but most of the presents I give are too large to fit. I also use them as drawer dividers/organizers but I still have a tower of them left. So below are a few additional ways I’ve put my boxes to use:
Wall Art
 This one is straightforward. All you need are push-pins and a ruler to evenly space out your boxes along the wall. Although my design is different, credit for the idea goes to Tiffany Johnson on Youtube. I would not have thought of it otherwise.
Another great thing about it is that they can be interchanged as often as I like! I could have a day when I want to hang all the blue birchboxes or all the purple ones or only the geometics, only the flowered ones, etc.
Empty Magnetic Palettes
 Z-palettes are a huge deal in the beauty industry and before their recent (now deleted) Instagram rampage on customers…
 …I was already planning a way to create my own. When you really think about it, Z-palettes are just slim cardboard boxes with colored paper around it, magnetic sheets, and a thin acrylic lid. They can be easily duplicated and many cosmetic companies already have their own custom palettes. You can get them in metal or hard plastic instead of cardboard. Some versions have a mirror on the inside instead of a clear lid. You can also find some very inexpensive ones on ebay and amazon. That being said, none have the cute prints that are on Birchboxes and I still wanted to make my own. The only thing I had to actually buy was the magnetic sheet from Michael’s which cost me $2.99 without a coupon.
 ITEMS USED:
- 1 Birchbox or any sturdy box
- 1 cutting tool (scissors and/or x-acto knife or even a regular knife)
- Tape (preferably clear and durable) or glue
- 1 pencil
- 1 magnetic sheet (strong enough to hold the weight of the eyeshadows)
ADDITIONAL ITEMS:
- 1 ruler (I didn’t end up using it but it helps to create an even square on the lid)
- glue (any strong bond type of glue will work)
- 1 foam sheet (to add an additional layer of padding to the palette)
- 1 piece of cardboard (for the additional layer of padding)
- 1 sheet of plastic (doesn’t have to be acrylic but it should be thick, unwrinkled, and easy to clean/not stain)
*The foam I’ve had from multiple subscription boxes and mailed packages. The sheet of plastic I used came from hosiery packaging but additional household sources can be the plastic around products like my hot glue gun, markers, insoles, the plastic cover on bakery boxes, etc. It took me only a few minutes to find supplies around the house.
 Part 1 (skip this step if you don’t want the added protective layer)
 Make sure the piece of foam fits the dimensions of the box. Then use it to trace around the cardboard and magnetic sheet and cut those so they all are the same size. Then glue the foam to the bottom of the birchbox, making sure to spread an even layer (paying extra attention to the four corners).
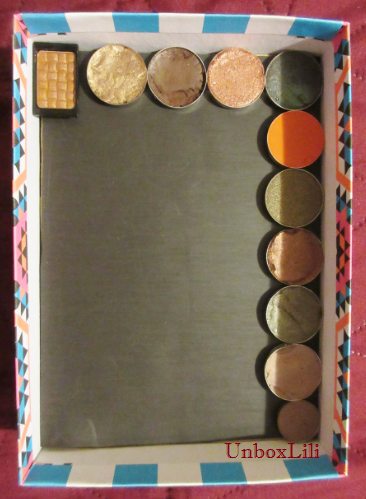
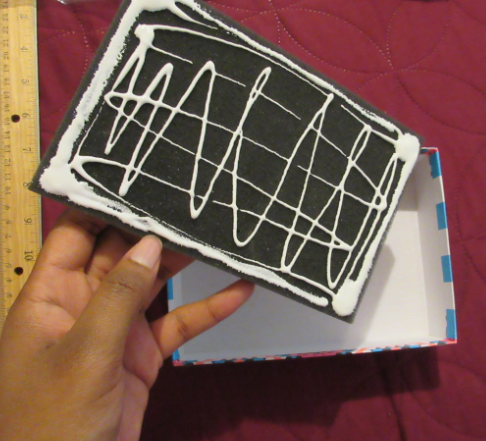 Peel off the backing of the magnet and attach the magnet sticky-side down to the cardboard. Use a little glue if necessary for extra adhesion power. Then apply glue to the other side of the brown cardboard in order to attach it to the foam layer already inside the birchbox. Now your custom palette has extra protection!
 Part 2
If you skipped part 1, cut the magnetic sheet to fit the dimensions of the bottom of the birchbox. Remove the paper backing and attach it to the bottom, adding extra glue if needed.
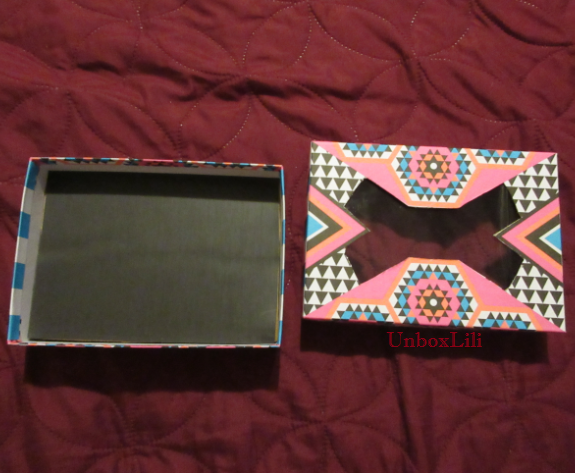
Now we’re moving onto the lid. In my example, I followed the pattern of the print but you can use a ruler and pencil to trace a rectangle underneath the lid and then cut it out to form a hole in the cover.
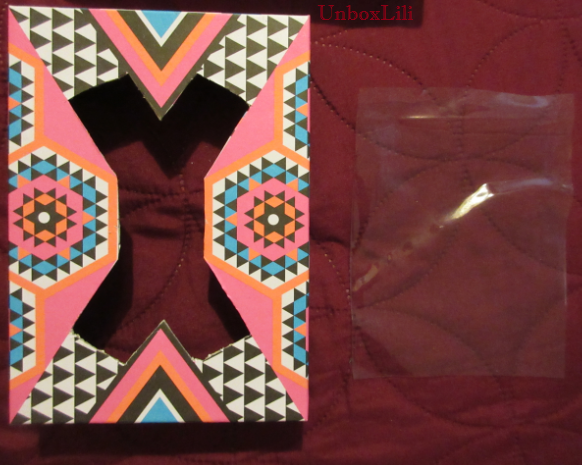 Cut the sheet of plastic to fit on the underside of the Birchbox lid. It should be large enough to cover the hole with a little extra room. When you tape or glue the edges of the plastic to the box, you don’t want tape lines to be visible once the lid is flipped over.
 And that’s it! I like how sturdy this feels (it can even be stored upward but give the glue a day to dry before use). If you find this to be too bulky you can always cut the edges of the lid and base by half and then line it all with colorful tape to hide any jagged edges. In fact, next time I will line the edges around the lid hole with solid colored washi tape before I tape the clear plastic underneath.
  This has room for a minimum of 24 MAC sized eyeshadow pans.
 I have SO many Birchboxes left that I should start gifting these to my eyeshadow loving friends. And with all the different Birchbox tops just imagine the number of unique magnetic palettes you could create too!
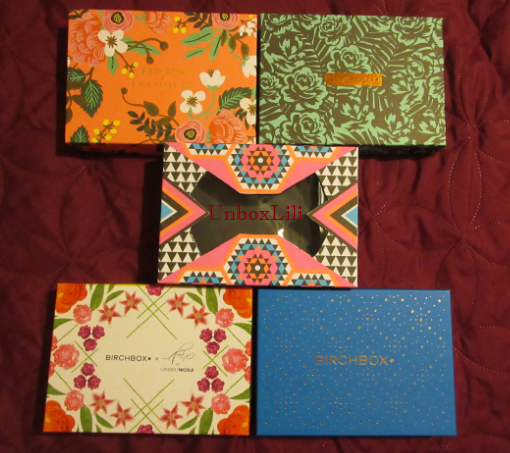
But really this could be done with any cardboard box, magnetic sheets, plus cutting and pasting tools. An ordinary box can be easily spruced up with printed paper or washi tape. 🙂
-Lili ❤
